
Accessing On-Board Diagnostics II (OBD-II) data via Controller Area Network (CANbus) can be a gateway to understanding your vehicle’s health and performance. For enthusiasts and professionals alike, tapping into this data stream opens up possibilities for diagnostics, monitoring, and custom projects. Often, resources like an “Obdii Wiki” can provide foundational knowledge, but practical implementation can still present challenges. This article addresses a common hurdle encountered when trying to read OBD-II data using Carloop, offering a straightforward solution based on real-world experience.
One user encountered difficulties receiving OBD data from their car’s CANbus using a Carloop device. After some experimentation and referring to Carloop documentation, a series of code modifications proved effective. These steps, detailed below, not only resolved the immediate issue but also offer valuable insights for anyone starting their OBD-II and CANbus journey with Carloop.
The solution revolved around adapting the code to correctly interface with the Carloop library and hardware. Here are the key adjustments that made the difference:
-
Include the Carloop Library: Ensure the Carloop library is included in your project. This is fundamental for utilizing Carloop-specific functionalities.
-
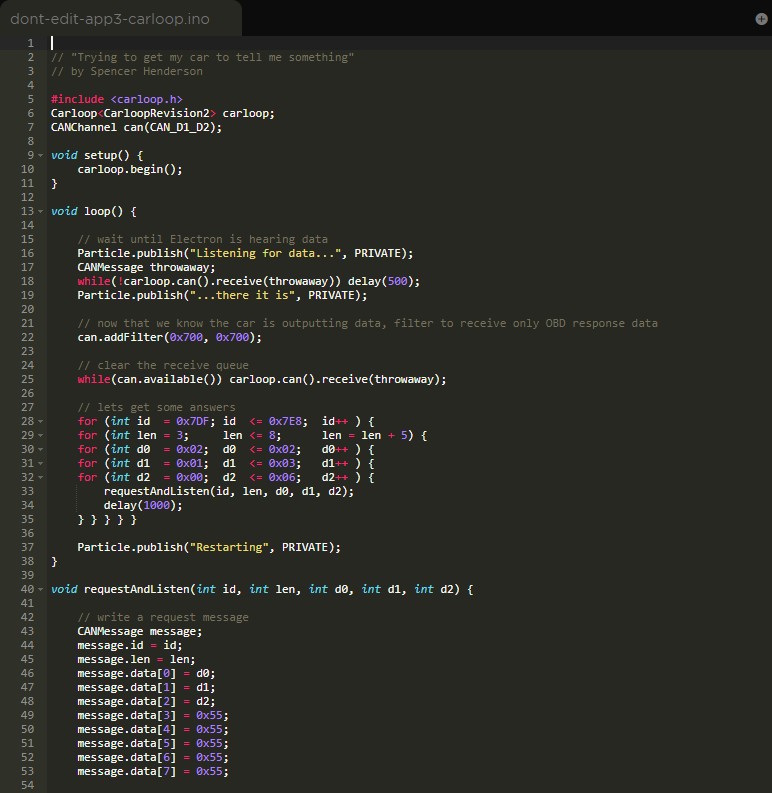
Add
#include <Carloop.h>: Place this include statement at the beginning of your program. This line explicitly imports the necessary Carloop library definitions. -
Instantiate Carloop Object: Add
Carloop<carlooprevision2> carloop;</carlooprevision2>at the top of your code. This line creates a Carloop object, specifying the Carloop revision being used. This step is crucial for the microcontroller to recognize and interact correctly with the connected Carloop hardware. -
Initialize Carloop Communication: Replace
can.begin(500000);withcarloop.begin();. Thecarloop.begin()function initializes the CANbus communication, and by default, it sets the speed to 500000 bits/sec, which is a standard speed for OBD-II CAN communication. -
Modify CAN Receive Calls: Change all instances of
can.receive(message)tocarloop.can().receive(message). This adjustment ensures that the code uses the Carloop CAN interface for receiving messages. -
Modify CAN Transmit Calls: Similarly, replace all occurrences of
can.transmit(message)withcarloop.can().transmit(message). This directs the code to use the Carloop CAN interface for transmitting messages as well. -
Data Payload Consideration: Add lines to explicitly set data bytes in the message:
message.data[3] = 0x55; message.data[4] = 0x55; message.data[5] = 0x55; message.data[6] = 0x55; message.data[7] = 0x55;. While the exact reason for this being necessary in this specific case isn’t fully determined, it was observed that setting these data bytes, potentially related to message padding or specific protocol requirements, helped in receiving a response.
Further investigation revealed an interesting behavior related to message length. Transmitting messages with a length of 3 bytes (message.len=3;) did not elicit a response from the CANbus. However, changing the message length to 8 bytes (message.len=8;) resulted in successful communication and OBD-II data retrieval. This suggests potential nuances in the CANbus protocol implementation within the vehicle’s OBD-II system or how Carloop interacts with it, particularly concerning message length expectations.
In conclusion, accessing OBD-II data via CANbus with Carloop requires careful attention to library inclusion, object instantiation, and correct function calls for CAN communication. While the specific reasons behind certain behaviors, like message length sensitivity, may require deeper protocol analysis (potentially found in resources akin to an “obdii wiki” for CANbus protocols), these practical steps provide a solid foundation for successfully interfacing with your vehicle’s OBD-II system and unlocking a wealth of diagnostic and performance data.