
For automotive enthusiasts and mechanics working with Japanese Domestic Market (JDM) vehicles from the 1990s, accessing the Engine Control Unit (ECU) for diagnostics can sometimes present unique challenges. While many assume OBDII compatibility is universal, certain JDM Toyota ECUs from this era utilize the ISO14230-4 (5 baud init) protocol, which isn’t as broadly supported as other OBDII standards, especially within common OBD2 Android applications. This article sheds light on navigating this protocol for obdii 90’s car diagnostics and offers a practical approach to connecting with these ECUs.
It’s also important to note that not all Bluetooth OBD2 dongles are created equal; compatibility with the ISO14230-4 protocol can vary. However, through hands-on testing, we’ve confirmed successful connections with this configuration on several non-OBD1 JDM ECUs, including:
- ST215 3S-GTE A/T (89661-21330)
- ZZT231 2ZZ-GE M/T (89666-20060)
Setting Up Your OBD2 Port for 90’s JDM Engine Swaps
In scenarios involving engine swaps, particularly when integrating a JDM engine into a chassis originally designed for a different market, you might find yourself needing to create or adapt an OBD2 port. Interestingly, in the case of the ZZT231 Celica, the North American OBD2 port configuration proved to be compatible, even though the North American 2ZZ-GE engine used a different OBD2 protocol. This compatibility stems from the identical wiring diagrams, simplifying the process considerably.
To ensure correct connectivity, the OBD2 port pinout should be configured as follows:
- SIL (Serial Interface Link): This pin connects to the corresponding pin on the engine ECU. The specific pin will depend on your ECU model, so consult your wiring diagrams.
- Pin 4 & 5 (Ground): These are ground pins. For optimal performance and to avoid potential issues, ensure these grounds are effectively connected to the ECU grounds.
- B+ (Battery Positive Voltage): This pin provides 12V power to the diagnostic tool connected to the OBD2 port. For vehicles not in regular use, consider not permanently powering this pin to prevent potential battery drain.
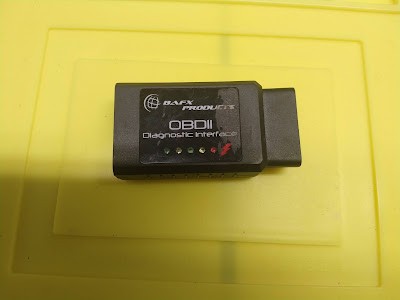
For establishing a wireless connection, an ELM327 Bluetooth dongle is typically used. During our testing, the BAFX PRODUCTS OBDII Diagnostic Interface proved reliable. While other ELM327 dongles may function with varying degrees of success, testing different models you might already own is advisable before purchasing a new one.
Utilizing Car Gauge Lite for OBDII Diagnostics on 90’s JDM Cars
While personal preferences for OBDII applications vary, Car Gauge Lite demonstrated consistent functionality throughout our tests with 90’s JDM ECUs using the ISO14230-4 protocol. This makes it a viable option for accessing diagnostic data from these vehicles.
Before launching the Car Gauge Lite application, it’s essential to pair your OBDII Bluetooth device via your Android device’s Bluetooth settings menu. This establishes the initial connection that the app will then utilize.
Upon opening Car Gauge Lite, you’ll be greeted with the main screen, which serves as your dashboard for vehicle data.
It’s worth noting that the free “Lite” version of Car Gauge Lite includes advertisements, which can be frequent and somewhat intrusive, potentially hindering efficient workflow. A paid, ad-free version is available, and it’s recommended to validate the Lite version’s functionality with your setup before investing in the paid upgrade.
To ensure proper communication with 90’s JDM ECUs, a crucial setting adjustment within the application preferences is necessary.
Specifically, you’ll need to enable the ISO-9141/KWP2000 protocol option within the app’s settings. This adjustment is critical for establishing a connection with ECUs utilizing the ISO14230-4 protocol.
With the ELM327 dongle plugged into your vehicle’s OBD2 port and the ignition key turned to the “ON” position (or engine running), you can proceed to connect via Bluetooth within the Car Gauge Lite app.
The connection process involves a series of dialog boxes prompting you for selections. Remember that your OBD2 Bluetooth adapter’s MAC address will differ from the one displayed in these examples. You’ll need to locate your adapter’s MAC address in your Android device’s Bluetooth settings and remember it for the connection process.
Successful ECU Connection and Data Monitoring
Upon successfully navigating the connection dialogs, you should now be connected to your JDM ECU!
Like many contemporary OBDII Android applications, Car Gauge Lite allows for extensive customization of your dashboard. You can tailor the display to show the specific data fields that are most relevant to your diagnostic needs, enabling focused monitoring of your 90’s JDM car’s engine performance and health.