
Experiencing a check engine light in your Honda can be concerning. If you’ve encountered the Honda Obdii Code 23-01, or its generic OBDII equivalent P0325, you’re likely dealing with a knock sensor issue. As an auto repair expert at autelfrance.com, I’m here to guide you through understanding, diagnosing, and fixing this problem, ensuring optimal performance for your Honda. This guide will provide a comprehensive look at Honda OBDII code 23-01, specifically focusing on the knock sensor malfunction and its resolution.
Often, the first sign is the intermittent appearance of the engine management light. It might illuminate, then disappear, only to reappear later. This was exactly the case with my 2004 Honda CR-V, equipped with the robust 2.0-liter K20A petrol engine – a powerplant shared across various Honda models like the Accord, Civic, and Stream. Before the check engine light became persistent, there were subtle hints. The engine’s responsiveness wasn’t quite what it used to be. Looking back, I noticed a slight hesitation upon initial acceleration from idle, a clue easily missed in daily driving. Recognizing these early symptoms can save you from potential engine damage and ensure a smoother driving experience.
To pinpoint the cause of the Honda OBDII code 23-01, a systematic approach is essential. When the engine management light first appeared, my immediate reaction was to conduct a visual inspection. Pulling over safely, I checked under the hood and beneath the car for any obvious issues – leaks, loose components, or unusual smells. This preliminary check is always recommended when the check engine light illuminates. In my case, everything seemed normal at first glance.
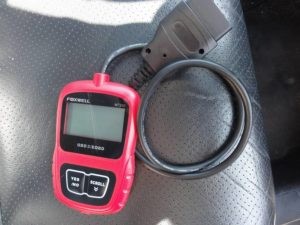
At this point, a diagnostic scan tool becomes indispensable. I reached for my Foxwell NT200 diagnostic scanner, a cost-effective tool ideal for reading ECU codes.
Alt text: Foxwell NT200 OBDII scanner displaying Honda OBDII code 23-01, related to knock sensor issue, during car diagnostic process.
It’s important to note the limitations of tools like the NT200. It focuses solely on ECU codes, meaning it won’t read codes from systems like airbags or ABS. Also, it’s not compatible with JOBD, the Japanese version of OBD2, relevant if you’re working on Japanese import vehicles. For my Honda CR-V, these limitations were not a concern.
Using an OBDII scanner is straightforward:
- Locate the OBD2 port in your Honda. In the CR-V, it’s positioned in the driver’s side footwell, above and to the left of the clutch pedal.
Alt text: OBDII port location in a Honda CR-V driver’s footwell, used for connecting diagnostic scan tools to read Honda OBDII code 23-01.
- Plug in your OBDII scanner.
- Turn the ignition to the “ON” position (engine off).
- The scanner powers up from the car’s OBDII port.
- Allow the scanner to communicate with the car’s ECU. You’ll navigate a simple menu system – the NT200 is user-friendly with just two buttons.
- Navigate to the “Read Codes” or similar function to retrieve stored diagnostic trouble codes.
Alt text: Diagnostic screen of Foxwell NT200 OBDII scanner showing Honda OBDII code 23-01 P0325, confirming knock sensor malfunction in Honda vehicle.
Ideally, you’ll see a single code, simplifying diagnosis. In my case, the scanner revealed code P0325, or Honda specific code 23-01, indicating a fault within the knock sensor circuit.
Understanding the Knock Sensor and “Knock”
To effectively address Honda OBDII code 23-01, it’s crucial to understand the function of the knock sensor and the phenomenon of “knock” itself. Engine knock, sometimes referred to as “pinging,” is an abnormal combustion event. It occurs when the air-fuel mixture in the engine cylinder ignites prematurely, not in sync with the spark plug’s ignition timing. This uncontrolled combustion creates pressure waves and noise, which can be detrimental to the engine if left unchecked.
Prolonged or severe engine knock can lead to significant engine damage, including piston damage, connecting rod stress, and cylinder head issues. This is where the knock sensor plays a vital role. Mounted directly onto the engine block, the knock sensor acts as a listening device. It detects the specific frequencies associated with engine knock. When knock is detected, the sensor signals the Engine Control Unit (ECU). The ECU then takes immediate corrective action, typically by retarding the ignition timing or adjusting the air-fuel ratio to suppress the knocking and protect the engine. Honda OBDII code 23-01 signals that there is an issue within this critical system, preventing the engine from being properly protected against knock.
Step-by-Step Guide to Fixing Honda OBDII Code 23-01: Knock Sensor Replacement
Addressing Honda OBDII code 23-01 usually involves replacing the faulty knock sensor. Here’s a step-by-step guide based on my experience, which should be applicable to many Honda models with similar engines:
-
Prepare the vehicle: For safe access to the knock sensor, raise the front of your Honda. Ramps are convenient if you have them, otherwise, a jack and axle stands will work just as well. Ensure the vehicle is stable and secure before proceeding underneath.
-
Remove the under-tray: Locate and remove the plastic under-tray beneath the front of the engine bay. This provides better access to the knock sensor location. Be gentle with the plastic trim clips, as they can be brittle. Have some cable ties handy as a temporary fix if some clips break during removal.
Alt text: Honda CR-V with the plastic undertray removed, revealing access points for replacing the knock sensor related to Honda OBDII code 23-01.
- Locate the knock sensor: The knock sensor is positioned on the front of the engine block, often in a slightly awkward location to reach and visualize. It’s beneficial to consult online resources or repair manuals specific to your Honda model for precise location details.
Alt text: Close-up view showing the location of the knock sensor on a Honda engine block, the source of Honda OBDII code 23-01 when faulty.
-
Inspect wiring and sensor security: Before replacing the sensor, carefully inspect the wiring connector and ensure the existing knock sensor is securely fastened. A loose connection or damaged wiring could also trigger Honda OBDII code 23-01. In my case, the wiring and sensor were secure, indicating a likely sensor failure.
-
Research potential causes: While a faulty knock sensor is the most common culprit for Honda OBDII code 23-01, it’s wise to briefly research if other less common issues might trigger this code. This step helps avoid unnecessary sensor replacement if the problem lies elsewhere. However, in most cases, code 23-01 directly points to a failing knock sensor.
-
Source a replacement knock sensor: Consider the urgency of the repair. Local Honda dealerships often stock knock sensors due to their common failure rate, suggesting this is a frequently replaced part. While dealership parts might be pricier, they offer immediate availability. Alternatively, online retailers offer competitive pricing, but factor in delivery time.
Alt text: Brand new knock sensor component ready for installation to resolve Honda OBDII code 23-01 and restore engine knock detection.
-
Prepare for replacement:
- Disconnect the battery: Always disconnect the negative battery terminal before working on electrical components to prevent shorts and ensure safety.
- Gather tools: You’ll need a 27mm wrench (spanner) or a 27mm socket, potentially with a universal joint for better access in tight spaces. Long nose pliers or your fingers can be used to disconnect the wiring connector. A torque wrench is essential for correctly tightening the new sensor. Consider a specialized 27mm wrench for easier access, like the Facom wrench I used.
Alt text: Selection of tools including a 27mm wrench and socket, essential for replacing the knock sensor and resolving Honda OBDII code 23-01.
-
Remove the old sensor:
- Disconnect the wiring connector: Carefully detach the electrical connector from the knock sensor. Space is limited, so angled long nose pliers or nimble fingers are helpful. Remember how it’s oriented for re-assembly.
- Loosen the sensor: Use the 27mm wrench or socket to loosen and remove the old knock sensor.
-
Install the new sensor:
- Clean the mounting surface: Ensure the sensor mounting surface on the engine block is clean and free of grease, rust, or debris. This ensures good contact for accurate knock detection.
- Hand-tighten the new sensor: Thread the new knock sensor into position by hand initially to avoid cross-threading.
- Torque to specification: Using a torque wrench, tighten the new knock sensor to the specified torque – for most Hondas, this is around 31 Nm (Newton meters). Proper torque is crucial for sensor function.
- Reconnect the wiring: Reconnect the wiring connector to the new knock sensor, ensuring it clicks securely into place.
-
Final steps:
- Reconnect the battery: Reconnect the negative battery terminal.
- Start the engine: Start your Honda and check if the check engine light has turned off.
- Verify code clearance: Ideally, the Honda OBDII code 23-01 (P0325) should clear automatically. You can use your OBDII scanner to confirm the code is no longer present. In my case, the code had cleared itself upon starting the engine, a positive sign.
- Reinstall under-tray: Reinstall the plastic under-tray.
- Test drive: Take your Honda for a test drive to ensure the issue is resolved and the engine performs smoothly.
Alt text: Newly installed knock sensor successfully resolving Honda OBDII code 23-01, indicated by the absence of check engine light after repair.
Conclusion: Resolving Honda OBDII Code 23-01 Enhances Performance
Successfully addressing Honda OBDII code 23-01 by replacing the knock sensor is a rewarding DIY repair. Using the 2004 Honda CR-V with the K20A engine as a practical example, this guide has outlined the diagnostic and repair process. Beyond eliminating the check engine light and alleviating concerns about potential engine damage, fixing this issue can actually enhance your driving experience. I noticed improved engine responsiveness after replacing the knock sensor. While subtle, there might even be a marginal improvement in fuel economy, although environmental factors like weather can also play a role.
If you found this guide helpful in understanding and resolving Honda OBDII code 23-01, or if you have further questions, please feel free to leave a comment below. Your experiences and questions enrich our community of DIY car enthusiasts and Honda owners.