Vcds Hex V2 Interface Flashing Blue indicates a crucial need for auto diagnostics. This article by CARDIAGTECH.NET explores the significance, troubleshooting, and benefits of using the VCDS HEX V2 interface. Learn how to optimize your auto repairs and maintenance with advanced diagnostic tools, enhanced vehicle functionality, and comprehensive system analysis for superior automotive care.
1. Understanding the VCDS HEX V2 Interface
The VCDS HEX V2 interface, utilized extensively in automotive diagnostics, facilitates communication with a vehicle’s onboard computer. This tool allows mechanics and car enthusiasts to read diagnostic trouble codes (DTCs), monitor live data, perform adaptations, and make various coding changes to enhance vehicle performance and customization. The flashing blue light typically indicates either a connection issue or a firmware update in progress, which requires immediate attention to prevent disruptions in diagnostic procedures.
1.1. Key Features of the VCDS HEX V2 Interface
The VCDS HEX V2 interface boasts several features enhancing its utility in automotive diagnostics:
- Broad Vehicle Compatibility: Supports a wide range of Volkswagen Audi Group (VAG) vehicles, including VW, Audi, Seat, and Skoda models.
- Comprehensive Diagnostic Capabilities: Capable of reading and clearing diagnostic trouble codes (DTCs) from all modules within the vehicle.
- Live Data Monitoring: Provides real-time data from various sensors and modules, allowing for accurate assessment of vehicle performance.
- Adaptations and Coding: Facilitates adjustments and modifications to vehicle settings, such as enabling or disabling features and adjusting control module parameters.
- User-Friendly Interface: Designed with an intuitive software interface, making it accessible for both professional mechanics and DIY enthusiasts.
- Regular Software Updates: Ross-Tech provides frequent updates to ensure compatibility with the latest vehicle models and diagnostic protocols.
- Portability: Compact design allows for easy transportation and use in various locations, whether in a professional shop or on-the-go.
- Robust Construction: Built to withstand the demands of automotive environments, ensuring durability and long-term reliability.
1.2. Benefits of Using the VCDS HEX V2 Interface
Employing the VCDS HEX V2 interface delivers numerous advantages in automotive diagnostics and maintenance:
- Enhanced Diagnostic Accuracy: Pinpoints issues with high precision, reducing guesswork and saving time on repairs.
- Cost Savings: Enables users to perform diagnostics and maintenance tasks independently, reducing reliance on expensive dealership services.
- Improved Vehicle Performance: Allows for optimization of vehicle settings and performance parameters, resulting in smoother operation and increased efficiency.
- Customization Options: Provides the ability to personalize vehicle features and settings according to individual preferences.
- Preventative Maintenance: Facilitates regular monitoring of vehicle systems, helping to identify and address potential issues before they escalate into major problems.
- Time Efficiency: Streamlines the diagnostic process, allowing mechanics to quickly identify and resolve issues, increasing productivity.
- Comprehensive System Insights: Offers in-depth access to vehicle modules and data, providing a holistic understanding of vehicle health.
- Increased Resale Value: Demonstrating a history of proactive maintenance and diagnostics can enhance the vehicle’s resale value.
2. Decoding the Flashing Blue Light
When the VCDS HEX V2 interface displays a flashing blue light, it’s crucial to understand the underlying cause to effectively troubleshoot the issue. This section explores common reasons and necessary steps to resolve the problem.
2.1. Common Reasons for the Flashing Blue Light
The flashing blue light on the VCDS HEX V2 interface typically indicates one of several possible scenarios:
- Firmware Update in Progress: The interface might be undergoing a firmware update. Interrupting this process can cause damage.
- Connection Issues: Problems with the USB connection to the computer or the OBD-II connection to the vehicle can trigger the flashing blue light.
- Driver Installation Problems: Incorrect or outdated drivers can hinder communication between the interface and the computer.
- Software Compatibility Issues: Incompatibility between the VCDS software version and the interface firmware can cause errors.
- Hardware Malfunction: In rare cases, the flashing blue light may indicate a hardware fault within the interface itself.
2.2. Step-by-Step Troubleshooting Guide
Follow these steps to diagnose and fix the flashing blue light issue on your VCDS HEX V2 interface:
- Check USB Connection:
- Ensure the USB cable is securely connected to both the interface and the computer.
- Try using a different USB port on your computer to rule out port-related issues.
- Avoid using USB hubs or extension cables, as they can sometimes cause connection problems.
- Verify OBD-II Connection:
- Make sure the interface is properly connected to the vehicle’s OBD-II port.
- Check the OBD-II port for any damage or debris that might interfere with the connection.
- Ensure the vehicle’s ignition is turned on, as some modules require power to communicate.
- Allow Firmware Update to Complete:
- If the flashing blue light started during a firmware update, allow the process to finish without interruption.
- Monitor the VCDS software for any progress messages or prompts.
- Avoid disconnecting the interface or turning off the computer during the update.
- Reinstall or Update Drivers:
- Download the latest drivers for the VCDS HEX V2 interface from the Ross-Tech website.
- Uninstall the existing drivers from your computer.
- Reinstall the new drivers, following the instructions provided by Ross-Tech.
- Check Software Compatibility:
- Verify that you are using a compatible version of the VCDS software for your interface firmware.
- Update the VCDS software to the latest version if necessary.
- Refer to the Ross-Tech website for information on software and firmware compatibility.
- Restart Computer and Interface:
- Restart your computer to refresh the system and clear any temporary issues.
- Disconnect the interface from both the computer and the vehicle, then reconnect it after the computer has restarted.
- Test with a Different Vehicle:
- If possible, try connecting the interface to a different vehicle to see if the issue persists.
- This can help determine whether the problem is with the interface or the original vehicle.
- Contact Ross-Tech Support:
- If none of the above steps resolve the flashing blue light issue, contact Ross-Tech support for further assistance.
- Provide them with detailed information about the problem, including any error messages or troubleshooting steps you have already taken.
By systematically following these troubleshooting steps, you can effectively diagnose and resolve the flashing blue light issue on your VCDS HEX V2 interface, ensuring smooth and accurate vehicle diagnostics.
3. Advanced Troubleshooting Techniques
If the basic troubleshooting steps don’t resolve the flashing blue light issue, consider these advanced techniques for a deeper diagnostic approach.
3.1. Checking USB Port Functionality
Proper USB port functionality is crucial for the VCDS HEX V2 interface to communicate effectively with your computer. Here’s how to thoroughly test and ensure your USB ports are working correctly:
- Test with Other USB Devices:
- Plug in other USB devices, such as a mouse, keyboard, or USB drive, into the same port.
- If these devices are not recognized or do not function correctly, the USB port may be faulty.
- Try Different USB Ports:
- Attempt using different USB ports on your computer to see if the issue persists.
- Some USB ports may have different power outputs or controller configurations, which can affect device recognition.
- Check Device Manager (Windows):
- Open Device Manager by searching for it in the Windows Start Menu.
- Look for any errors or warnings related to USB controllers or devices.
- If you see a yellow exclamation mark next to a USB device, it indicates a problem with the driver or hardware.
- Update USB Drivers:
- In Device Manager, expand the “Universal Serial Bus controllers” section.
- Right-click on each USB controller and select “Update driver.”
- Choose the option to search automatically for updated drivers.
- Uninstall and Reinstall USB Controllers:
- If updating the drivers doesn’t resolve the issue, try uninstalling and reinstalling the USB controllers.
- Right-click on each USB controller and select “Uninstall device.”
- Restart your computer, and Windows will automatically reinstall the USB controllers.
- Check USB Power Management Settings:
- Open Device Manager and expand the “Universal Serial Bus controllers” section.
- Right-click on the USB Root Hub and select “Properties.”
- Go to the “Power Management” tab and uncheck the box that says “Allow the computer to turn off this device to save power.”
- Repeat this process for each USB Root Hub.
- Test with a Powered USB Hub:
- Use a powered USB hub to provide additional power to the VCDS HEX V2 interface.
- This can help resolve issues caused by insufficient power from the USB port.
- Examine USB Port Physically:
- Inspect the USB port for any physical damage, such as bent pins or debris.
- Use a flashlight to get a better view of the port’s interior.
- Run Hardware Diagnostics:
- Use hardware diagnostic tools to test the USB ports for any underlying issues.
- Many computer manufacturers provide built-in diagnostic utilities for hardware testing.
- BIOS/UEFI Settings:
- Check your computer’s BIOS/UEFI settings to ensure that USB ports are enabled and configured correctly.
- Refer to your computer’s manual for instructions on accessing and modifying BIOS/UEFI settings.
By systematically checking and testing your USB ports, you can identify and resolve potential issues that may be causing the flashing blue light on your VCDS HEX V2 interface.
3.2. Verifying Driver Integrity
Ensuring the integrity of the VCDS HEX V2 interface drivers is vital for proper communication between the device and your computer. Damaged or corrupted drivers can lead to various issues, including the dreaded flashing blue light. Here’s how to verify driver integrity:
- Access Device Manager:
- Open Device Manager by searching for it in the Windows Start Menu.
- Locate the VCDS Interface:
- Look for the VCDS HEX V2 interface under “Ports (COM & LPT)” or “Universal Serial Bus devices.”
- Check for Errors:
- If there is a yellow exclamation mark or a red “X” next to the device, it indicates a problem with the driver.
- Update the Driver:
- Right-click on the VCDS HEX V2 interface and select “Update driver.”
- Choose the option to “Search automatically for updated drivers.”
- If Windows cannot find a suitable driver, proceed to the next step.
- Reinstall the Driver:
- Right-click on the VCDS HEX V2 interface and select “Uninstall device.”
- Make sure to check the box that says “Delete the driver software for this device” if it is available.
- Disconnect the VCDS HEX V2 interface from your computer.
- Restart your computer.
- Reconnect the VCDS HEX V2 interface, and Windows should automatically detect and reinstall the driver.
- Manually Install the Driver:
- Download the latest driver package from the Ross-Tech website.
- Extract the contents of the driver package to a folder on your computer.
- In Device Manager, right-click on the VCDS HEX V2 interface and select “Update driver.”
- Choose the option to “Browse my computer for drivers.”
- Navigate to the folder where you extracted the driver package and select the appropriate driver file.
- Follow the on-screen instructions to complete the installation.
- Check Driver Details:
- Right-click on the VCDS HEX V2 interface in Device Manager and select “Properties.”
- Go to the “Driver” tab and verify the driver version, date, and provider.
- Ensure that the driver information matches the latest version available on the Ross-Tech website.
- Run Driver Verifier:
- Driver Verifier is a built-in Windows tool that can help identify issues with drivers.
- Open Command Prompt as an administrator.
- Type “verifier” and press Enter.
- Choose “Create standard settings” and click “Next.”
- Select “Select driver names from a list” and click “Next.”
- Check the box next to the VCDS HEX V2 interface driver and click “Finish.”
- Restart your computer, and Driver Verifier will begin monitoring the driver.
- If Driver Verifier detects any issues, it will generate a blue screen of death (BSOD) with information about the problem.
- Test with a Clean Boot:
- Perform a clean boot to eliminate any software conflicts that may be affecting the driver.
- Press the Windows key + R, type “msconfig,” and press Enter.
- Go to the “Services” tab, check the box that says “Hide all Microsoft services,” and click “Disable all.”
- Go to the “Startup” tab and click “Open Task Manager.”
- Disable all startup items.
- Restart your computer and check if the issue persists.
- Check for Driver Conflicts:
- In Device Manager, check for any other devices that may be conflicting with the VCDS HEX V2 interface.
- Look for devices with yellow exclamation marks or red “X” marks.
- Try disabling or uninstalling these devices to see if it resolves the issue.
By thoroughly verifying the integrity of the VCDS HEX V2 interface drivers, you can eliminate potential software-related issues and ensure smooth communication with your vehicle.
3.3. Examining Firmware Compatibility
Ensuring that your VCDS HEX V2 interface firmware is compatible with the VCDS software version is crucial for seamless diagnostics. Incompatible firmware can lead to communication errors, including the flashing blue light. Here’s how to examine and verify firmware compatibility:
-
Determine Your Current Firmware Version:
- Connect your VCDS HEX V2 interface to your computer.
- Open the VCDS software.
- Go to the “Options” screen.
- The firmware version of your interface will be displayed in the “Interface” section.
-
Identify Your VCDS Software Version:
- In the VCDS software, go to the “About” screen.
- The software version will be displayed at the top of the window.
-
Consult Ross-Tech Compatibility Charts:
- Visit the Ross-Tech website and navigate to the support or downloads section.
- Look for a compatibility chart or table that lists the compatible firmware versions for each VCDS software version.
- Compare your firmware and software versions to the chart to ensure they are compatible.
-
Update Firmware if Necessary:
- If your firmware is outdated or incompatible, you may need to update it.
- Follow the instructions provided by Ross-Tech for updating the firmware of your VCDS HEX V2 interface.
- Make sure to download the correct firmware version for your interface model.
-
Check Beta Versions:
- If you are using a beta version of the VCDS software, it may have specific firmware requirements.
- Check the release notes or documentation for the beta version to ensure compatibility.
-
Consider Operating System Compatibility:
- Ensure your operating system (Windows) is compatible with both the VCDS software and the interface firmware.
- Refer to the Ross-Tech website for a list of supported operating systems.
-
Test After Updates:
- After updating the firmware or software, thoroughly test the VCDS HEX V2 interface to ensure that it is working correctly.
- Connect to a vehicle and perform various diagnostic functions to verify compatibility.
-
Rollback if Issues Persist:
- If you experience issues after updating the firmware or software, you may need to rollback to a previous version.
- Follow the instructions provided by Ross-Tech for rolling back to a previous firmware or software version.
-
Contact Ross-Tech Support:
- If you are unsure about firmware compatibility or need assistance with updating or rolling back, contact Ross-Tech support for help.
- Provide them with detailed information about your interface model, firmware version, software version, and operating system.
By carefully examining firmware compatibility, you can prevent potential communication issues and ensure that your VCDS HEX V2 interface operates smoothly and efficiently.
4. Hardware and Software Solutions
When troubleshooting the VCDS HEX V2 interface, addressing potential hardware and software issues is essential. This section provides detailed solutions for both categories.
4.1. Resolving Hardware Issues
Hardware issues can significantly impact the performance of the VCDS HEX V2 interface. Here are some steps to identify and resolve common hardware-related problems:
-
Inspect the Interface Cable:
- Check the cable for any signs of damage, such as cuts, frays, or bent connectors.
- Ensure the cable is securely connected to both the interface and the computer.
- Try using a different USB cable to rule out cable-related issues.
-
Examine the OBD-II Connector:
- Inspect the OBD-II connector on the interface for any bent or broken pins.
- Make sure the connector is clean and free from debris.
- Check the vehicle’s OBD-II port for any damage or corrosion.
-
Test with a Different Vehicle:
- Connect the interface to a different vehicle to see if the issue persists.
- This can help determine whether the problem is with the interface or the original vehicle.
-
Check the Interface LEDs:
- Observe the LEDs on the interface to see if they are lighting up correctly.
- Refer to the Ross-Tech documentation for the expected LED behavior.
- If the LEDs are not lighting up as expected, it may indicate a hardware fault.
-
Try a Different Computer:
- Connect the interface to a different computer to see if the issue persists.
- This can help determine whether the problem is with the original computer or the interface.
-
Use a Powered USB Hub:
- Connect the interface to a powered USB hub to provide additional power.
- This can help resolve issues caused by insufficient power from the USB port.
-
Check for Overheating:
- Ensure the interface is not overheating, as this can cause it to malfunction.
- Allow the interface to cool down if it feels hot to the touch.
-
Inspect Internal Components:
- If you are comfortable doing so, open the interface and inspect the internal components for any signs of damage, such as burnt components or loose connections.
- Be careful not to damage any of the components during inspection.
-
Contact Ross-Tech Support:
- If you suspect a hardware issue with the interface, contact Ross-Tech support for assistance.
- Provide them with detailed information about the problem and any troubleshooting steps you have already taken.
-
Consider Repair or Replacement:
- If the interface is damaged beyond repair, you may need to consider purchasing a new one.
- Ross-Tech may offer repair services for certain hardware issues.
By systematically addressing potential hardware issues, you can ensure that your VCDS HEX V2 interface is functioning correctly and providing accurate diagnostic information.
4.2. Optimizing Software Configuration
Proper software configuration is essential for the VCDS HEX V2 interface to function correctly. Here’s how to optimize your software setup to resolve potential issues:
-
Install the Latest VCDS Software:
- Download the latest version of the VCDS software from the Ross-Tech website.
- Uninstall any previous versions of the software before installing the new version.
- Follow the on-screen instructions to complete the installation.
-
Run VCDS as Administrator:
- Right-click on the VCDS shortcut and select “Properties.”
- Go to the “Compatibility” tab.
- Check the box that says “Run this program as an administrator.”
- Click “Apply” and then “OK.”
-
Disable Antivirus Software:
- Temporarily disable your antivirus software to see if it is interfering with VCDS.
- Some antivirus programs may mistakenly flag VCDS as a threat.
-
Adjust Firewall Settings:
- Ensure that VCDS is allowed through your firewall.
- Add VCDS as an exception in your firewall settings.
-
Configure USB Port Settings:
- In Device Manager, locate the VCDS HEX V2 interface under “Ports (COM & LPT).”
- Right-click on the interface and select “Properties.”
- Go to the “Port Settings” tab.
- Adjust the settings to match the recommended settings in the Ross-Tech documentation.
-
Disable USB Selective Suspend:
- Open the Control Panel and go to “Power Options.”
- Click “Change plan settings” next to your selected power plan.
- Click “Change advanced power settings.”
- Expand the “USB settings” section.
- Set “USB selective suspend setting” to “Disabled.”
- Click “Apply” and then “OK.”
-
Run VCDS in Compatibility Mode:
- Right-click on the VCDS shortcut and select “Properties.”
- Go to the “Compatibility” tab.
- Check the box that says “Run this program in compatibility mode for.”
- Select a previous version of Windows from the drop-down menu.
- Click “Apply” and then “OK.”
-
Clear VCDS Configuration Files:
- Locate the VCDS configuration files on your computer.
- Delete the configuration files to reset VCDS to its default settings.
- Refer to the Ross-Tech documentation for the location of the configuration files.
-
Check for Software Conflicts:
- Ensure that there are no other programs running that may be conflicting with VCDS.
- Close any unnecessary programs before running VCDS.
-
Update Windows:
- Ensure that your Windows operating system is up to date.
- Install any available updates to resolve potential compatibility issues.
By carefully optimizing your software configuration, you can ensure that VCDS is running smoothly and communicating correctly with your VCDS HEX V2 interface.
5. Maximizing VCDS HEX V2 Performance
To fully leverage the capabilities of your VCDS HEX V2 interface, optimizing its performance is essential. This section provides actionable strategies for maximizing efficiency and accuracy in your diagnostic procedures.
5.1. Optimizing Scan Speeds
Efficient scan speeds can save considerable time during vehicle diagnostics. Here’s how to optimize scan speeds using the VCDS HEX V2 interface:
- Use the Latest VCDS Software:
- Ensure you have the most recent version of the VCDS software installed. Updates often include enhancements that improve scan speeds.
- Select the Appropriate Scan Mode:
- VCDS offers different scan modes, such as “Quick Scan” and “Full Scan.” Use “Quick Scan” for a faster overview and “Full Scan” for comprehensive diagnostics.
- Limit Module Selection:
- When performing a scan, select only the modules you need to diagnose. Scanning all modules can be time-consuming if you’re focusing on a specific issue.
- Disable Unnecessary Features:
- Disable any unnecessary features in the VCDS software that may slow down the scan process, such as live data logging or advanced measuring blocks.
- Optimize USB Connection:
- Ensure the USB cable is securely connected and use a high-quality cable to minimize data transfer issues. Avoid using USB hubs or extension cables.
- Reduce Background Processes:
- Close any unnecessary programs running in the background on your computer to free up system resources and improve scan speeds.
- Defragment Your Hard Drive:
- Regularly defragment your hard drive to improve data access speeds. This can help speed up the scan process.
- Use a Solid State Drive (SSD):
- If possible, install the VCDS software on a solid-state drive (SSD) for faster read and write speeds.
- Adjust Interface Latency:
- In Device Manager, adjust the latency settings for the VCDS HEX V2 interface to optimize data transfer speeds.
- Check Vehicle Battery Voltage:
- Ensure the vehicle’s battery has sufficient voltage, as low voltage can affect the communication speed between the interface and the vehicle’s modules.
By implementing these strategies, you can significantly improve scan speeds and streamline your diagnostic workflow with the VCDS HEX V2 interface.
5.2. Ensuring Data Accuracy
Accurate data is the cornerstone of effective automotive diagnostics. Here are key steps to ensure the data you obtain from the VCDS HEX V2 interface is reliable and precise:
-
Use a Stable Power Source:
- Ensure the vehicle has a stable power source during diagnostics. Use a battery maintainer or charger to prevent voltage drops, which can lead to inaccurate data.
-
Verify Connections:
- Double-check all connections, including the OBD-II port and the USB connection to your computer. Loose or faulty connections can cause data transmission errors.
-
Update VCDS Software Regularly:
- Keep your VCDS software updated to the latest version. Updates often include bug fixes and improvements that enhance data accuracy.
-
Calibrate Sensors:
- Use the VCDS software to calibrate sensors as needed. Proper calibration ensures that the sensors are providing accurate readings.
-
Check for Fault Codes:
- Address any fault codes before collecting live data. Fault codes can affect the accuracy of the data being reported by the sensors.
-
Monitor Live Data Carefully:
- When monitoring live data, pay close attention to the values being reported by the sensors. Look for any unusual or unexpected readings.
-
Compare Data to Specifications:
- Compare the data you collect to the vehicle manufacturer’s specifications. This helps identify any deviations or issues that may be affecting the vehicle’s performance.
-
Use High-Quality Cables:
- Use high-quality USB and OBD-II cables to minimize data transmission errors. Avoid using cheap or damaged cables.
-
Avoid Electrical Interference:
- Keep the VCDS HEX V2 interface away from sources of electrical interference, such as high-voltage wires or radio transmitters.
-
Document Your Findings:
- Document your findings carefully, including any fault codes, live data readings, and observations. This can help you track changes over time and identify potential issues.
By following these steps, you can ensure that the data you obtain from the VCDS HEX V2 interface is accurate and reliable, allowing you to make informed decisions about vehicle diagnostics and repairs.
6. Utilizing VCDS for Advanced Functions
The VCDS HEX V2 interface is not just for basic diagnostics; it can also perform advanced functions that enhance vehicle performance and customization. This section explores how to use VCDS for coding, adaptations, and advanced diagnostics.
6.1. Coding and Adaptations
Coding and adaptations are powerful features of the VCDS HEX V2 interface that allow you to modify vehicle settings and enable or disable certain functions. Here’s how to use these features effectively:
-
Understand Coding and Adaptations:
- Coding involves changing the software settings of a control module to enable or disable certain features.
- Adaptations involve adjusting the parameters of a control module to optimize its performance.
-
Research Before Coding:
- Before making any changes, research the coding options available for your vehicle. Consult online forums, Ross-Tech documentation, and other reliable sources.
-
Backup Original Settings:
- Always backup the original coding and adaptation settings before making any changes. This allows you to restore the original settings if something goes wrong.
-
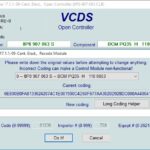
Use the VCDS Coding Helper:
- The VCDS Coding Helper provides guidance and information about the available coding options for each control module.
- Use the Coding Helper to understand the purpose of each coding option and its potential impact on vehicle performance.
-
Follow Instructions Carefully:
- Follow the instructions provided by VCDS carefully when making coding and adaptation changes.
- Double-check your entries before saving them to ensure that they are correct.
-
Test After Coding:
- After making coding or adaptation changes, test the vehicle to ensure that the changes have been implemented correctly and that there are no adverse effects.
-
Use Long Coding Helper (LCode):
- The Long Coding Helper (LCode) simplifies the process of making coding changes by providing a user-friendly interface.
- Use LCode to easily navigate the available coding options and make the necessary changes.
-
Check for Fault Codes:
- After making coding or adaptation changes, check for fault codes to ensure that there are no issues.
- Address any fault codes that appear to ensure that the vehicle is functioning correctly.
-
Document Your Changes:
- Document any coding and adaptation changes that you make to the vehicle. This helps you keep track of the changes and restore the original settings if needed.
-
Exercise Caution:
- Exercise caution when making coding and adaptation changes. Incorrect changes can cause serious problems with the vehicle’s performance and safety.
By following these guidelines, you can safely and effectively use the coding and adaptation features of the VCDS HEX V2 interface to customize your vehicle and enhance its performance.
6.2. Advanced Diagnostics
The VCDS HEX V2 interface offers advanced diagnostic capabilities that go beyond basic fault code reading. Here’s how to use VCDS for advanced diagnostics:
-
Utilize Measuring Blocks:
- Measuring blocks provide real-time data from various sensors and components in the vehicle.
- Use measuring blocks to monitor the performance of key systems and identify potential issues.
-
Perform Output Tests:
- Output tests allow you to activate various components in the vehicle to test their functionality.
- Use output tests to verify that components are working correctly and to diagnose potential problems.
-
Use the Advanced Measuring Values (AMV) Feature:
- The Advanced Measuring Values (AMV) feature allows you to access additional measuring blocks that are not available in the standard measuring blocks menu.
- Use AMV to gather more detailed data about the vehicle’s performance.
-
Perform Readiness Tests:
- Readiness tests verify that the vehicle’s emission control systems are functioning correctly.
- Use readiness tests to ensure that the vehicle will pass an emissions inspection.
-
Graphing and Logging:
- Use the graphing and logging features to visualize and record data from measuring blocks over time.
- This can help you identify intermittent problems and track the performance of key systems.
-
Adaptation Channels:
- Adaptation channels allow you to adjust the parameters of various control modules.
- Use adaptation channels to optimize the performance of the engine, transmission, and other systems.
-
Fault Code Freeze Frames:
- When a fault code is stored, VCDS captures a freeze frame of data that provides information about the conditions that were present when the fault occurred.
- Use freeze frames to help diagnose the root cause of the fault.
-
Diagnostic Trouble Code (DTC) Lookup:
- VCDS includes a built-in DTC lookup feature that provides information about the meaning and potential causes of fault codes.
- Use the DTC lookup feature to help diagnose and repair vehicle problems.
-
Use the Oscilloscope Function (if available):
- Some VCDS interfaces include an oscilloscope function that allows you to visualize electrical signals in the vehicle.
- Use the oscilloscope to diagnose problems with sensors, actuators, and other electrical components.
-
Consult Technical Service Bulletins (TSBs):
- Consult Technical Service Bulletins (TSBs) from the vehicle manufacturer to identify known issues and recommended repair procedures.
- VCDS can help you diagnose and repair problems covered in TSBs.
By utilizing these advanced diagnostic capabilities, you can gain a deeper understanding of your vehicle’s performance and effectively troubleshoot complex issues with the VCDS HEX V2 interface.
7. Maintenance and Longevity
To ensure your VCDS HEX V2 interface continues to perform optimally, proper maintenance and care are essential. This section outlines best practices for maintaining your interface and extending its lifespan.
7.1. Proper Storage Techniques
Proper storage is crucial for preserving the integrity and functionality of your VCDS HEX V2 interface. Here are some storage techniques to follow:
-
Use a Protective Case:
- Store the VCDS HEX V2 interface in a protective case to shield it from dust, moisture, and physical damage.
-
Keep it Dry:
- Store the interface in a dry environment to prevent corrosion and electrical issues. Avoid storing it in damp or humid locations.
-
Avoid Extreme Temperatures:
- Store the interface in a location where temperatures are moderate and stable. Avoid storing it in direct sunlight or in areas with extreme heat or cold.
-
Protect from Impact:
- Store the interface in a location where it is unlikely to be dropped or subjected to impact.
-
Store Cables Properly:
- Store the interface cable neatly to prevent tangling and damage. Consider using a cable organizer or Velcro straps.
-
Avoid Magnetic Fields:
- Keep the interface away from strong magnetic fields, as they can potentially damage the electronic components.
-
Clean Before Storing:
- Before storing the interface, clean it with a soft, dry cloth to remove any dirt or debris.
-
Disconnect Cables:
- Disconnect all cables from the interface before storing it to prevent strain on the connectors.
-
Label the Case:
- Label the storage case with the contents to make it easy to identify and locate the interface when needed.
-
Store in a Secure Location:
- Store the interface in a secure location where it is protected from theft and unauthorized access.
By following these storage techniques, you can help prolong the life of your VCDS HEX V2 interface and ensure that it is ready for use whenever you need it.
7.2. Regular Cleaning and Inspections
Regular cleaning and inspections are vital for maintaining the VCDS HEX V2 interface in optimal condition. Here’s how to keep your interface clean and inspect it for potential issues:
-
Clean the Interface Regularly:
- Use a soft, dry cloth to clean the interface regularly. Avoid using harsh chemicals or solvents, as they can damage the plastic housing and electronic components.
-
Clean the Connectors:
- Clean the OBD-II and USB connectors with a cotton swab and isopropyl alcohol. This helps remove dirt, debris, and corrosion that can interfere with data transmission.
-
Inspect the Cable:
- Inspect the interface cable for any signs of damage, such as cuts, frays, or bent connectors. Replace the cable if it is damaged.
-
Check the LEDs:
- Check the LEDs on the interface to ensure that they are functioning correctly. Refer to the Ross-Tech documentation for the expected LED behavior.
-
Inspect the OBD-II Connector:
- Inspect the OBD-II connector on the interface for any bent or broken pins. Repair or replace the connector if it is damaged.
-
Test the Interface:
- Test the interface regularly to ensure that it is communicating correctly with your computer and the vehicle.
-
Check for Software Updates:
- Check for software updates regularly and install them as needed. Updates often include bug fixes and improvements that enhance the performance of the interface.
-
Inspect the Housing:
- Inspect the housing of the interface for any cracks or damage. Replace the interface if the housing is damaged.
-
**