
Turning off the brake pad wear sensor via VCDS is a common task for automotive technicians. If you’re facing persistent brake pad warning lights due to faulty wiring or have chosen to replace your brake pads with aftermarket options lacking the sensor, CARDIAGTECH.NET offers solutions. This guide provides a detailed walkthrough on how to disable the brake pad wear sensor using VCDS, ensuring a smooth and error-free process. Learn about alternative diagnostic tools and the benefits of using CARDIAGTECH.NET for all your automotive diagnostic needs, including fault code clearing and electronic control unit (ECU) coding.
1. Understanding the Brake Pad Wear Sensor System
The brake pad wear sensor system is designed to alert drivers when their brake pads are nearing the end of their service life. These sensors are typically embedded in one or more of the brake pads and work by completing an electrical circuit. When the brake pad wears down to a certain point, the sensor comes into contact with the brake rotor, breaking the circuit and triggering a warning light on the dashboard.
1.1. How the System Works
The system operates on a simple principle:
- Intact Circuit: When the brake pads are new or have sufficient thickness, the sensor maintains a closed electrical circuit.
- Worn Pads: As the brake pads wear, the sensor eventually makes contact with the rotor, breaking the circuit.
- Warning Light: This broken circuit signals the car’s computer to activate the brake pad warning light, alerting the driver to replace the pads.
1.2. Common Issues
Several issues can cause the brake pad warning light to illuminate even when the brake pads are not worn:
- Faulty Wiring: Damage to the sensor wiring due to corrosion, road debris, or improper installation can cause false alarms.
- Sensor Malfunction: The sensor itself may fail, leading to an incorrect signal being sent to the car’s computer.
- Aftermarket Pads: Some aftermarket brake pads do not come equipped with wear sensors, necessitating the disabling of the warning system.
- Corrosion: Corrosion on the sensor contacts or within the wiring harness can disrupt the electrical circuit, triggering the warning light.
1.3. Identifying the Need to Disable the Sensor
There are several scenarios where disabling the brake pad wear sensor might be necessary or desirable:
- Using Aftermarket Pads Without Sensors: When installing brake pads that do not have built-in wear sensors, the warning light will remain on unless the system is disabled.
- Persistent False Alarms: If the wiring or sensors are prone to failure, disabling the system can prevent constant, unnecessary warnings.
- Cost Savings: Replacing faulty sensors can be expensive. Disabling the system might be a more economical solution for older vehicles.
- Track Use: In performance driving scenarios, drivers often prefer to monitor brake pad wear visually, making the electronic sensors redundant.
2. Introduction to VCDS
VCDS (Vag-Com Diagnostic System) is a software and hardware package developed by Ross-Tech, designed for diagnosing and modifying Volkswagen, Audi, Skoda, and SEAT vehicles. It allows users to access and control various electronic control units (ECUs) within the car, enabling tasks such as reading fault codes, performing adaptations, and coding modules.
2.1. What is VCDS?
VCDS is a comprehensive diagnostic tool that provides functionality similar to the factory diagnostic tools used by dealerships. It consists of a software application that runs on a Windows PC and a special interface cable that connects the PC to the car’s OBD-II port.
2.2. Key Features of VCDS
- Fault Code Reading and Clearing: VCDS can read and clear diagnostic trouble codes (DTCs) from all modules in the car.
- Live Data Monitoring: It allows users to monitor real-time data from various sensors and systems, providing valuable insights into the car’s operation.
- Adaptations: VCDS can perform adaptations, which involve adjusting the settings of various modules to suit specific needs or preferences.
- Coding: It enables users to code modules, which involves changing the software parameters to enable or disable certain features.
- Output Tests: VCDS can perform output tests, which activate specific components to verify their functionality.
- Logging: It can log data over time, allowing users to analyze performance and diagnose intermittent issues.
2.3. Benefits of Using VCDS
- Comprehensive Diagnostics: VCDS provides access to a wide range of diagnostic information, allowing for accurate troubleshooting.
- Customization: It enables users to customize various vehicle settings to their liking.
- Cost Savings: By diagnosing and resolving issues independently, users can save on costly dealership visits.
- Community Support: Ross-Tech provides excellent support and documentation, and there is a large online community of VCDS users who can offer assistance.
2.4. VCDS Versions and Hardware
Ross-Tech offers various versions of VCDS, each with different capabilities and pricing. The most common hardware interface is the HEX-V2, which supports both older and newer vehicles. VCDS-Lite is a more basic version that works with older interface cables and is suitable for older vehicles. CARDIAGTECH.NET offers comprehensive support for all VCDS versions and can assist you in selecting the right tool for your needs.
3. Preparing for the Procedure
Before attempting to disable the brake pad wear sensor, it’s essential to prepare properly to ensure a smooth and successful process.
3.1. Essential Tools and Software
- VCDS Interface Cable: A genuine Ross-Tech VCDS interface cable is required to connect your computer to the vehicle.
- Laptop with VCDS Software: A Windows-based laptop with the VCDS software installed. Ensure the software is up to date.
- Vehicle Information: Have the vehicle’s VIN (Vehicle Identification Number) and current coding information on hand.
- Battery Charger: Connect a battery charger to the vehicle to maintain a stable voltage during the coding process.
- Backup Plan: Always have a backup plan in case something goes wrong. This includes noting down the original coding values and having a way to restore them if necessary.
3.2. Backing Up Existing Settings
Before making any changes, it’s crucial to back up the existing settings of the instrument cluster. This will allow you to revert to the original configuration if something goes wrong.
- Run a Full Scan: Use VCDS to run a full scan of the vehicle. This will save all fault codes and coding information for all modules.
- Save the Scan Log: Save the scan log to your computer for future reference.
- Note the Instrument Cluster Coding: Specifically, note the coding of the instrument cluster (Address 17). This is the coding that you will be modifying.
3.3. Understanding the Risks
Modifying vehicle settings with VCDS carries some risks. Incorrect coding can lead to malfunctions or errors. It’s essential to proceed with caution and double-check all information before making any changes.
- Potential for Errors: Incorrect coding can cause various issues, such as warning lights, system malfunctions, or even rendering the vehicle inoperable.
- Warranty Implications: Modifying vehicle settings may void the warranty on affected components.
- Software Compatibility: Ensure that the VCDS software is compatible with your vehicle and the modules you are modifying.
- Power Interruption: Avoid disconnecting the battery or turning off the ignition during the coding process, as this can corrupt the module’s software.
4. Step-by-Step Guide: Turning Off the Brake Pad Wear Sensor
Follow these detailed steps to disable the brake pad wear sensor using VCDS:
4.1. Connecting VCDS to Your Vehicle
- Turn on the Ignition: Turn the ignition key to the “ON” position without starting the engine.
- Connect the VCDS Cable: Plug the VCDS interface cable into the OBD-II port of your vehicle. The OBD-II port is typically located under the dashboard on the driver’s side.
- Connect to Laptop: Connect the other end of the VCDS cable to your laptop.
- Launch VCDS Software: Open the VCDS software on your laptop.
- Test the Connection: In the VCDS software, click on “Options” and then “Test” to verify that the software can communicate with the interface cable and your vehicle.
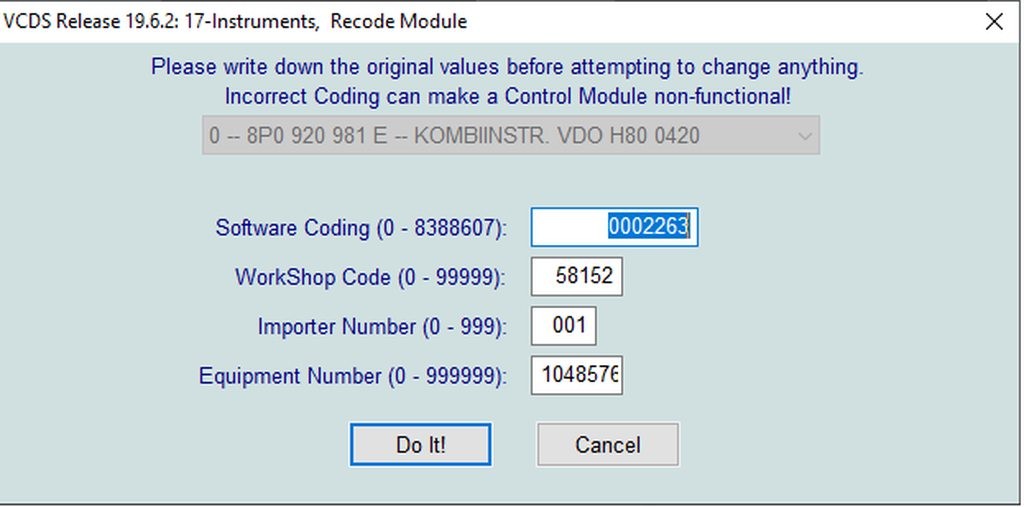
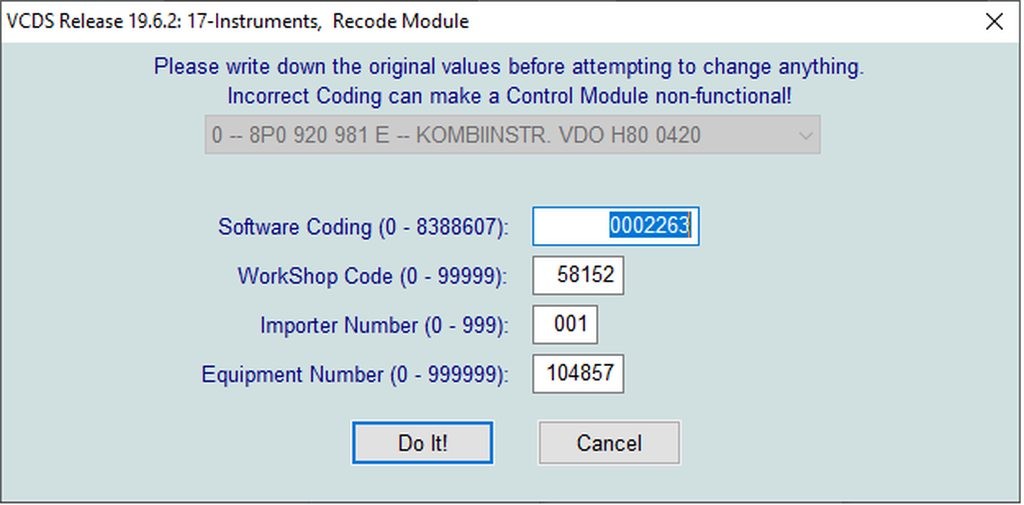
4.2. Accessing the Instrument Cluster Module (Address 17)
- Select Control Module: On the main screen of VCDS, click on “Select Control Module.”
- Enter Address 17: Enter “17” in the address field to access the Instrument Cluster module.
- Open Coding: Once the Instrument Cluster module is selected, click on “Coding – 07.”
4.3. Modifying the Coding
- Long Coding Helper: VCDS may offer a “Long Coding Helper” which provides a user-friendly interface for modifying the coding. If available, use this feature.
- Manual Coding: If the Long Coding Helper is not available, you will need to manually modify the coding.
- Identify the Relevant Digit: The digit responsible for the brake pad wear sensor warning varies depending on the vehicle model and year. Consult the Ross-Tech Wiki or other reliable sources to identify the correct digit.
- Modify the Coding: Once you have identified the correct digit, modify the coding to disable the brake pad wear sensor. This typically involves subtracting a specific value from the existing coding.
- Apply the Changes: After modifying the coding, click on “Do It!” to apply the changes.
4.4. Example Coding Modification
Here’s an example of how to modify the coding to disable the brake pad wear sensor on an Audi A3 8P:
- Original Coding: 0002263
- Digit to Modify: The 5th digit (2) is often associated with the brake pad wear sensor.
- Modified Coding: 0002163 (Subtract 1 from the 5th digit)
4.5. Saving the New Coding
- Verify Changes: After applying the changes, verify that the new coding has been saved correctly.
- Test the System: Start the engine and check if the brake pad warning light is off.
- Run a Scan: Perform another scan of the vehicle to check for any new fault codes.
4.6. Addressing Potential Issues
Sometimes, after modifying the coding, you may encounter unexpected issues, such as additional warning lights or system malfunctions. Here are some steps to address these issues:
- Double-Check Coding: Ensure that the new coding is correct and that you have not made any errors.
- Revert to Original Coding: If you encounter significant issues, revert to the original coding to restore the system to its previous state.
- Consult Documentation: Refer to the Ross-Tech Wiki or other reliable sources for troubleshooting information.
- Seek Expert Advice: If you are unable to resolve the issues on your own, seek assistance from a qualified automotive technician or VCDS expert. CARDIAGTECH.NET’s support team is available to provide guidance and assistance.
5. Troubleshooting Common Problems
Even with careful preparation and execution, you might encounter some common problems when disabling the brake pad wear sensor. Here’s how to troubleshoot them.
5.1. Warning Light Still On
If the brake pad warning light remains on after modifying the coding, consider the following:
- Incorrect Coding: Double-check that you have modified the correct digit and applied the correct value.
- Fault Code Not Cleared: Use VCDS to clear any stored fault codes related to the brake pad wear sensor.
- Wiring Issue: There may still be a wiring issue causing the warning light to illuminate. Inspect the sensor wiring for damage or corrosion.
- Sensor Still Connected: Ensure the old sensor is disconnected from the circuit. Sometimes, even with the coding changed, a connected but worn sensor can trigger the light.
5.2. Additional Warning Lights Appear
If additional warning lights appear after modifying the coding, it could indicate:
- Incorrect Coding: This is often due to an incorrect coding value. Revert to the original coding and try again.
- Module Communication Issues: Sometimes, changing coding can disrupt communication between modules. A full scan of the vehicle can help identify any communication errors.
- Low Battery Voltage: Low battery voltage during the coding process can cause errors. Ensure the battery is fully charged and stable during coding.
5.3. VCDS Not Connecting
If VCDS is not connecting to your vehicle, try the following:
- Check Cable Connection: Ensure the VCDS cable is securely connected to both the laptop and the OBD-II port.
- Verify Ignition: Make sure the ignition is turned on but the engine is off.
- Test Cable: Use the “Test” function in the VCDS options to verify that the cable is working correctly.
- Update Drivers: Ensure that the VCDS cable drivers are up to date on your laptop.
- Try Another Vehicle: If possible, try connecting VCDS to another compatible vehicle to rule out issues with the cable or software.
6. Alternatives to VCDS
While VCDS is a powerful tool, there are alternative diagnostic tools available that can also be used to disable the brake pad wear sensor.
6.1. OBDeleven
OBDeleven is a popular diagnostic tool that uses a Bluetooth dongle and a smartphone app. It offers many of the same features as VCDS, including fault code reading and clearing, adaptations, and coding.
6.1.1. Key Features
- User-Friendly Interface: OBDeleven features a user-friendly interface that is easy to navigate.
- One-Click Apps: It offers pre-programmed “One-Click Apps” that simplify common tasks, such as disabling the brake pad wear sensor.
- Coding and Adaptations: OBDeleven allows users to perform coding and adaptations to customize vehicle settings.
- Live Data Monitoring: It can monitor real-time data from various sensors and systems.
6.1.2. Pros and Cons
| Feature | Pros | Cons |
|---|---|---|
| Ease of Use | User-friendly interface, One-Click Apps | Requires a smartphone or tablet |
| Portability | Compact Bluetooth dongle | Limited functionality without credits |
| Cost | Lower initial cost compared to VCDS | Credits required for advanced functions, subscription model for Pro version |
| Compatibility | Wide range of VW, Audi, Skoda, and SEAT vehicles supported | May not support all older vehicles |
6.2. Autel Scanners
Autel offers a range of professional-grade diagnostic scanners that are capable of performing advanced functions, including disabling the brake pad wear sensor.
6.2.1. Key Features
- Comprehensive Diagnostics: Autel scanners provide comprehensive diagnostic coverage for a wide range of vehicle makes and models.
- Advanced Coding and Programming: They support advanced coding and programming functions, allowing for extensive customization.
- Bi-Directional Control: Autel scanners can perform bi-directional control, which allows users to activate specific components to verify their functionality.
- Wireless Updates: They offer wireless software updates to ensure the scanner is always up to date.
6.2.2. Pros and Cons
| Feature | Pros | Cons |
|---|---|---|
| Coverage | Wide range of vehicle makes and models | Higher cost compared to VCDS and OBDeleven |
| Functionality | Advanced coding, programming, and bi-directional control | Steeper learning curve for beginners |
| Updates | Wireless software updates | Subscription required for updates after the initial period |
| User Interface | Intuitive touchscreen interface | Can be bulky and less portable than smartphone-based tools |
6.3. Comparison Table
| Feature | VCDS | OBDeleven | Autel Scanners |
|---|---|---|---|
| Cost | Moderate | Low initial cost, but requires credits or a subscription for full access | High |
| Ease of Use | User-friendly, but requires a Windows laptop | Very user-friendly, smartphone-based | Professional-grade, may require training |
| Functionality | Comprehensive diagnostics, coding, and adaptations | Good diagnostics, coding, and adaptations with credits or subscription | Extensive diagnostics, coding, programming, and bi-directional control |
| Vehicle Coverage | Primarily VW, Audi, Skoda, and SEAT | Primarily VW, Audi, Skoda, and SEAT | Wide range of vehicle makes and models |
| Portability | Requires a laptop, less portable | Very portable, smartphone-based | Less portable, larger handheld device |
| Updates | Free software updates | Requires credits or a subscription for full access | Subscription required for updates after the initial period |
7. The Importance of Proper Diagnostics
Disabling the brake pad wear sensor should not be a substitute for proper diagnostics and maintenance. It’s crucial to ensure that the brake system is functioning correctly and that the brake pads are in good condition.
7.1. Regular Brake System Inspections
Regular brake system inspections are essential to ensure the safety and reliability of your vehicle. These inspections should include:
- Visual Inspection of Brake Pads: Check the thickness of the brake pads and look for signs of wear or damage.
- Inspection of Brake Rotors: Examine the brake rotors for cracks, warping, or excessive wear.
- проверка тормозных шлангов: Проверьте тормозные шланги на наличие утечек, трещин или повреждений.
- проверка тормозной жидкости: Проверьте уровень и состояние тормозной жидкости. Тормозную жидкость следует менять каждые два года или в соответствии с рекомендациями производителя.
7.2. Maintaining Brake System Components
Proper maintenance of brake system components is essential to ensure optimal performance and longevity. This includes:
- Replacing Worn Brake Pads: Replace brake pads when they reach the minimum recommended thickness.
- Resurfacing or Replacing Brake Rotors: Resurface or replace brake rotors if they are cracked, warped, or excessively worn.
- Flushing Brake Fluid: Flush the brake fluid every two years to remove contaminants and moisture.
- Lubricating Brake Components: Lubricate brake components, such as the caliper slides, to ensure smooth operation.
- Caliber Maintenance: Clean and inspect brake calipers regularly, ensuring they are not sticking or leaking.
7.3. Addressing Underlying Issues
If the brake pad warning light is illuminating due to a faulty sensor or wiring issue, it’s essential to address the underlying problem rather than simply disabling the sensor. Ignoring these issues can lead to more serious problems down the road.
- Repairing Damaged Wiring: Repair or replace any damaged wiring to ensure proper sensor function.
- Replacing Faulty Sensors: Replace faulty sensors to restore the system to its original functionality.
- Inspecting Connectors: Clean and inspect electrical connectors to ensure good contact and prevent corrosion.
8. Why Choose CARDIAGTECH.NET?
CARDIAGTECH.NET is your trusted partner for all automotive diagnostic tools and equipment. We offer a wide range of products, including VCDS, OBDeleven, Autel scanners, and more. Here’s why you should choose us:
8.1. Wide Selection of Diagnostic Tools
We offer a comprehensive selection of diagnostic tools to meet the needs of both professional technicians and DIY enthusiasts. Whether you need a basic code reader or a professional-grade scanner, we have you covered.
8.2. Expert Advice and Support
Our team of experienced technicians is available to provide expert advice and support to help you choose the right tools for your needs. We can answer your questions, provide technical assistance, and help you troubleshoot any issues you may encounter.
8.3. Competitive Pricing
We offer competitive pricing on all of our products, ensuring that you get the best value for your money. We also offer discounts and special promotions to help you save even more.
8.4. Fast Shipping
We understand that you need your tools quickly, so we offer fast shipping on all orders. We ship from our warehouse in the United States, so you can expect to receive your order within a few business days.
8.5. Customer Satisfaction Guarantee
We are committed to providing excellent customer service and ensuring your satisfaction. If you are not happy with your purchase for any reason, simply return it for a full refund.
9. Understanding Customer Needs
At CARDIAGTECH.NET, we understand the challenges faced by our customers and strive to provide solutions that meet their specific needs.
9.1. Addressing Customer Challenges
- Physical Demands: We offer ergonomic tools and equipment to reduce physical strain and improve comfort.
- Keeping Up with Technology: We provide training and resources to help technicians stay up-to-date with the latest automotive technologies.
- Time Constraints: Our diagnostic tools are designed to be efficient and easy to use, helping technicians save time and increase productivity.
- Competition: We offer competitive pricing and high-quality products to help garages and technicians stay ahead of the competition.
- Finding Quality Tools: We carefully select and test all of our products to ensure they meet our high standards for quality and durability.
9.2. Providing Needed Services
- Improving Efficiency: Our diagnostic tools can help technicians quickly and accurately diagnose and repair vehicles, improving efficiency and reducing downtime.
- Increasing Accuracy: Our tools provide precise and reliable data, helping technicians avoid costly mistakes and ensure accurate repairs.
- Cost Savings: By diagnosing and repairing vehicles independently, technicians can save on costly dealership visits and increase their profits.
- Enhancing Reputation: Providing high-quality service and accurate repairs can enhance a garage’s reputation and attract new customers.
10. Contact CARDIAGTECH.NET Today
Ready to optimize your automotive diagnostic capabilities? Contact CARDIAGTECH.NET today for expert advice, competitive pricing, and fast shipping on all your diagnostic tool needs.
10.1. How to Reach Us
- Address: 276 Reock St, City of Orange, NJ 07050, United States
- WhatsApp: +1 (641) 206-8880
- Website: CARDIAGTECH.NET
10.2. Request a Consultation
Contact us today to request a consultation with one of our experienced technicians. We can help you choose the right tools for your needs and provide expert advice on how to use them effectively.
10.3. Place Your Order
Visit our website or contact us directly to place your order. We offer fast shipping and excellent customer service to ensure your satisfaction.
FAQ: Turning Off Brake Pad Wear Sensor via VCDS
1. What is a brake pad wear sensor?
A brake pad wear sensor is an electronic component that alerts the driver when the brake pads are nearing the end of their service life.
2. Why would I want to turn off the brake pad wear sensor?
You might want to turn off the sensor if you’re using aftermarket brake pads without sensors, experiencing persistent false alarms, or prefer to monitor brake pad wear visually.
3. Is it safe to disable the brake pad wear sensor?
Disabling the sensor is generally safe as long as you regularly inspect your brake pads and ensure they are in good condition.
4. What is VCDS?
VCDS (Vag-Com Diagnostic System) is a software and hardware package used for diagnosing and modifying Volkswagen, Audi, Skoda, and SEAT vehicles.
5. Can I use other diagnostic tools besides VCDS to turn off the brake pad wear sensor?
Yes, alternative tools like OBDeleven and Autel scanners can also be used to disable the brake pad wear sensor.
6. What are the risks of modifying vehicle settings with VCDS?
Incorrect coding can lead to malfunctions or errors, potentially voiding your vehicle’s warranty.
7. How do I back up my vehicle’s settings before making changes with VCDS?
Run a full scan of the vehicle using VCDS and save the scan log to your computer. Note the coding of the instrument cluster (Address 17).
8. What do I do if I encounter issues after modifying the coding?
Double-check the coding, revert to the original coding if necessary, consult documentation, or seek expert advice.
9. What are some common problems when disabling the brake pad wear sensor?
Common problems include the warning light still being on, additional warning lights appearing, and VCDS not connecting to the vehicle.
10. Where can I get expert advice and support for using VCDS?
CARDIAGTECH.NET offers expert advice and support to help you choose the right tools and troubleshoot any issues you may encounter. Contact us via WhatsApp at +1 (641) 206-8880 or visit our website at CARDIAGTECH.NET.
By following this comprehensive guide and utilizing the right tools from CARDIAGTECH.NET, you can confidently disable the brake pad wear sensor and maintain the optimal performance of your vehicle.