
Printing From Autel Maxisys diagnostic scanners is a streamlined process designed to enhance your automotive repair workflow, providing tangible records of diagnostic results and reports. At CARDIAGTECH.NET, we understand the importance of efficient tools in your daily operations, so we’ve created this ultimate guide to teach you printing from your Autel MaxiSys, regardless of the model you own, be it the Autel Maxisys Ultra, Elite II auto scanner, or Autel MS906BT professional tool. Learn how to streamline report generation, optimize workshop efficiency, and harness advanced printing capabilities of your Autel device through PC link setup, wireless printing solutions, and troubleshooting tips, ensuring you can effectively document and share your findings with ease.
1. Understanding the Importance of Printing from Autel MaxiSys
As a professional in the automotive repair industry, you understand the critical role accurate diagnostics and comprehensive reporting play in your daily operations. Printing from your Autel MaxiSys diagnostic tool is more than just a convenience; it’s a cornerstone of efficient workflow, clear communication, and professional accountability. Here’s a deeper dive into why this capability is so vital:
-
Enhanced Workflow Efficiency:
- Immediate Documentation: Printing allows for immediate creation of physical records of diagnostic scans, fault codes, and repair procedures, reducing time spent on manual note-taking and data entry.
- Streamlined Report Generation: Easily generate detailed reports for clients, insurance companies, or internal records with just a few taps on your MaxiSys device.
-
Improved Communication:
- Clear Client Communication: Provide customers with easy-to-understand reports detailing the issues found and the repairs performed, fostering trust and transparency.
- Collaboration: Share printed diagnostic data with colleagues or specialists for expert consultation, ensuring accurate and effective repairs.
-
Accountability and Record-Keeping:
- Historical Data: Maintain a physical archive of vehicle diagnostics over time, allowing for better trend analysis and predictive maintenance.
- Liability Protection: Documenting diagnostic results and repair processes can serve as evidence of due diligence, protecting you from potential disputes or liability claims.
-
Professionalism and Credibility:
- Professional Image: Presenting clients with printed, professional-looking reports enhances your shop’s image and builds confidence in your services.
- Competitive Edge: Offering comprehensive printed diagnostics sets you apart from competitors and demonstrates a commitment to quality and thoroughness.
-
Key Benefits Recap:
| Benefit | Description | Impact on Business |
|---|---|---|
| Enhanced Workflow | Instant documentation of diagnostic results. Streamlines report creation for various stakeholders. | Reduces time spent on paperwork, increases technician efficiency, and speeds up service delivery. |
| Improved Communication | Simplifies the explanation of complex diagnostic information. Enables clear and concise communication with clients and peers. | Enhances client understanding and trust, promotes collaboration among technicians, and reduces misunderstandings. |
| Accountability | Creates a physical archive of diagnostic history. Provides evidence of diagnostics performed. | Protects against liability, supports accurate maintenance planning, and assists in identifying recurring issues. |
| Professional Presentation | Enhances shop appearance with professional-quality reports. Demonstrates a commitment to detail and accuracy. | Increases customer confidence, reinforces shop credibility, and attracts repeat business through professionalism. |
2. Essential Prerequisites Before Printing
Before you dive into printing from your Autel MaxiSys, it’s crucial to ensure you have all the necessary components and configurations in place. Proper preparation will save you time, prevent frustrating errors, and ensure a smooth printing process. Here’s a detailed checklist of prerequisites:
2.1 Hardware Requirements
- Autel MaxiSys Diagnostic Tool: This guide applies to various Autel MaxiSys models, including the Autel Maxisys Ultra, Elite II auto scanner, Autel MS906BT professional tool, and other similar devices.
- Printer:
- Compatibility: Ensure your printer is compatible with your computer’s operating system (Windows or macOS).
- Network Connectivity: The printer should be connected to the same network as your computer, either via Wi-Fi or Ethernet.
- Functionality: Verify the printer is in good working order, with sufficient paper and ink or toner.
- Computer: A computer (desktop or laptop) is required to install the necessary software for printing.
- Operating System: Windows 7, Windows 8, Windows 10, or macOS.
- Internet Access: A stable internet connection is needed to download the required software and drivers.
- USB Cable (Optional): For direct connection between the MaxiSys tool and the computer, a USB cable may be necessary.
2.2 Software Requirements
- Autel Maxi PC Suite:
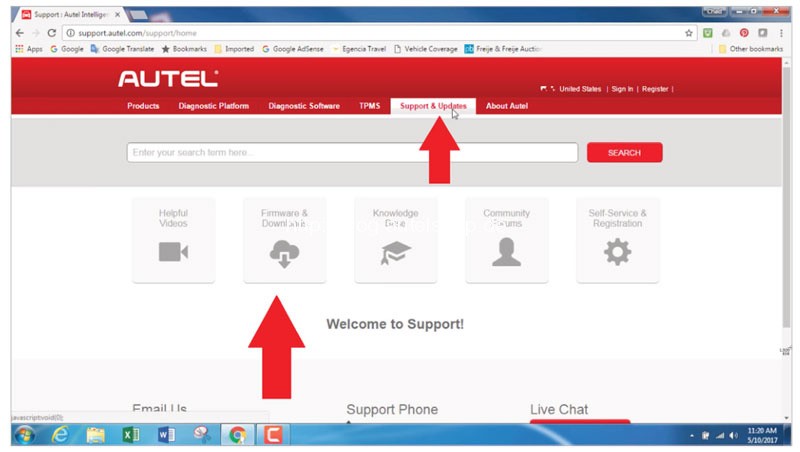
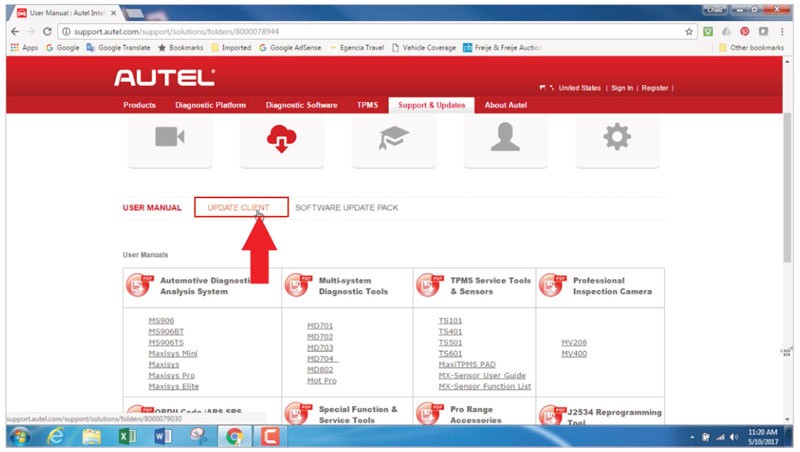
- Download: Download the latest version of Maxi PC Suite from the Autel website (www.autel.com). Navigate to “Support & Updates >> Firmware & Downloads >> Update Client >> Maxi PC Suite.”
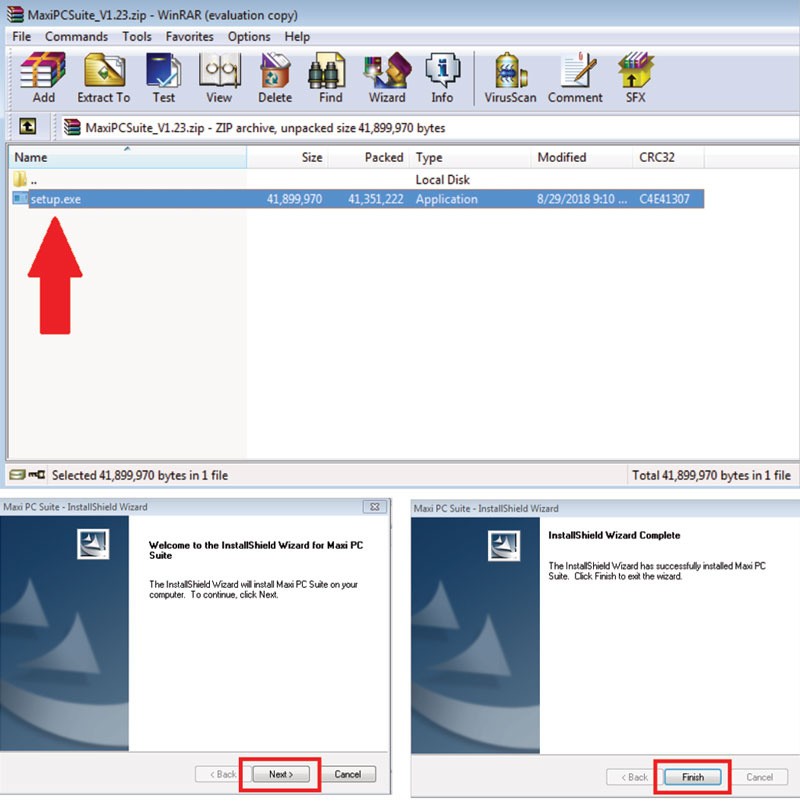
- Installation: Install the Maxi PC Suite on your computer following the on-screen instructions.
- Printer Driver:
- Installation: Ensure the correct driver for your printer is installed on your computer. This is usually available from the printer manufacturer’s website.
- Adobe Acrobat Reader:
- Latest Version: Verify that you have the latest version of Adobe Acrobat Reader installed. This is essential for viewing and printing PDF reports.
2.3 Network Configuration
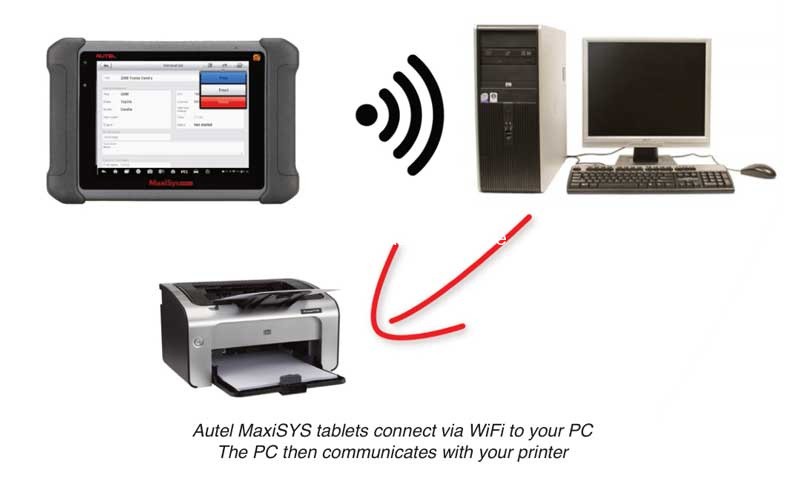
- Same Network: Make sure your Autel MaxiSys tablet, computer, and printer are all connected to the same Wi-Fi network.
- Stable Connection: A stable and reliable network connection is crucial for seamless printing.
2.4 Software Configuration
- Firewall and Antivirus:
- Allow Access: Configure your computer’s firewall and antivirus software to allow PC Link to pass through. This ensures that the software can communicate with the MaxiSys tool and printer.
- PC Link Settings:
- Auto Print: In PC Link, you can select “Auto Print” to automatically send print jobs to the default printer.
- Printer Selection: Verify that the correct printer is selected in the PC Link settings.
2.5 Detailed Checklist
| Step | Description | Action Required |
|---|---|---|
| Autel MaxiSys Tool | Verify the tool is functioning correctly and updated with the latest software. | Turn on the tool, check for software updates, and ensure it is connected to the network. |
| Printer Compatibility | Confirm that your printer is compatible with your computer’s OS and network. | Check printer specifications, ensure it supports network printing, and verify driver availability. |
| Computer OS and Internet Access | Ensure your computer meets the minimum OS requirements and has a stable internet connection. | Update your OS if necessary, troubleshoot network connectivity, and ensure stable internet access. |
| Autel Maxi PC Suite Download | Download the latest version of Maxi PC Suite from the Autel website. | Visit www.autel.com, navigate to the download section, and download the Maxi PC Suite. |
| Autel Maxi PC Suite Installation | Install the Maxi PC Suite on your computer. | Run the downloaded installer and follow the on-screen instructions to install the software. |
| Printer Driver Installation | Install the correct driver for your printer on your computer. | Visit the printer manufacturer’s website, download the appropriate driver, and install it on your computer. |
| Adobe Acrobat Reader Installation | Install the latest version of Adobe Acrobat Reader. | Visit the Adobe website, download the latest version of Acrobat Reader, and install it on your computer. |
| Network Connectivity Verification | Confirm that the Autel MaxiSys tool, computer, and printer are all connected to the same Wi-Fi network. | Check the Wi-Fi settings on each device and ensure they are connected to the same network. |
| Firewall and Antivirus Configuration | Configure your firewall and antivirus software to allow PC Link to pass through. | Add PC Link as an exception in your firewall and antivirus settings to ensure it can communicate with the MaxiSys tool and printer. |
| PC Link Settings Configuration | Select “Auto Print” in PC Link and verify that the correct printer is selected. | Open PC Link, navigate to settings, and configure the printing options according to your preferences. |
| USB Cable Availability (Optional) | Ensure a USB cable is available if you prefer a direct connection between the MaxiSys tool and the computer. | Keep a compatible USB cable handy in case you need to connect the MaxiSys tool directly to the computer. |
By taking the time to ensure these prerequisites are met, you’ll set yourself up for a hassle-free printing experience with your Autel MaxiSys diagnostic tool.
3. Step-by-Step Guide to Printing from Autel MaxiSys
Now that you’ve confirmed all the prerequisites, let’s walk through the process of printing from your Autel MaxiSys diagnostic tool. This step-by-step guide is designed to be clear and concise, ensuring you can quickly and easily print your diagnostic reports.
3.1 Connecting to Wi-Fi
- Access Settings: On your Autel MaxiSys tablet, navigate to the “Settings” menu.
- Select Wi-Fi: Choose the “Wi-Fi” option.
- Connect to Network: Select your Wi-Fi network from the list of available networks and enter the password if prompted.
- Verify Connection: Ensure that the tablet is successfully connected to the Wi-Fi network.
3.2 Downloading and Installing Maxi PC Suite
- Visit Autel Website: On your computer, go to www.autel.com.
- Navigate to Downloads: Select “Support & Updates >> Firmware & Downloads >> Update Client >> Maxi PC Suite.”
- Download Maxi PC Suite: Download the latest version of the Maxi PC Suite.
- Install the Suite: Run the downloaded installer and follow the on-screen instructions to install the software.
3.3 Configuring PC Link for Printing
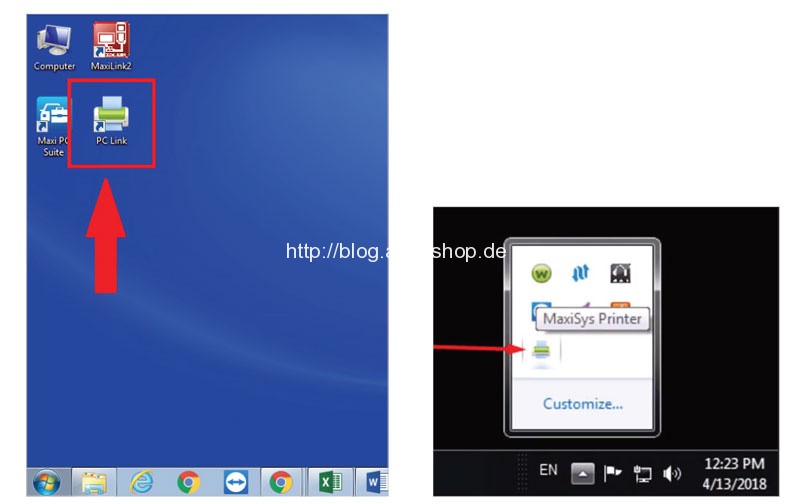
- Open PC Link: After installation, open the PC Link software on your computer.
- Locate Icon: An icon will appear in the system tray (usually at the bottom right of your screen).
- Configure Printing Options: Right-click the PC Link icon to access the settings.
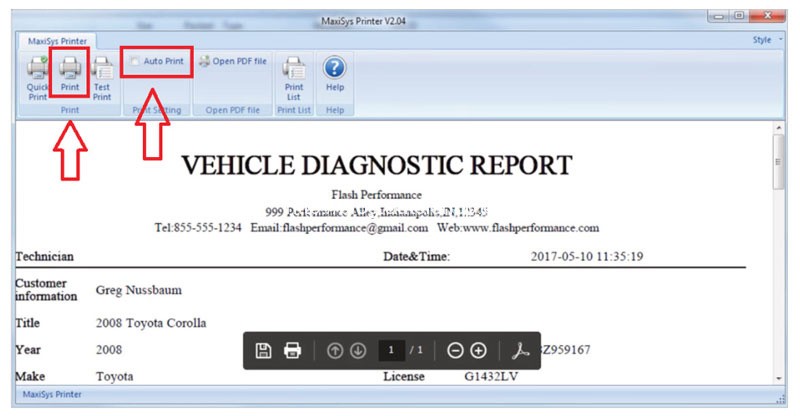
- Auto Print: Select “Auto Print” if you want print jobs to automatically go to your default printer.
- Print: Click “Print” to manually print a file directly from your computer.
3.4 Printing from the Autel MaxiSys Tablet
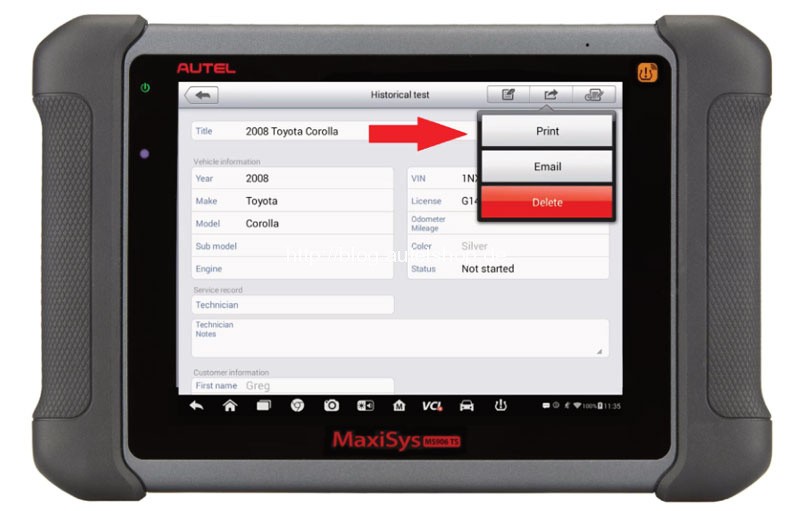
- Perform Diagnostic Scan: Use your Autel MaxiSys tablet to perform the necessary diagnostic scans and generate the report you want to print.
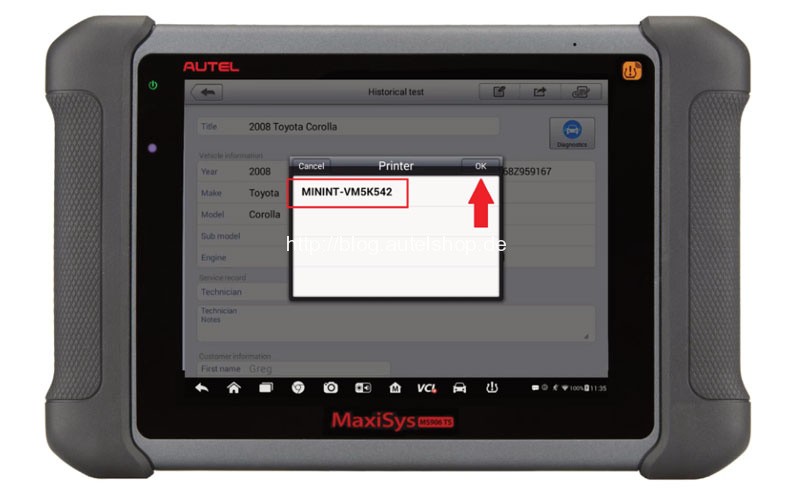
- Select Print Option: In the MaxiSys software, select the “Print” option.
- Confirm Printer: Choose “Print >> Confirm printer.”
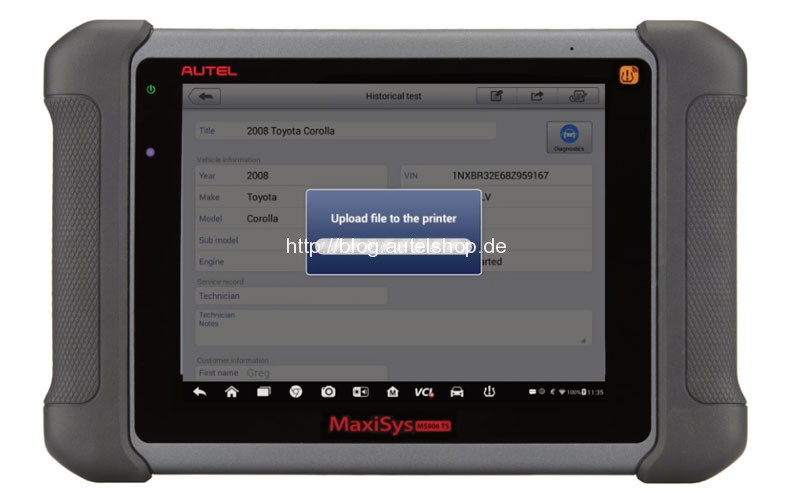
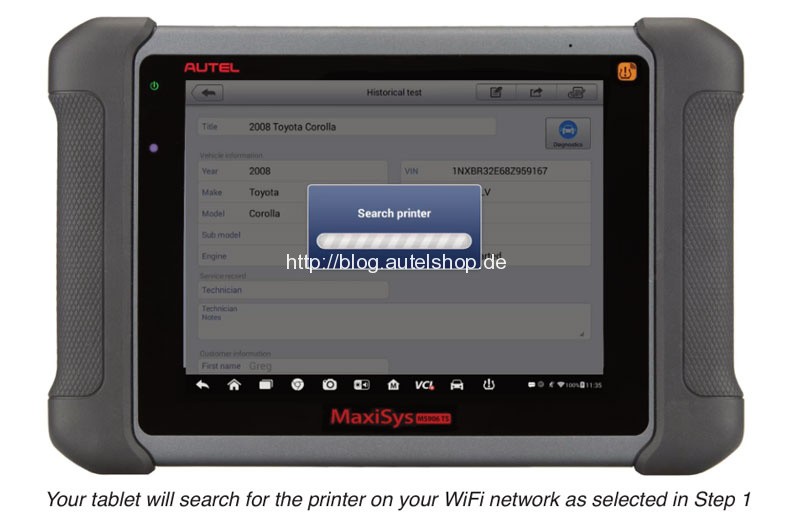
- Send to PC: Your MaxiSys tablet will send the file to your computer for printing.
- Print from PC: The PC Link software on your computer will receive the file and send it to your printer.
3.5 Printing via USB Connection (Alternative Method)
- Connect via USB: Connect your Autel MaxiSys tablet to your computer using a USB cable.
- Enable USB Storage: On the MaxiSys tablet, you may need to enable USB storage or file transfer mode.
- Locate Report: Find the diagnostic report file on your MaxiSys tablet.
- Copy to Computer: Copy the report file to your computer.
- Print from Computer: Open the report file on your computer (usually a PDF file) and print it using Adobe Acrobat Reader or another PDF viewer.
3.6 Quick Steps Recap
| Step | Action | Details |
|---|---|---|
| Connect to Wi-Fi | Ensure MaxiSys tablet is connected to the same Wi-Fi network as your computer. | Go to Settings > Wi-Fi, select your network, and enter the password. Verify the connection is successful. |
| Download Maxi PC Suite | Download the latest version of Maxi PC Suite from the Autel website. | Visit www.autel.com, navigate to Support & Updates > Firmware & Downloads > Update Client > Maxi PC Suite, and download the software. |
| Install Maxi PC Suite | Install the Maxi PC Suite on your computer. | Run the downloaded installer and follow the on-screen instructions to install the software. |
| Configure PC Link | Open PC Link and configure printing options. | Open PC Link, locate the icon in the system tray, right-click to access settings, and select “Auto Print” or configure printer settings. |
| Print from MaxiSys Tablet | Select “Print” on the MaxiSys tablet. | Perform a diagnostic scan, generate a report, select “Print” in the MaxiSys software, choose “Print >> Confirm printer,” and wait for the file to be sent to your computer for printing. |
| Print via USB (Optional) | Connect the MaxiSys tablet to your computer via USB and transfer the report. | Connect the MaxiSys tablet to your computer using a USB cable, enable USB storage, locate the report file, copy it to your computer, and print it using Adobe Acrobat Reader or another PDF viewer. |
By following these steps, you can effectively print diagnostic reports from your Autel MaxiSys tool, enhancing your workflow and providing professional documentation to your clients.
4. Troubleshooting Common Printing Issues
Even with careful setup, you might encounter issues when printing from your Autel MaxiSys. Here are common problems and their solutions:
4.1 “Upload Failed” or “Cannot Find Printer” Error
This error usually occurs when the MaxiSys tablet cannot communicate with the PC Link software on your computer. Here’s how to troubleshoot:
4.1.1 Ensure Network Connectivity
- Verify Wi-Fi Connection: Make sure both the MaxiSys tablet and your computer are connected to the same Wi-Fi network.
- Check IP Addresses: Confirm that both devices have valid IP addresses and can communicate with each other.
4.1.2 Firewall and Antivirus Settings
- Allow PC Link: Ensure that your computer’s firewall and antivirus software are not blocking PC Link. Add PC Link as an exception in both programs.
- Disable Temporarily: As a test, temporarily disable your firewall and antivirus software to see if this resolves the issue. If it does, you’ll need to adjust the settings to allow PC Link.
4.1.3 Virtual Networks
-
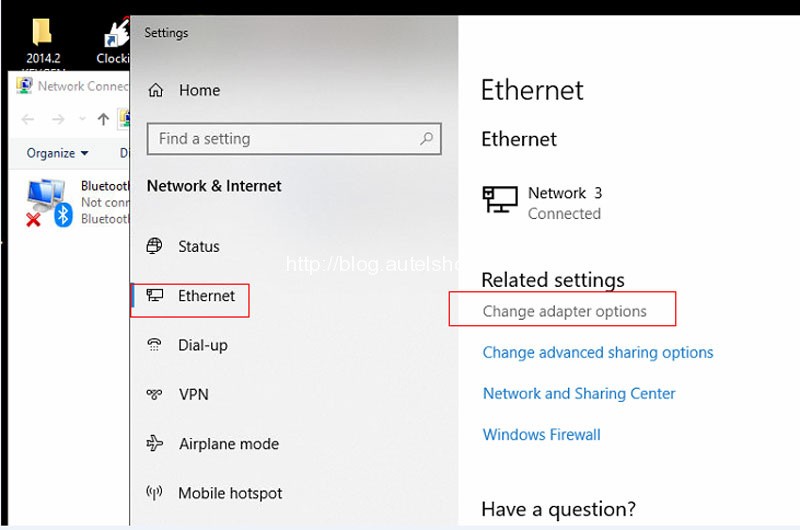
Disable Virtual Networks: Virtual network adapters can sometimes interfere with the printing process. Disable any virtual network adapters on your computer.
- Windows 7: Go to “Control Panel >> Network and Sharing Center >> Change adapter settings.” Right-click and disable any virtual networks.
- Windows 10: Go to “Ethernet >> Change adapter options.” Disable any virtual networks.
-
Restart PC Link: After disabling virtual networks, restart the PC Link software.
4.1.4 Restart Devices
- Restart Computer and MaxiSys Tablet: Sometimes, a simple restart can resolve communication issues. Restart both your computer and the MaxiSys tablet.
4.1.5 Reinstall PC Link
- Uninstall PC Link: Uninstall the PC Link software from your computer.
- Download Latest Version: Download the latest version of PC Link from the Autel website.
- Reinstall PC Link: Reinstall the software following the on-screen instructions.
4.2 Printer Not Listed or Recognized
If your printer is not listed in the PC Link settings or is not recognized by your computer, try these steps:
4.2.1 Verify Printer Connection
- Check Cables: Ensure that the printer is properly connected to your computer via USB or Ethernet.
- Wi-Fi Connection: If using Wi-Fi, make sure the printer is connected to the same network as your computer.
4.2.2 Install Printer Driver
- Download Driver: Download the latest printer driver from the printer manufacturer’s website.
- Install Driver: Install the driver on your computer.
4.2.3 Restart Printer
- Power Cycle: Turn off the printer, wait a few seconds, and then turn it back on.
4.2.4 Set as Default Printer
- Set as Default: In your computer’s settings, set the printer as the default printer.
4.3 Print Quality Issues
If the print quality is poor (e.g., blurry, faded, or missing colors), consider the following:
4.3.1 Check Ink/Toner Levels
- Low Levels: Ensure that the ink or toner levels are sufficient. Replace cartridges if necessary.
4.3.2 Clean Print Heads
- Run Cleaning Cycle: Use the printer’s built-in cleaning function to clean the print heads.
4.3.3 Adjust Print Settings
- Quality Settings: In the print dialog box, adjust the print quality settings to a higher resolution.
- Paper Type: Make sure the paper type setting matches the type of paper you are using.
4.4 General Troubleshooting Tips
- Check Cables: Ensure all cables are securely connected.
- Update Software: Keep your Autel MaxiSys software and PC Link up to date.
- Consult Autel Support: If you’ve tried all the above steps and are still experiencing issues, contact Autel support for assistance.
4.5 Troubleshooting Summary Table
| Issue | Possible Causes | Solutions |
|---|---|---|
| “Upload Failed” or “Cannot Find Printer” | Network connectivity issues, Firewall/Antivirus blocking PC Link, Virtual networks | Verify Wi-Fi connection, Allow PC Link in Firewall/Antivirus settings, Disable virtual networks, Restart devices, Reinstall PC Link |
| Printer Not Listed or Recognized | Printer not connected, Missing printer driver | Verify printer connection, Install printer driver, Restart printer, Set as default printer |
| Print Quality Issues | Low ink/toner levels, Dirty print heads, Incorrect print settings | Check ink/toner levels, Clean print heads, Adjust print settings (resolution, paper type) |
By systematically addressing these potential issues, you can minimize downtime and ensure a smooth and efficient printing experience with your Autel MaxiSys diagnostic tool.
5. Optimizing Your Printing for Maximum Efficiency
Beyond the basic setup and troubleshooting, there are several ways to optimize your printing process with the Autel MaxiSys for maximum efficiency. By implementing these strategies, you can save time, reduce waste, and enhance the overall professionalism of your diagnostic reporting.
5.1 Customize Print Settings
- Default Printer Settings:
- Access Settings: Access your computer’s printer settings through the Control Panel (Windows) or System Preferences (macOS).
- Adjust Defaults: Customize default settings such as paper size, orientation, print quality, and color options to suit your most common printing needs.
- PC Link Preferences:
- Auto Print: Enable “Auto Print” in PC Link for quick, one-click printing of diagnostic reports.
- Printer Selection: Ensure the correct printer is selected as the default printer in PC Link to avoid printing to the wrong device.
5.2 Create Report Templates
- Standardize Report Format:
- Consistent Layout: Develop a standardized layout for your diagnostic reports, including your shop’s logo, contact information, and key diagnostic data sections.
- Custom Headers/Footers: Add custom headers and footers to each page with relevant information such as the vehicle’s VIN, date, and technician’s name.
- Save as Templates:
- Use PDF Editor: Use a PDF editor (e.g., Adobe Acrobat) to create and save your report templates.
- Quick Access: Store templates in an easily accessible folder on your computer for quick access when generating reports.
5.3 Optimize Wi-Fi Connectivity
- Stable Connection:
- Minimize Interference: Ensure your Wi-Fi router is positioned in a location with minimal interference from other electronic devices or physical obstructions.
- Strong Signal: Use a Wi-Fi analyzer app on your smartphone or tablet to check the signal strength in your shop and identify areas where the signal may be weak.
- Network Configuration:
- Dedicated Network: Consider setting up a dedicated Wi-Fi network for your diagnostic tools and printers to minimize network congestion.
- Update Firmware: Keep your Wi-Fi router’s firmware up to date to ensure optimal performance and security.
5.4 Implement a Paperless Option
- Digital Reports:
- Save as PDF: Save diagnostic reports as PDF files instead of printing them.
- Electronic Delivery: Email reports to clients or store them in a cloud-based storage solution (e.g., Google Drive, Dropbox) for easy access.
- Tablet Viewing:
- Client Review: Allow clients to review diagnostic reports directly on your Autel MaxiSys tablet.
- Digital Signature: Use a stylus to capture digital signatures on the tablet, eliminating the need for paper-based forms.
5.5 Utilize Cloud Printing
- Google Cloud Print:
- Setup: Set up Google Cloud Print to enable printing from your Autel MaxiSys tablet to any printer connected to your Google account.
- Remote Printing: Print reports from anywhere with an internet connection, ideal for multi-location shops or technicians working remotely.
5.6 Streamline Printing Process at CARDIAGTECH.NET
- Tailored Solutions:
- Expert Advice: At CARDIAGTECH.NET, we understand the unique challenges faced by automotive repair professionals. Contact us for expert advice on optimizing your printing setup with Autel MaxiSys tools.
- Customized Configurations: Our team can assist you in configuring your printing settings and creating report templates tailored to your specific needs.
- Premium Products:
- High-Quality Printers: We offer a range of high-quality printers that are fully compatible with Autel MaxiSys diagnostic tools.
- Reliable Support: Benefit from our reliable technical support to ensure seamless integration and optimal performance.
5.7 Summary Table for Optimization Strategies
| Strategy | Description | Benefits |
|---|---|---|
| Customize Print Settings | Adjust default printer settings and PC Link preferences for common printing tasks. | Saves time, reduces errors, and ensures consistent print quality. |
| Create Report Templates | Develop standardized report layouts with shop branding and key diagnostic data sections. | Enhances professionalism, improves report readability, and streamlines report generation. |
| Optimize Wi-Fi Connectivity | Ensure a stable and strong Wi-Fi signal for reliable wireless printing. | Reduces printing delays, minimizes connectivity issues, and improves overall workflow efficiency. |
| Implement a Paperless Option | Save diagnostic reports as PDF files and deliver them electronically or allow clients to review them on a tablet. | Reduces paper consumption, saves printing costs, and provides clients with convenient access to their reports. |
| Utilize Cloud Printing | Set up Google Cloud Print for remote printing from your Autel MaxiSys tablet. | Enables printing from anywhere with an internet connection, ideal for multi-location shops or technicians working remotely. |
By implementing these optimization strategies, you can significantly improve the efficiency and professionalism of your printing process with the Autel MaxiSys.
6. Choosing the Right Printer for Your Autel MaxiSys
Selecting the right printer is crucial for ensuring seamless compatibility, optimal performance, and high-quality results when printing from your Autel MaxiSys diagnostic tool. Here’s a comprehensive guide to help you make the best choice based on your specific needs and requirements.
6.1 Key Considerations
- Compatibility:
- Driver Support: Ensure the printer has up-to-date drivers compatible with your computer’s operating system (Windows or macOS).
- PC Link Integration: Verify the printer works seamlessly with the Autel PC Link software for direct printing from your MaxiSys tablet.
- Print Quality:
- Resolution: Look for a printer with a high resolution (at least 600 dpi) for sharp, clear text and images.
- Color Accuracy: If you need to print color-coded diagnostic data, choose a printer with excellent color accuracy.
- Printing Speed:
- Pages Per Minute (PPM): Consider the printer’s PPM rating, especially if you frequently print large diagnostic reports.
- First Page Out Time (FPOT): Look for a printer with a fast FPOT for quick printing of single-page reports.
- Connectivity:
- Wi-Fi: Choose a printer with Wi-Fi connectivity for wireless printing from your Autel MaxiSys tablet.
- Ethernet: Consider a printer with Ethernet connectivity for a stable, wired network connection.
- USB: Ensure the printer has a USB port for direct connection to your computer.
- Paper Handling:
- Paper Size: Verify the printer supports the paper sizes you need (e.g., Letter, Legal, A4).
- Paper Tray Capacity: Consider the paper tray capacity for high-volume printing.
- Duplex Printing: Choose a printer with automatic duplex printing for printing on both sides of the paper.
- Cost:
- Initial Cost: Compare the initial purchase price of different printers.
- Running Costs: Consider the cost of ink or toner cartridges, paper, and maintenance.
- Reliability and Durability:
- Brand Reputation: Choose a printer from a reputable brand known for reliability and durability.
- Warranty: Look for a printer with a good warranty to protect against defects and malfunctions.
6.2 Recommended Printer Types
- Laser Printers:
- Pros: Fast printing speeds, high print quality, low running costs, durable.
- Cons: Higher initial cost, can be bulky.
- Best For: High-volume printing of text-based diagnostic reports.
- Inkjet Printers:
- Pros: Lower initial cost, excellent color accuracy, compact size.
- Cons: Slower printing speeds, higher running costs, less durable.
- Best For: Printing color-coded diagnostic data and images.
- All-in-One Printers:
- Pros: Multifunctionality (printing, scanning, copying, faxing), convenient.
- Cons: Can be more expensive, may not excel in any single function.
- Best For: Shops that need a versatile printer for various tasks.
6.3 Top Printer Models for Autel MaxiSys
| Printer Model | Type | Key Features | Pros | Cons |
|---|---|---|---|---|
| HP LaserJet Pro M404dw | Laser | Fast printing, duplex printing, Wi-Fi connectivity, mobile printing | High print quality, fast printing speeds, reliable, easy to use | No color printing |
| Brother HL-L2395DW | Laser | Compact, duplex printing, wireless connectivity, mobile printing | Affordable, space-saving, good print quality | No color printing |
| Canon PIXMA G6020 | Inkjet | High-yield ink tanks, wireless connectivity, mobile printing, duplex printing | Excellent color accuracy, low running costs, reliable | Slower printing speeds |
| Epson EcoTank ET-4760 | Inkjet | High-yield ink tanks, wireless connectivity, mobile printing, duplex printing, all-in-one functionality | Very low running costs, excellent print quality, versatile | Higher initial cost |
| Brother MFC-J805DW | Inkjet | All-in-one functionality, wireless connectivity, mobile printing, duplex printing, INKvestment Tank cartridges | Affordable, good print quality, convenient features | Moderate running costs |
6.4 Factors to Consider Based on Shop Size
- Small Shops:
- Printer Needs: A compact, affordable printer with good print quality is sufficient.
- Recommended Models: Brother HL-L2395DW, Canon PIXMA G6020
- Medium Shops:
- Printer Needs: A reliable printer with fast printing speeds and duplex printing is ideal.
- Recommended Models: HP LaserJet Pro M404dw, Epson EcoTank ET-4760
- Large Shops:
- Printer Needs: A high-volume printer with low running costs and all-in-one functionality is essential.
- Recommended Models: HP LaserJet Pro M404dw, Epson EcoTank ET-4760
6.5 Purchasing from CARDIAGTECH.NET
- Expert Guidance:
- Personalized Recommendations: At CARDIAGTECH.NET, our experts can provide personalized recommendations based on your specific needs and budget.
- Compatibility Assurance: We ensure that all printers we offer are fully compatible with Autel MaxiSys diagnostic tools.
- Premium Products:
- High-Quality Selection: We offer a curated selection of high-quality printers from top brands.
- Competitive Pricing: Benefit from competitive pricing and special offers on our printer selection.
- Reliable Support:
- Technical Assistance: Receive reliable technical support and assistance with setup and troubleshooting.
- Customer Satisfaction: We are committed to ensuring your complete satisfaction with your purchase.
By carefully considering these factors and choosing the right printer, you can optimize your printing process with the Autel MaxiSys and enhance the efficiency and professionalism of your automotive repair shop.
7. Integrating Printing with Your Workflow at CARDIAGTECH.NET
At CARDIAGTECH.NET, we understand that simply having the right tools isn’t enough; it’s how you integrate them into your existing workflow that truly matters. Here’s how to seamlessly integrate printing from your Autel MaxiSys into your automotive repair shop’s workflow, enhancing efficiency, accuracy, and customer satisfaction.
7.1 Streamlining the Diagnostic Process
- Pre-Scan Printing:
- Initial Vehicle Scan: Before starting any repair work, perform a comprehensive vehicle scan using your Autel MaxiSys.
- Print Initial Report: Print the initial diagnostic report to document the vehicle’s condition upon arrival. This serves as a baseline for comparison after repairs.
- During-Repair Printing:
- Interim Scans: Perform interim scans during the repair process to monitor progress and identify any new issues that may arise.
- Document Changes: Print reports after each scan to document changes and ensure all problems are addressed.
- Post-Repair Printing:
- Final Scan: After completing the repairs, perform a final vehicle scan to verify that all issues have been resolved.
- Print Final Report: Print the final diagnostic report and compare it to the initial report to demonstrate the effectiveness of the repairs.
7.2 Enhancing Customer Communication
- Clear and Concise Reports:
- Easy-to-Understand Language: Use clear, concise language in your diagnostic reports, avoiding technical jargon whenever possible.
- Highlight Key Findings: Highlight key findings, such as fault codes, symptoms, and recommended repairs.
- Visual Aids:
- Screenshots: Include screenshots from your Autel MaxiSys to illustrate specific issues or data points.
- Diagrams: Add diagrams or illustrations to help customers understand complex repairs.
- Personalized Recommendations:
- Tailored Advice: Provide personalized recommendations based on the customer’s specific needs and budget.
- Explain Options: Clearly explain the different repair options available and their potential benefits and drawbacks.
- Delivery Methods:
- Printed Reports: Provide customers with printed copies of their diagnostic reports.
- Digital Reports: Offer digital