
P2015 Vcds is your key to resolving intake manifold flap position sensor issues in your Volkswagen or Audi. This article from CARDIAGTECH.NET dives deep into understanding, diagnosing, and fixing the dreaded P2015 error code using VCDS (VAG-COM Diagnostic System). Learn how to troubleshoot this common problem, save money on costly repairs, and restore your car’s performance. We’ll explore intake manifold adjustment, throttle body adaptation, and VCDS diagnostics for optimal engine function.
1. Understanding the P2015 Error Code
The P2015 error code, officially defined as “Intake Manifold Flap Position Sensor/Switch Range/Performance,” indicates a problem with the intake manifold flap system. This system is crucial for optimizing engine performance, fuel economy, and emissions. Let’s break down what this means for your Volkswagen or Audi.
1.1 What Does P2015 Mean?
The P2015 code signals that the Engine Control Unit (ECU) has detected an issue with the intake manifold flap position sensor. The sensor reports the position of the intake manifold flaps, which adjust the airflow into the engine. When the sensor readings are outside the expected range, or the system isn’t performing as expected, the P2015 code is triggered. This can lead to a check engine light and potential performance problems.
1.2 Symptoms of a P2015 Error
Recognizing the symptoms of a P2015 error is the first step in diagnosing the problem. Common signs include:
- Check Engine Light: The most obvious indicator.
- Loss of Power: Especially noticeable at lower RPMs.
- Poor Fuel Economy: The engine may not be running efficiently.
- Rough Idle: The engine may vibrate or stall at idle.
- Hesitation During Acceleration: The car may feel sluggish when accelerating.
1.3 Causes of the P2015 Code
Several factors can trigger the P2015 code. Understanding these potential causes can help you pinpoint the problem more quickly.
- Faulty Intake Manifold Flap Actuator: This actuator controls the movement of the flaps.
- Defective Intake Manifold Flap Position Sensor: The sensor may provide inaccurate readings.
- Carbon Buildup: Accumulation of carbon deposits can restrict flap movement.
- Vacuum Leaks: Leaks in the vacuum lines can disrupt the system’s operation.
- Wiring Issues: Damaged or corroded wiring to the sensor or actuator.
- ECU Problems: In rare cases, a faulty ECU can trigger the code.
2. VCDS and the P2015 Code
VCDS (VAG-COM Diagnostic System) is a powerful tool for diagnosing and troubleshooting issues in Volkswagen and Audi vehicles. It allows you to read fault codes, monitor sensor data, and perform adaptations, making it invaluable for tackling the P2015 error.
2.1 What is VCDS?
VCDS is a Windows-based diagnostic software package developed by Ross-Tech. It works with a special interface cable to communicate with the vehicle’s ECU, providing detailed information about the car’s systems and allowing you to perform various diagnostic and repair functions.
2.2 How VCDS Helps Diagnose P2015
VCDS can help you diagnose the P2015 code in several ways:
- Reading Fault Codes: VCDS can read and clear diagnostic trouble codes (DTCs), including P2015.
- Monitoring Sensor Data: You can monitor the intake manifold flap position sensor readings in real-time to see if they are within the specified range.
- Performing Output Tests: VCDS allows you to activate the intake manifold flap actuator to see if it is functioning correctly.
- Running Adaptations: After replacing components, VCDS can be used to perform adaptations to ensure the system is properly calibrated.
2.3 Connecting VCDS to Your Vehicle
To use VCDS, you’ll need a compatible interface cable and a Windows laptop. Here’s how to connect:
- Install the VCDS software on your laptop from Ross-Tech.
- Connect the VCDS interface cable to your laptop’s USB port.
- Locate the OBD-II port in your vehicle (usually under the dashboard).
- Connect the other end of the VCDS cable to the OBD-II port.
- Turn on your vehicle’s ignition (but don’t start the engine).
- Launch the VCDS software on your laptop.
- Test the connection to ensure VCDS can communicate with your vehicle’s ECU.
3. Step-by-Step Guide to Diagnosing P2015 with VCDS
Follow these steps to diagnose the P2015 error code using VCDS:
3.1 Reading the Fault Code
- Connect VCDS to your vehicle as described above.
- Select “Select Control Module” on the main screen.
- Choose “01-Engine” to access the engine control module.
- Click “Fault Codes – 02” to read any stored fault codes.
- Note the P2015 code and any other related codes.
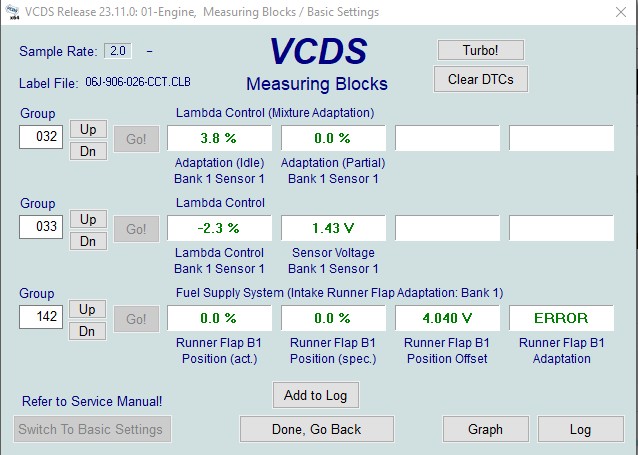
3.2 Checking Sensor Data
- From the Engine Control Module screen, select “Measuring Blocks – 08.”
- Enter the appropriate measuring block number for the intake manifold flap position sensor (refer to your vehicle’s repair manual or Ross-Tech Wiki for the correct block number).
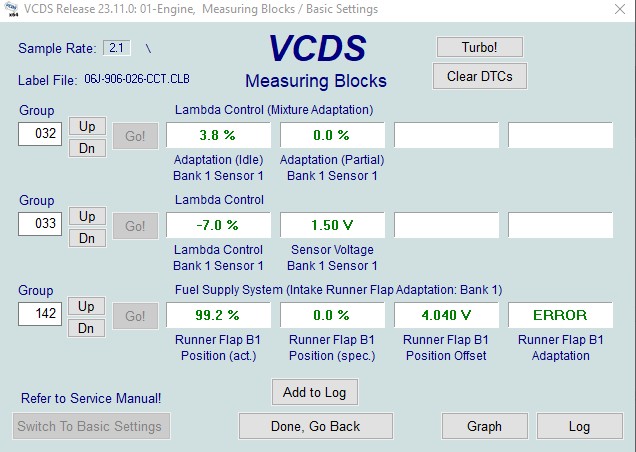
- Monitor the sensor readings while the engine is running.
- Compare the readings to the specified range. If the readings are consistently out of range, it indicates a problem with the sensor or actuator.
3.3 Performing Output Tests
- From the Engine Control Module screen, select “Output Tests – 03.”
- Choose the output test for the intake manifold flap actuator.
- Follow the on-screen instructions to activate the actuator.
- Listen for the actuator to move. If it doesn’t move or sounds abnormal, it may be faulty.
3.4 Interpreting the Results
Based on the VCDS data, you can narrow down the cause of the P2015 error:
- If the sensor readings are out of range, replace the intake manifold flap position sensor.
- If the actuator doesn’t move during the output test, replace the intake manifold flap actuator.
- If the sensor and actuator appear to be functioning correctly, check for vacuum leaks, carbon buildup, or wiring issues.
4. Repairing the P2015 Error
Once you’ve diagnosed the cause of the P2015 error, you can proceed with the necessary repairs. Here are some common solutions:
4.1 Replacing the Intake Manifold Flap Actuator
- Disconnect the vacuum lines and electrical connector from the actuator.
- Remove the old actuator from the intake manifold.
- Install the new actuator, ensuring it is properly seated.
- Reconnect the vacuum lines and electrical connector.
4.2 Replacing the Intake Manifold Flap Position Sensor
- Disconnect the electrical connector from the sensor.
- Remove the old sensor from the intake manifold.
- Install the new sensor, ensuring it is properly tightened.
- Reconnect the electrical connector.
4.3 Cleaning Carbon Buildup
- Remove the intake manifold from the engine.
- Inspect the intake ports and flaps for carbon buildup.
- Use a carbon cleaner and a brush to remove the deposits.
- Reinstall the intake manifold.
4.4 Addressing Vacuum Leaks
- Inspect all vacuum lines connected to the intake manifold and actuator.
- Look for cracks, breaks, or loose connections.
- Replace any damaged vacuum lines.
- Ensure all connections are secure.
4.5 Checking and Repairing Wiring
- Inspect the wiring to the sensor and actuator for damage.
- Look for frayed wires, corroded connectors, or loose connections.
- Repair or replace any damaged wiring.
- Ensure all connections are secure.
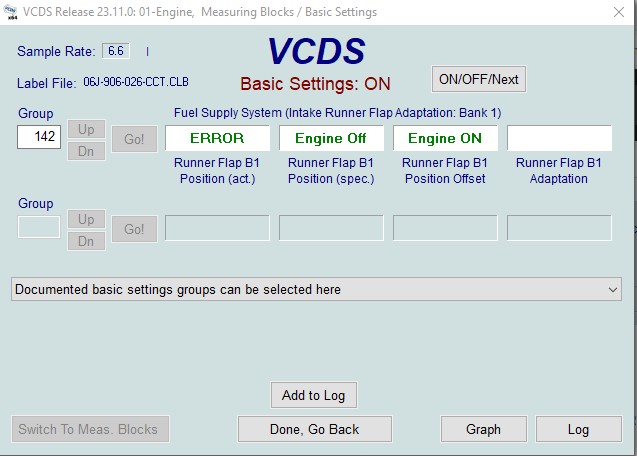
5. Performing Adaptation with VCDS
After replacing components or cleaning carbon buildup, it’s essential to perform an adaptation with VCDS to ensure the system is properly calibrated. Here’s how:
5.1 Why Adaptation is Necessary
Adaptation allows the ECU to learn the new parameters of the intake manifold flap system. This ensures that the flaps are operating correctly and that the engine is running efficiently. Without adaptation, the P2015 error may persist, or the engine may not perform optimally.
5.2 Step-by-Step Adaptation Process
- Connect VCDS to your vehicle.
- Select “Select Control Module” on the main screen.
- Choose “01-Engine” to access the engine control module.
- Click “Adaptation – 10.”
- Enter the appropriate adaptation channel number for the intake manifold flaps (refer to your vehicle’s repair manual or Ross-Tech Wiki for the correct channel number).
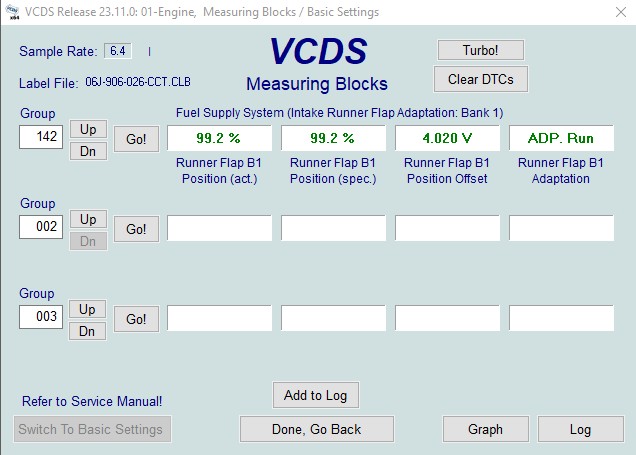
- Follow the on-screen instructions to perform the adaptation.
- Once the adaptation is complete, clear any fault codes and test drive the vehicle.
6. Advanced Troubleshooting Tips
If you’ve tried the above steps and are still experiencing the P2015 error, here are some advanced troubleshooting tips:
6.1 Checking the Throttle Body
A dirty or malfunctioning throttle body can also cause issues with the intake manifold flap system. Clean the throttle body and perform a throttle body adaptation using VCDS.
6.2 Inspecting the PCV Valve
A faulty PCV (Positive Crankcase Ventilation) valve can cause vacuum leaks and affect the performance of the intake manifold flap system. Inspect the PCV valve and replace it if necessary.
6.3 Verifying the EGR Valve
The EGR (Exhaust Gas Recirculation) valve can also contribute to carbon buildup in the intake manifold. Check the EGR valve and clean or replace it if needed.
6.4 Using a Smoke Tester
A smoke tester can help you find vacuum leaks that are difficult to detect visually. Connect the smoke tester to the intake system and look for smoke escaping from any leaks.
7. Preventing Future P2015 Errors
Preventing future P2015 errors involves regular maintenance and addressing potential issues before they escalate. Here are some tips:
7.1 Regular Maintenance
Follow your vehicle’s recommended maintenance schedule, including regular oil changes, air filter replacements, and spark plug replacements.
7.2 Cleaning the Intake Manifold
Periodically clean the intake manifold to prevent carbon buildup. This can be done as part of a regular maintenance routine.
7.3 Checking Vacuum Lines
Regularly inspect vacuum lines for cracks, breaks, or loose connections. Replace any damaged lines promptly.
7.4 Using Quality Fuel
Use high-quality fuel to minimize carbon buildup and ensure optimal engine performance.
8. Benefits of Using CARDIAGTECH.NET Tools
When it comes to diagnosing and repairing the P2015 error, having the right tools is essential. CARDIAGTECH.NET offers a range of high-quality diagnostic tools and equipment to help you get the job done right.
8.1 High-Quality Diagnostic Tools
CARDIAGTECH.NET provides top-of-the-line diagnostic tools, including VCDS interfaces, multimeters, and smoke testers, to help you accurately diagnose the P2015 error and other automotive issues.
8.2 Expert Support
CARDIAGTECH.NET offers expert technical support to help you troubleshoot complex issues and get the most out of your diagnostic tools. Our team of experienced technicians is available to answer your questions and provide guidance.
8.3 Competitive Pricing
CARDIAGTECH.NET offers competitive pricing on all our diagnostic tools and equipment, making it affordable for both professional technicians and DIY enthusiasts to get the tools they need.
8.4 Fast Shipping
CARDIAGTECH.NET provides fast and reliable shipping to ensure you get your tools quickly and can start diagnosing and repairing your vehicle as soon as possible.
9. Why Choose CARDIAGTECH.NET for Your Automotive Needs
Choosing the right supplier for your automotive diagnostic tools and equipment is crucial. CARDIAGTECH.NET stands out as a trusted and reliable source for several reasons:
9.1 Extensive Product Range
CARDIAGTECH.NET offers a wide range of diagnostic tools, equipment, and accessories to meet all your automotive needs. Whether you’re a professional technician or a DIY enthusiast, we have the tools you need to get the job done right.
9.2 Commitment to Quality
At CARDIAGTECH.NET, we are committed to providing only the highest quality products. We partner with leading manufacturers to ensure that our tools are durable, reliable, and accurate.
9.3 Customer Satisfaction
Customer satisfaction is our top priority at CARDIAGTECH.NET. We go above and beyond to ensure that our customers are happy with their purchases and that their needs are met.
9.4 Industry Expertise
Our team at CARDIAGTECH.NET has extensive experience in the automotive industry. We understand the challenges that technicians and DIY enthusiasts face, and we are dedicated to providing the best possible solutions.
10. Real-World Case Studies
Let’s look at some real-world examples of how VCDS and CARDIAGTECH.NET tools can help resolve P2015 errors:
10.1 Case Study 1: 2012 VW GTI
A 2012 VW GTI owner experienced a check engine light and loss of power. Using VCDS, they read the P2015 code and monitored the intake manifold flap position sensor data. The readings were consistently out of range. After replacing the sensor with a part from CARDIAGTECH.NET and performing an adaptation with VCDS, the P2015 error was resolved, and the car’s performance was restored.
10.2 Case Study 2: 2015 Audi A3
A 2015 Audi A3 owner had a rough idle and poor fuel economy. VCDS revealed the P2015 code and an issue with the intake manifold flap actuator. The owner used a smoke tester from CARDIAGTECH.NET to find a vacuum leak in the actuator’s vacuum line. After replacing the vacuum line, clearing the fault codes, and performing an adaptation with VCDS, the engine ran smoothly, and the fuel economy improved.
10.3 Case Study 3: 2010 VW Jetta
A 2010 VW Jetta owner faced a P2015 code and suspected carbon buildup in the intake manifold. They removed the intake manifold and used a carbon cleaner and brush from CARDIAGTECH.NET to clean the deposits. After reinstalling the intake manifold and performing an adaptation with VCDS, the P2015 error disappeared, and the engine’s performance was back to normal.
11. Cost Analysis: DIY vs. Professional Repair
Deciding whether to tackle the P2015 error yourself or take it to a professional repair shop depends on your mechanical skills, available tools, and budget. Here’s a cost analysis to help you make an informed decision:
11.1 DIY Repair Costs
- VCDS Interface: $200 – $400 (one-time investment)
- Intake Manifold Flap Actuator: $50 – $150
- Intake Manifold Flap Position Sensor: $30 – $100
- Vacuum Lines: $10 – $30
- Carbon Cleaner: $10 – $20
- Tools (if needed): $20 – $50
Total DIY Cost: $320 – $750 (plus the cost of VCDS if you don’t already own one)
11.2 Professional Repair Costs
- Diagnostic Fee: $80 – $150
- Intake Manifold Flap Actuator Replacement: $200 – $400
- Intake Manifold Flap Position Sensor Replacement: $150 – $300
- Vacuum Leak Repair: $100 – $200
- Carbon Buildup Cleaning: $300 – $500
Total Professional Repair Cost: $830 – $1550
As you can see, DIY repair can save you a significant amount of money, especially if you already own a VCDS interface. However, it requires time, effort, and mechanical skills. If you’re not comfortable working on your car, it’s best to take it to a professional.
12. Staying Updated with Automotive Technology
The automotive industry is constantly evolving, with new technologies and diagnostic techniques emerging all the time. Staying updated with the latest advancements is crucial for both professional technicians and DIY enthusiasts.
12.1 Following Industry News
Stay informed about the latest automotive news and trends by following industry publications, websites, and blogs.
12.2 Attending Training Courses
Attend training courses and workshops to learn about new diagnostic techniques and repair procedures.
12.3 Participating in Online Forums
Join online forums and communities to share knowledge, ask questions, and learn from other automotive enthusiasts.
12.4 Utilizing CARDIAGTECH.NET Resources
CARDIAGTECH.NET provides a wealth of resources, including articles, videos, and tutorials, to help you stay updated with the latest automotive technology.
13. Overcoming Challenges in Automotive Repair
Automotive repair can be challenging, especially when dealing with complex systems like the intake manifold flap system. Here are some strategies for overcoming common challenges:
13.1 Seeking Expert Advice
Don’t hesitate to seek advice from experienced technicians or online communities when facing a difficult repair.
13.2 Using Diagnostic Tools Effectively
Learn how to use diagnostic tools like VCDS effectively to gather accurate data and pinpoint the cause of the problem.
13.3 Following Repair Manuals
Always follow repair manuals and procedures to ensure you’re performing the repair correctly.
13.4 Taking Your Time
Rushing through a repair can lead to mistakes. Take your time and pay attention to detail.
14. The Future of Automotive Diagnostics
Automotive diagnostics is becoming increasingly sophisticated, with advanced technologies like artificial intelligence and machine learning playing a greater role.
14.1 AI-Powered Diagnostics
AI-powered diagnostic tools can analyze vast amounts of data to identify patterns and predict potential issues.
14.2 Remote Diagnostics
Remote diagnostics allows technicians to diagnose and repair vehicles remotely, saving time and money.
14.3 Connected Car Technology
Connected car technology provides real-time data about vehicle performance, enabling proactive maintenance and diagnostics.
15. Conclusion: Mastering the P2015 Code with VCDS
The P2015 error code can be a frustrating issue, but with the right tools and knowledge, it can be diagnosed and repaired effectively. VCDS is an invaluable tool for troubleshooting this problem, providing detailed information about the intake manifold flap system and allowing you to perform adaptations. By following the steps outlined in this article and utilizing the resources available at CARDIAGTECH.NET, you can master the P2015 code and keep your Volkswagen or Audi running smoothly.
Don’t let the P2015 error code keep you off the road. Contact CARDIAGTECH.NET today at 276 Reock St, City of Orange, NJ 07050, United States, or call us on Whatsapp at +1 (641) 206-8880. Visit our website at CARDIAGTECH.NET to explore our range of diagnostic tools and equipment. Let us help you diagnose and repair the P2015 error and get back to enjoying your ride. Our expert team is ready to assist you with all your automotive diagnostic needs.
FAQ: P2015 VCDS
1. What is the P2015 error code?
The P2015 error code indicates an issue with the intake manifold flap position sensor/switch range/performance in Volkswagen and Audi vehicles.
2. What are the symptoms of a P2015 error?
Symptoms include a check engine light, loss of power, poor fuel economy, rough idle, and hesitation during acceleration.
3. What causes the P2015 code?
Causes can include a faulty intake manifold flap actuator, defective sensor, carbon buildup, vacuum leaks, wiring issues, or ECU problems.
4. How can VCDS help diagnose the P2015 error?
VCDS can read fault codes, monitor sensor data, perform output tests, and run adaptations to help diagnose the P2015 error.
5. How do I connect VCDS to my vehicle?
Connect the VCDS interface cable to your laptop’s USB port and the vehicle’s OBD-II port, then launch the VCDS software.
6. What is intake manifold flap adaptation?
Adaptation allows the ECU to learn the new parameters of the intake manifold flap system after replacing components or cleaning carbon buildup.
7. Can I repair the P2015 error myself?
Yes, if you have mechanical skills and the necessary tools, you can repair the P2015 error yourself. However, professional repair is recommended if you’re not comfortable working on your car.
8. What tools do I need to repair the P2015 error?
You’ll need a VCDS interface, multimeter, socket set, wrench set, and possibly a smoke tester and carbon cleaner.
9. How can I prevent future P2015 errors?
Regular maintenance, cleaning the intake manifold, checking vacuum lines, and using quality fuel can help prevent future P2015 errors.
10. Where can I find high-quality diagnostic tools and equipment?
CARDIAGTECH.NET offers a wide range of high-quality diagnostic tools and equipment, including VCDS interfaces, multimeters, and smoke testers.
16. Technical Specifications Related to P2015 and VCDS
Understanding the technical specifications associated with the P2015 error code and VCDS can further aid in accurate diagnosis and repair. Let’s explore some critical specifications:
16.1. Sensor Voltage Range
The intake manifold flap position sensor typically operates within a specific voltage range. This range is usually between 0 and 5 volts DC. Here’s a typical breakdown:
| Flap Position | Voltage (Approximate) |
|---|---|
| Flap Closed | 0.5 – 1.0 V |
| Flap Open | 4.0 – 4.5 V |
| Intermediate | 1.5 – 3.5 V |
When diagnosing with VCDS, monitoring the sensor’s voltage output is crucial. Readings outside this range indicate a potential sensor malfunction or wiring issue.
16.2. Actuator Resistance
The intake manifold flap actuator contains an electric motor that moves the flaps. Measuring the resistance of this motor can help determine its condition. Normal resistance values typically fall between 5 and 20 ohms. Higher or lower resistance values suggest a faulty motor or internal wiring problem.
16.3. Vacuum Pressure
For systems utilizing vacuum-operated actuators, proper vacuum pressure is essential. Normal vacuum pressure should be around 18-22 inches of mercury (inHg) at idle. Low vacuum pressure can prevent the actuator from functioning correctly, leading to a P2015 error.
16.4. VCDS Adaptation Channels
When performing an adaptation with VCDS, it’s crucial to use the correct adaptation channel. Here are some common adaptation channels related to the intake manifold flap system:
| Channel Number | Description |
|---|---|
| 060 | Throttle Body Adaptation |
| 098 | Intake Manifold Flap Adaptation |
| 102 | EGR Valve Adaptation |
Refer to your vehicle’s repair manual or the Ross-Tech Wiki for the exact channel number and adaptation procedure.
16.5. Wiring Diagram Specifications
Consulting the wiring diagram for your specific vehicle model is crucial for troubleshooting wiring issues. The wiring diagram provides information on wire colors, connector locations, and circuit layouts. Use a multimeter to check for continuity, voltage, and shorts in the wiring harness.
17. Comparing Different VCDS Versions
VCDS has evolved over the years, with newer versions offering enhanced features and compatibility. Here’s a comparison of some common VCDS versions:
| Feature | VCDS Lite | VCDS | VCDS Professional |
|---|---|---|---|
| Vehicle Compatibility | Limited | Extensive | Full |
| Functionality | Basic | Advanced | Comprehensive |
| Updates | Limited | Regular | Frequent |
| Support | Limited | Standard | Priority |
| Cost | Lower | Moderate | Higher |
Choosing the right VCDS version depends on your needs and budget. VCDS Lite is suitable for basic diagnostics on older vehicles, while VCDS Professional offers the most comprehensive features and support for newer models.
18. P2015 and Related Error Codes
The P2015 error code is often accompanied by other related error codes that provide additional information about the problem. Here are some common related codes:
- P2004: Intake Manifold Flap; Bank 1: Stuck Open
- P2005: Intake Manifold Flap; Bank 2: Stuck Open
- P2006: Intake Manifold Flap; Bank 1: Stuck Closed
- P2007: Intake Manifold Flap; Bank 2: Stuck Closed
- P2016: Intake Manifold Flap Position Sensor Circuit Low
- P2017: Intake Manifold Flap Position Sensor Circuit High
Addressing these related codes along with the P2015 error can help ensure a complete and effective repair.
19. Using Multimeters in P2015 Diagnosis
A multimeter is an essential tool for diagnosing electrical issues related to the P2015 error. Here are some ways to use a multimeter:
19.1. Checking Sensor Voltage
Use a multimeter to measure the voltage output of the intake manifold flap position sensor. Compare the readings to the specified voltage range to determine if the sensor is functioning correctly.
19.2. Measuring Actuator Resistance
Measure the resistance of the intake manifold flap actuator motor to check for internal faults.
19.3. Testing for Continuity
Use a multimeter to test for continuity in the wiring harness to identify broken or damaged wires.
19.4. Checking for Shorts
Test for shorts to ground or power in the wiring harness to identify potential electrical problems.
20. Smoke Testing for Vacuum Leaks
A smoke tester is a valuable tool for locating vacuum leaks that can contribute to the P2015 error. Here’s how to use a smoke tester effectively:
20.1. Connect the Smoke Tester
Connect the smoke tester to the intake system, following the manufacturer’s instructions.
20.2. Introduce Smoke
Introduce smoke into the intake system and pressurize it slightly.
20.3. Inspect for Leaks
Carefully inspect all vacuum lines, connections, and components for smoke escaping from any leaks.
20.4. Mark and Repair Leaks
Mark any leaks that you find and repair them by replacing damaged lines or tightening loose connections.
21. Cleaning Carbon Buildup: A Detailed Guide
Carbon buildup in the intake manifold can restrict airflow and affect the performance of the intake manifold flaps. Here’s a detailed guide to cleaning carbon buildup:
21.1. Remove the Intake Manifold
Remove the intake manifold from the engine, following the vehicle’s repair manual.
21.2. Inspect for Carbon
Inspect the intake ports and flaps for carbon buildup.
21.3. Apply Carbon Cleaner
Apply a carbon cleaner specifically designed for intake manifolds. Let it soak for the recommended time.
21.4. Scrub the Deposits
Use a brush or scraper to scrub away the carbon deposits.
21.5. Rinse Thoroughly
Rinse the intake manifold thoroughly with water to remove any remaining cleaner and carbon residue.
21.6. Reinstall the Manifold
Reinstall the intake manifold, ensuring all connections are secure.
22. Upgrading Your Diagnostic Equipment with CARDIAGTECH.NET
Investing in high-quality diagnostic equipment can significantly improve your ability to diagnose and repair automotive issues, including the P2015 error. CARDIAGTECH.NET offers a wide range of diagnostic tools and equipment to meet your needs.
22.1. VCDS Interfaces
Choose from a variety of VCDS interfaces, including the HEX-V2 and HEX-NET, to suit your budget and diagnostic requirements.
22.2. Multimeters
CARDIAGTECH.NET offers a selection of high-quality multimeters for accurate electrical testing.
22.3. Smoke Testers
Locate vacuum leaks quickly and easily with a smoke tester from CARDIAGTECH.NET.
22.4. Scan Tools
Explore a range of scan tools with advanced features for comprehensive vehicle diagnostics.
23. The Importance of Regular Vehicle Inspections
Regular vehicle inspections can help identify potential issues before they escalate into major problems, including those related to the intake manifold flap system.
23.1. Check Engine Light
Pay attention to the check engine light and have it diagnosed promptly.
23.2. Performance Issues
Address any performance issues, such as loss of power, poor fuel economy, or rough idle, as soon as they arise.
23.3. Scheduled Maintenance
Follow your vehicle’s recommended maintenance schedule to ensure optimal performance and longevity.
24. Addressing Common Misconceptions about P2015
There are several misconceptions surrounding the P2015 error code. Let’s clarify some common misunderstandings:
24.1. It’s Always the Sensor
While a faulty sensor is a common cause, the P2015 error can also be caused by other factors, such as vacuum leaks, carbon buildup, or wiring issues.
24.2. It’s an Easy Fix
The complexity of the repair depends on the underlying cause. Some repairs, like replacing a vacuum line, are relatively simple, while others, like cleaning carbon buildup, are more involved.
24.3. It’s Not a Serious Problem
Ignoring the P2015 error can lead to reduced engine performance, poor fuel economy, and potentially more severe engine damage over time.
25. The Role of Software Updates in VCDS
Regular software updates are essential for keeping your VCDS interface up-to-date with the latest vehicle models and diagnostic protocols.
25.1. Compatibility
Software updates ensure compatibility with new vehicle models and systems.
25.2. Bug Fixes
Updates often include bug fixes and performance improvements.
25.3. New Features
New versions of VCDS may introduce new features and diagnostic capabilities.
26. Ethical Considerations in Automotive Repair
As an automotive technician or DIY enthusiast, it’s important to adhere to ethical principles in all your repair work.
26.1. Honest Diagnostics
Provide honest and accurate diagnostics to your customers or yourself.
26.2. Transparent Pricing
Offer transparent pricing for your services and parts.
26.3. Quality Repairs
Perform high-quality repairs that meet or exceed industry standards.
27. The Impact of Environmental Regulations on Automotive Diagnostics
Environmental regulations play an increasingly important role in automotive diagnostics.
27.1. Emissions Testing
Emissions testing is required in many regions to ensure vehicles meet environmental standards.
27.2. Diagnostic Requirements
Regulations may require specific diagnostic procedures and equipment to be used for emissions-related repairs.
27.3. Compliance
Ensure your diagnostic practices comply with all applicable environmental regulations.
28. Documenting Your P2015 Repair Process
Proper documentation is crucial for tracking your diagnostic and repair work.
28.1. Record Fault Codes
Record all fault codes and related data.
28.2. Note Diagnostic Steps
Document each step of your diagnostic process.
28.3. List Parts Replaced
Keep a record of all parts replaced during the repair.
28.4. Track Time and Costs
Track the time and costs associated with the repair.
29. Preparing for P2015 Repairs: A Checklist
Before starting a P2015 repair, use this checklist to ensure you’re prepared:
- Gather necessary tools and equipment.
- Obtain the vehicle’s repair manual.
- Review wiring diagrams.
- Download the latest version of VCDS.
- Purchase replacement parts from CARDIAGTECH.NET.
30. Optimizing Engine Performance After P2015 Repair
After repairing the P2015 error, take steps to optimize engine performance:
- Perform a throttle body adaptation.
- Check and clean the air filter.
- Replace spark plugs if necessary.
- Use high-quality fuel.
Remember, CARDIAGTECH.NET is your trusted partner for all your automotive diagnostic needs. Visit our website at CARDIAGTECH.NET or contact us at 276 Reock St, City of Orange, NJ 07050, United States, or call us on Whatsapp at +1 (641) 206-8880 for expert assistance and high-quality tools. Let us help you keep your vehicle running smoothly and efficiently.