Unlocking the wealth of data hidden within your car’s onboard computer is easier than ever with an Obdii Obd2 Wifi Elm327 adapter. These handy devices, when paired with your smartphone or tablet and the right app like Car Scanner, can provide real-time diagnostics, performance monitoring, and much more. This guide will walk you through the simple steps to establish a WiFi connection between your ELM327 adapter and your device, so you can start exploring your vehicle’s information.
Step 1: Prepare and Connect Your OBDII ELM327 WiFi Adapter
Before diving into the software, let’s ensure your OBDII OBD2 WiFi ELM327 adapter is correctly plugged into your vehicle.
- Locate the OBDII Port: Your car’s OBDII port is usually located within the driver’s side dashboard area. Common locations include under the steering wheel, near the pedals, or in the glove compartment. Consult your vehicle’s manual if you are unsure of its exact location.
- Plug in the Adapter: With your car’s ignition turned off, firmly plug your OBDII OBD2 WiFi ELM327 adapter into the OBDII port. Ensure it’s securely connected.
- Power Up the Adapter: Turn your car’s ignition to the “ON” position (or start the engine). This provides power to the OBDII system and your adapter. Some adapters have a power button – if yours does, make sure it is switched on.
Step 2: Connect to the Adapter’s WiFi Network via Your Device
Now that your OBDII OBD2 WiFi ELM327 adapter is physically connected and powered, you need to establish a WiFi connection between the adapter and your smartphone or tablet.
-
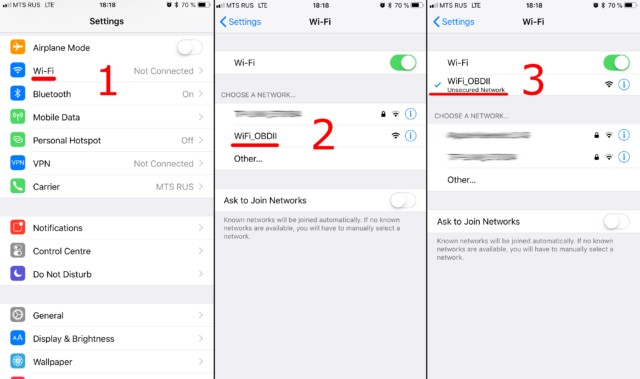
Access WiFi Settings: On your iOS or Android device, navigate to the WiFi settings menu. This is typically found within the Settings app under “WiFi”.
-
Enable WiFi: Ensure that WiFi is turned “ON” on your device.
-
Scan for Networks: Your device will automatically scan for available WiFi networks. Look for a network name that is associated with your OBDII OBD2 WiFi ELM327 adapter.
Common network names include:
- OBDII
- OBD2
- WIFI_OBDII
- VLINK (common for VGate adapters)
- Or a name related to your adapter’s brand
Important Note: The WiFi network name will never be your car’s brand or model.
-
Connect to the Adapter’s Network: Tap on the WiFi network name of your OBDII OBD2 WiFi ELM327 adapter to connect.
- Password (If Required): Most OBDII OBD2 WiFi ELM327 adapters do not require a password. However, if prompted, refer to the documentation that came with your adapter for the WiFi password.
Step 3: Configure Car Scanner App for WiFi Connection
With your device connected to the OBDII OBD2 WiFi ELM327 adapter’s WiFi network, the next step is to configure the Car Scanner app to communicate via WiFi.
- Open Car Scanner App: Launch the Car Scanner application on your device.
- Access Settings: Locate and tap the “Settings” icon within the Car Scanner app. This is usually represented by a gear icon, often found in the top-right corner of the main screen.
- Navigate to Adapter/Connection Settings: Within the Settings menu, find and select the “Adapter” option (in older versions of Car Scanner, this may be labeled “Connection”).
- Select Connection Type: WiFi: In the Adapter or Connection settings, choose “Wi-Fi” as the connection type.
-
Verify IP Address and Port: Confirm that the IP address and port settings are correct for your OBDII OBD2 WiFi ELM327 adapter.
- Default Settings: For most OBDII OBD2 WiFi ELM327 adapters, the default IP address is
192.168.0.10and the port is35000. - Adapter Documentation: Some adapters may use different IP addresses or ports. Refer to the documentation that came with your specific OBDII OBD2 WiFi ELM327 adapter to verify these settings if the default doesn’t work. Adjust the settings in Car Scanner accordingly if needed.
- Default Settings: For most OBDII OBD2 WiFi ELM327 adapters, the default IP address is
Step 4: Connect and Start Scanning!
With the WiFi connection established and Car Scanner configured, you are now ready to connect and begin diagnosing your vehicle.
- Tap the Connect Button: Return to the main screen of the Car Scanner app. You should see a large, prominent “Connect” button (often green). Tap this button to initiate the connection to your OBDII OBD2 WiFi ELM327 adapter.
- Connection Successful: Car Scanner will attempt to connect to your OBDII OBD2 WiFi ELM327 adapter. Once connected, you should see a confirmation within the app, and you can start using its features to read diagnostic codes, monitor live data, and much more.
Subsequent Connections:
For future uses, ensure your OBDII OBD2 WiFi ELM327 adapter is plugged in and powered, and your device is connected to the adapter’s WiFi network. Then, simply open the Car Scanner app and tap the “Connect” button.
By following these steps, you’ll be able to seamlessly connect your OBDII OBD2 WiFi ELM327 adapter and start exploring your car’s diagnostics with the Car Scanner app. Enjoy the insights into your vehicle’s health and performance!

