Understanding your 2009 Nissan Altima’s fuse box is crucial for diagnosing and resolving electrical issues, especially when it comes to your On-Board Diagnostics II (OBDII) port. This article provides a detailed guide to help you locate the OBDII fuse and other essential fuses in your vehicle, ensuring you can keep your Altima running smoothly.
Knowing the fuse locations and their functions can save you time and money by allowing you to troubleshoot simple electrical problems yourself. Whether you’re dealing with a non-functional OBDII scanner or other electrical malfunctions, this guide will help you navigate your 2009 Nissan Altima’s fuse system.
Instrument Panel Fuse Box
Location of the Fuse Box
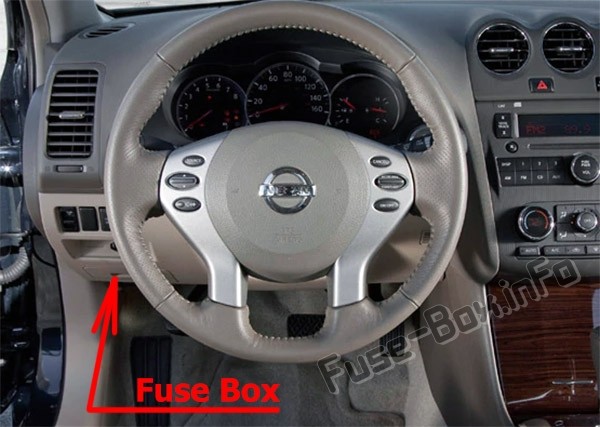
The primary fuse box inside your 2009 Nissan Altima is conveniently located within the passenger compartment. To access it, look under the dashboard on the driver’s side, to the left of the steering wheel. You’ll find a cover that needs to be removed to expose the fuse box.
 Instrument panel fuse box location in a Nissan Altima (2007-2013)
Instrument Panel Fuse Diagram
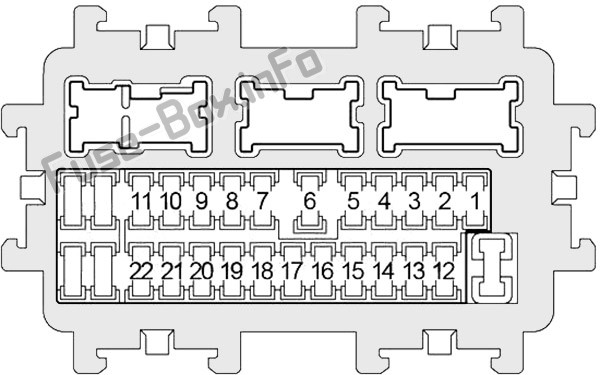
Once you’ve located the fuse box and removed the cover, you’ll see a layout of fuses and their corresponding numbers. The diagram below illustrates the fuse arrangement for the instrument panel fuse box in a Nissan Altima manufactured between 2007 and 2013, including the 2009 model year.
 Diagram of the instrument panel fuse box in a Nissan Altima (2007-2013)
The following table details the fuse assignments within the instrument panel fuse box. While the “OBDII fuse” isn’t explicitly labeled, fuses related to the power socket (often used for OBDII scanners) and engine control systems are important to consider when diagnosing OBDII issues.
| № | Amp | Description |
|---|---|---|
| 1 | 20 | Heated Seat |
| 2 | 10 | SRS Air Bag Control System |
| 3 | 10 | Air Conditioner Control, Body Control Module, Audio, Compass, CVT Control System, Electronically Controlled Power Steering System, Inside Mirror, Power Distribution System, Rear Window Defogger, Tire Pressure Monitoring System, Engine Control System |
| 4 | 10 | Back-up Lamp, Audio, Navigation, ABS, TCS, VDC, Charging System, CVT Control System, Engine Control System, Headlamp, Illumination, Combination Meter, SRS Air Bag Control System, Tire Pressure Monitoring System, Turn Signal and Hazard Warning Lamps, Warning Chime |
| 5 | 15 | Power Socket (Cigar Lighter) |
| 6 | 10 | Body Control Module, Intelligent Key System, Air Conditioner Control, CVT Control System, Engine Control System, Homelink Universal Transmitter |
| 7 | 10 | Stop Lamp, ABS, TCS, VDC, CVT Control System, Engine Control System, Body Control Module, Intelligent Key System, NVIS, Power Distribution System |
| 8 | – | Not Used |
| 9 | 10 | Interior Room Lamp, Body Control Module, Intelligent Key System, NVIS, Power Distribution System |
| 10 | 10 | Body Control Module, Headlamp, Auto Light System, Daytime Light System, Front Fog Lamp, Front Wiper and Washer System, Illumination, Intelligent Key System, Interior Room Lamp, NVIS, Parking Lamp, License Plate Lamp, Tail Lamp, Power Distribution System, Power Door Lock System, Power Window System, Sunroof, Turn Signal and Hazard Warning Lamps, Vehicle Security System, Warning Chime |
| 11 | 10 | Headlamp, Intelligent Key System, Combination Meter, NVIS, Tire Pressure Monitoring System, Turn Signal and Hazard Warning Lamps, Vehicle Security System, Warning Chime, CVT Control System |
| 12 | – | Not Used |
| 13 | 10 | Body Control Module, Rear Window Defogger |
| 14 | 20 | Rear Window Defogger |
| 15 | 20 | Rear Window Defogger |
| 16 | – | Not Used |
| 17 | – | Not Used |
| 18 | 15 | Power Socket (Accessory Socket) |
| 19 | 10 | Audio, Body Control Module, Air Conditioner, Door Mirror, Intelligent Key System, Combination Meter, Power Distribution System, Sunroof |
| 20 | – | Not Used |
| 21 | 15 | Air Conditioner Control, Body Control Module |
| 22 | 15 | Air Conditioner Control, Body Control Module |
Key Fuses for OBDII Considerations:
- Fuse #5 (15A) & #18 (15A): Power Socket. OBDII scanners often draw power from the power socket (cigarette lighter). If your scanner isn’t powering on, check these fuses first.
- Fuse #3 & #4 (10A): Engine Control System. These fuses are vital for the engine control unit (ECU) and related systems, which are essential for OBDII functionality. Issues with these fuses can impact your vehicle’s diagnostics.
Engine Compartment Fuse Box
Location in the Engine Bay
Your 2009 Nissan Altima also has a second fuse box located in the engine compartment. This fuse box houses fuses and relays for higher-current systems. It is typically found near the battery or engine, under the hood. Refer to your vehicle’s owner manual for the precise location if needed.
Engine Compartment Fuse Diagram
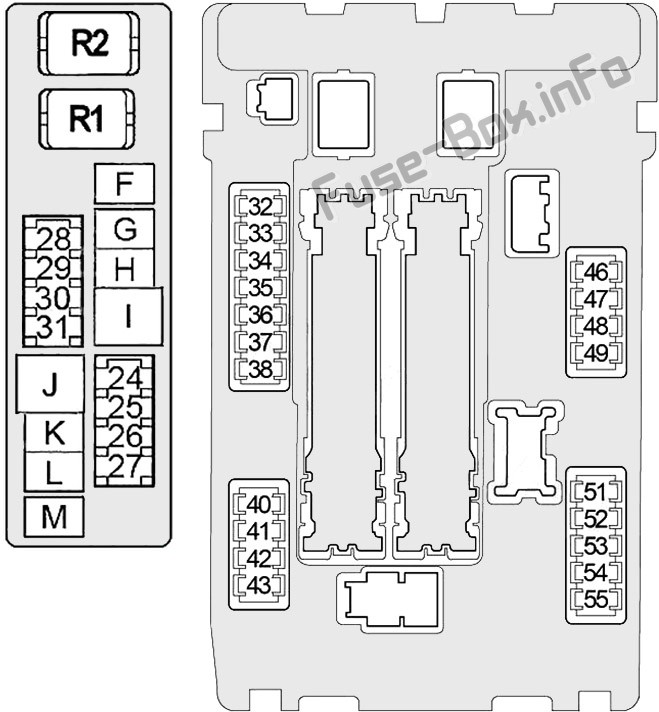
The diagram below shows the layout of the engine compartment fuse box. This box contains fuses and relays that protect various critical systems in your Altima.
 Under-hood fuse box diagram for a Nissan Altima (2007-2013)
The table below details the fuses and relays in the engine compartment fuse box. While less directly related to the OBDII port itself, these fuses control systems that communicate with or are monitored by the OBDII system.
| № | Amp | Description |
|---|---|---|
| 24 | 15 | Audio, Navigation |
| 25 | 15 | Audio, Navigation |
| 26 | 15 | Audio, Navigation |
| 27 | – | Not Used |
| 28 | – | Not Used |
| 29 | 10 | Charging System |
| 30 | 15 | Horn, Intelligent Key System, Vehicle Security System |
| 31 | 10 | BCM (Body Control Module), Starting System, Intelligent Key System, NVIS, Power Distribution System |
| F | 50 | VDC |
| G | 30 | ABS, TCS, VDC |
| H | 40 | BCM (Body Control Module), Headlamp, Auto Light System, Daytime Light System, Front Fog Lamps, Front Wiper and Washer System, Illumination, Intelligent Key System, Interior Room Lamp, NVIS, Parking Lamp, License Plate Lamp, Tail Lamp, Power Door Lock System, Power Distribution System, Power Seat , Power Window System, Rear Window Defogger, Sunroof, Tire Pressure Monitoring System, Trunk Lid Opener, Turn Signal and Hazard Warning Lamps, Warning Chime, Vehicle Security System |
| I | 40 | ABS, TCS |
| J | – | Not Used |
| K | 40 | Engine Control System |
| L | 40 | Ignition |
| M | 40 | Engine Control System |
| 32 | 15 | Fuel Pump Relay |
| 33 | 10 | BCM (Body Control Module), Engine Control System, CVT Control System, Intelligent Key System, NVIS, Starting System |
| 34 | 10 | CVT Control System |
| 35 | 10 | Engine Control System |
| 36 | 10 | ABS, TCS, VDC |
| 37 | 15 | Engine Control System |
| 38 | 10 | Front Wiper and Washer System |
| 40 | 10 | Steering Lock Relay |
| 41 | 10 | Air Conditioner Relay |
| 42 | 15 | Engine Control Module (ECM) Relay |
| 43 | 10 / 15 | Throttle Control Motor Relay |
| 46 | 10 | Parking Lamp, Tail Lamp, License Plate Lamp |
| 47 | 10 | Parking Lamp, Tail Lamp, License Plate Lamp, Illumination, Auto Light System |
| 48 | 10 | Headlamp (High), Auto Light System, Daytime Light System |
| 49 | 10 | Headlamp (High), Auto Light System, Daytime Light System |
| 51 | 15 | Headlamp (Low), Auto Light System, Daytime Light System |
| 52 | 15 | Headlamp (Low), Auto Light System, Daytime Light System |
| 53 | 15 | Front Fog Lamp |
| 54 | 10 | Not Used |
| 55 | 30 | Front Wiper Relay |
Relays
| № | Description |
|---|---|
| R1 | Horn |
| R2 | Cooling Fan Motor (3) |
Relevant Engine Compartment Fuses for Diagnostics:
- Fuses K & M (40A) and 33, 35, 37 (10-15A): Engine Control System. These fuses are critical for the overall engine management system. Issues here can definitely impact OBDII readings and scanner connectivity.
- Fuse 42 (15A): Engine Control Module (ECM) Relay. The ECM is the brain of your engine and directly interfaces with the OBDII system.
Fusible Link Block (Main Fuses)
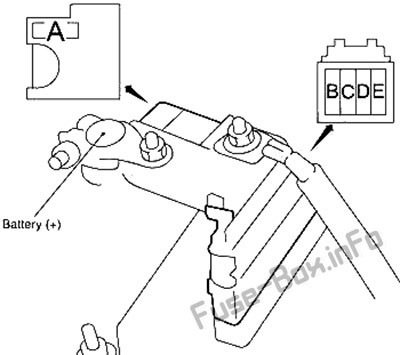
Located directly on the positive terminal of your battery, the fusible link block contains high-amperage main fuses. These protect major electrical circuits in your 2009 Nissan Altima.
 Main fuses (fusible link block) for a Nissan Altima (2007-2013)
| № | Amp | Description |
|---|---|---|
| A | 250 | Generator, Starter, Fuses E, D |
| B | 80 | Ignition Relay (1), Fuses 40, 41, 42, 43 |
| C | 100 | Accessory Relay, Fuses 5, 6, 7, 9, 10, 11 |
| D | 60 | Headlamp High Relay, Headlamp Low Relay, Tail Lamp Relay, Fuses 53, 54, 55 |
| E | 100 | Fuses F, G, H, I, K, L, M, 24, 25, 26, 29, 30, 31 |
Note: While these main fuses are not directly related to the OBDII port function specifically, they are the first line of defense for the entire electrical system. If you’re experiencing widespread electrical issues, checking these is a good starting point.
Conclusion
When troubleshooting OBDII issues in your 2009 Nissan Altima, start by checking Instrument Panel Fuses #5 and #18 for the power socket, and #3 and #4 for the engine control system. Additionally, inspect the Engine Compartment Fuses related to the engine control system for any blown fuses.
By understanding the fuse layout of your 2009 Nissan Altima, you can effectively diagnose and resolve electrical problems, ensuring your vehicle remains reliable and your OBDII system functions correctly for emissions testing and diagnostics.
Further Resources:
- How to check the fuses?
- How to replace a blown fuse?
- Why do car fuses blow?
- Types of automotive fuses
