
Setting up your headlight range adjustment (Leuchtweitenregulierung) with VCDS is a crucial aspect of vehicle maintenance, ensuring optimal visibility and safety on the road. Are you struggling with headlight adjustment on your vehicle? CARDIAGTECH.NET provides a comprehensive guide to help you understand and calibrate your headlight range adjustment using VCDS, enhancing your driving safety and preventing potential hazards. This article dives deep into using VCDS for headlight range adjustment, covering everything from coding to troubleshooting.
1. Understanding Headlight Range Adjustment
The automatic headlight range adjustment system ensures that your headlights are always correctly aligned, regardless of the vehicle’s load or road conditions. This prevents blinding oncoming drivers and maximizes visibility.
What is Leuchtweitenregulierung?
Leuchtweitenregulierung, or headlight range adjustment, is a system that automatically adjusts the vertical angle of your headlights to compensate for changes in vehicle load and pitch. This ensures optimal illumination of the road ahead without blinding oncoming traffic.
Why is it Important?
Properly adjusted headlights are crucial for:
- Safety: Maximizing visibility in various driving conditions.
- Legal Compliance: Meeting regulatory standards for headlight alignment.
- Courtesy: Preventing glare that can impair the vision of other drivers.
2. Key Components of the System
The headlight range adjustment system consists of several key components working in harmony:
- Headlight Control Units: Manage the adjustment process, receiving input from sensors and controlling the headlight motors.
- Level Sensors: Located on the front and rear axles, these sensors measure the vehicle’s pitch and provide data to the control units.
- Headlight Motors: Adjust the vertical angle of the headlights based on signals from the control units.
Component Locations in a Vehicle
3. Introduction to VCDS
VCDS (VAG-COM Diagnostic System) is a powerful diagnostic tool used for Volkswagen Audi Group (VAG) vehicles, including Audi, Volkswagen, Skoda, and SEAT. It allows you to perform various functions, including reading and clearing fault codes, viewing live data, and performing adaptations and basic settings.
What Can VCDS Do?
With VCDS, you can:
- Read and Clear Fault Codes: Identify and resolve issues within the headlight range adjustment system.
- View Live Data: Monitor sensor readings and system parameters in real-time.
- Perform Basic Settings: Calibrate the headlight range adjustment system after repairs or adjustments.
- Coding: Adapt control units to match the vehicle’s specifications.
Why Use VCDS for Headlight Adjustment?
VCDS offers a comprehensive suite of tools specifically designed for VAG vehicles, making it the ideal choice for adjusting your headlight range. Its user-friendly interface and extensive documentation ensure accurate and efficient calibration.
4. Preparing for Headlight Adjustment
Before you begin, ensure you have everything you need:
- VCDS Interface: A genuine VCDS interface connected to your vehicle’s OBD-II port.
- Laptop: A laptop with VCDS software installed and a stable internet connection.
- Vehicle: Your VAG vehicle with the headlight range adjustment system.
- Flat Surface: Park your vehicle on a level surface to ensure accurate readings.
- Headlight Aiming Screen: A headlight aiming screen or a flat wall to check and adjust the headlight beams.
5. Step-by-Step Guide to Setting Up Headlight Range Adjustment with VCDS
Follow these steps to calibrate your headlight range adjustment system using VCDS:
5.1. Connecting to the Vehicle
- Connect the VCDS interface to your vehicle’s OBD-II port.
- Turn on the ignition but do not start the engine.
- Launch the VCDS software on your laptop.
- Click on “Select Control Module” and choose the appropriate control module for headlight range adjustment. This is typically module 29 (left) and 39 (right).
5.2. Checking and Clearing Fault Codes
-
In the control module, click on “Fault Codes – 02”.
-
Record any fault codes present.
-
Click on “Clear Codes – 05” to clear the fault codes. Address any issues indicated by the fault codes before proceeding.
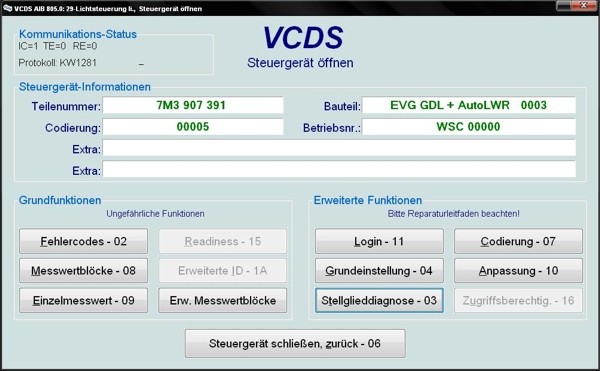
5.3. Coding the Control Units
The control units may be used in various vehicles and must be coded to the specific vehicle type. The correct coding for SGA is 00005.
- Click on “Coding – 07”.
- Enter the appropriate code for your vehicle. For SGA, this is typically 00005.
5.4. Performing Basic Settings
-
Click on “Basic Settings – 04”.
-
Select group 001. The headlights will move to the adjustment position. This may take 10-20 seconds.
-
Adjust the headlights using a headlight aiming screen. The outer screws adjust the lateral position, and the inner screws adjust the vertical position.
-
Select group 002.
-
Click “Done, Go Back” to finish the basic setting.
-
Turn the ignition off and on to save the learned control position.
5.5. Verifying the Adjustment
- After completing the basic settings, check the headlight alignment using a headlight aiming screen.
- Ensure the beams are correctly aligned according to the manufacturer’s specifications.
6. Advanced Diagnostic Functions
VCDS provides several advanced diagnostic functions to help you troubleshoot issues with the headlight range adjustment system.
6.1. Measuring Value Blocks
-
Click on “Measuring Blocks – 08”.
-
View live data from the level sensors and control units.
-
Compare the readings to the specified values to identify any discrepancies.
Here’s a breakdown of what each block signifies:
- Block 1:
- Voltage Terminal 15: Supply voltage for the control unit.
- Voltage Terminal 56b: Voltage on the low beam contact of the light switch.
- Speed: Current vehicle speed.
- Vehicle Condition: 0 when stationary, 85 when moving steadily, 255 when accelerating or decelerating.
- Block 2:
- Sensor (G78) Front Vehicle Level: Target value 1.6V to 3.0V.
- Sensor (G76) Rear Vehicle Level: Target value 2.0V to 3.0V.
- Basic Setting Status: Should display “ADP i.O.,” indicating successful basic setting learning.
- Control Voltage Actuator Motor: Target value 40% to 80%.
- Block 3:
- Lamp Power: Target value 30 to 40W.
- Lamp Voltage: Target value 68V to 103V.
- Control Voltage Actuator Motor (Slave): Target value 40% to 80%.
6.2. Actuator Test
-
Click on “Output Tests – 03”.
-
Run the actuator test to manually control the headlight motors.
-
Observe the movement of the headlights to ensure the motors are functioning correctly.
7. Common Issues and Troubleshooting
Even with careful calibration, issues can arise. Here are some common problems and how to address them:
7.1. Fault Codes
If fault codes persist after clearing them, investigate the underlying issue. Common fault codes relate to:
- Level Sensors: Check the wiring and connections to the level sensors. Ensure they are properly mounted and free from damage.
- Headlight Motors: Test the headlight motors to ensure they are functioning correctly. Replace if necessary.
- Control Units: Inspect the control units for damage or corrosion. Replace if necessary.
7.2. Incorrect Headlight Alignment
If the headlights are not aligning correctly, double-check the following:
- Vehicle Level: Ensure the vehicle is parked on a level surface.
- Tire Pressure: Verify that the tire pressure is correct.
- Load: Remove any heavy loads from the vehicle that could affect the suspension.
7.3 Sensor Range Issues
If the measured value of a level sensor is outside its target range, an “Adaptation not possible” error may appear. This error must be resolved before the basic setting can be performed.
- Check Sensor Mounting: Ensure the sensors are correctly mounted and the linkage is not obstructed.
- Inspect Wiring: Look for damaged or corroded wiring leading to the sensors.
- Verify Sensor Function: Use a multimeter to check the sensor’s output voltage and ensure it is within the specified range.
8. Maintaining Your Headlight Range Adjustment System
Regular maintenance is key to ensuring the longevity and reliability of your headlight range adjustment system. Here are some tips:
- Inspect Level Sensors: Check the level sensors regularly for damage or corrosion.
- Clean Headlight Lenses: Keep the headlight lenses clean to maximize light output.
- Check Wiring: Inspect the wiring and connections to the system components.
- Recalibrate: Recalibrate the system if you notice any issues with headlight alignment.
9. Why Choose CARDIAGTECH.NET for Your Automotive Diagnostic Needs?
At CARDIAGTECH.NET, we understand the challenges you face in your daily work. From wrestling with stubborn bolts to keeping up with the latest automotive technology, we know it’s not always easy. That’s why we’re committed to providing you with top-notch diagnostic tools and equipment that not only simplify your tasks but also boost your efficiency and precision.
Benefits of Choosing CARDIAGTECH.NET:
- High-Quality Products: Our diagnostic tools are rigorously tested to ensure they meet the highest standards of performance and durability.
- Expert Support: Our team of experienced technicians is always ready to provide you with the support you need, whether it’s helping you choose the right tool or troubleshooting a complex issue.
- Competitive Pricing: We offer competitive pricing on all our products, making advanced diagnostic technology accessible to everyone.
- Customer Satisfaction: We are dedicated to ensuring your complete satisfaction with our products and services.
10. Call to Action
Don’t let outdated equipment hold you back. Upgrade to CARDIAGTECH.NET today and experience the difference that quality tools can make. Contact us now for a consultation and let us help you find the perfect solutions for your automotive diagnostic needs.
Ready to take your automotive diagnostics to the next level? Contact CARDIAGTECH.NET today. Whether you need advice on choosing the right diagnostic tools or require support for your existing equipment, our team is here to help.
Contact Information:
- Address: 276 Reock St, City of Orange, NJ 07050, United States
- WhatsApp: +1 (641) 206-8880
- Website: CARDIAGTECH.NET
FAQ: Understanding Headlight Range Adjustment with VCDS
-
What is headlight range adjustment, and why is it important?
Headlight range adjustment, or Leuchtweitenregulierung, is a system that automatically adjusts the vertical angle of your headlights to compensate for changes in vehicle load and pitch. It is important for safety, legal compliance, and courtesy to other drivers.
-
What is VCDS, and how can it help with headlight adjustment?
VCDS (VAG-COM Diagnostic System) is a powerful diagnostic tool used for Volkswagen Audi Group (VAG) vehicles. It allows you to read and clear fault codes, view live data, perform adaptations, and calibrate the headlight range adjustment system, ensuring accurate and efficient calibration.
-
What are the key components of the headlight range adjustment system?
The key components include headlight control units, level sensors (located on the front and rear axles), and headlight motors.
-
How do I connect to the vehicle using VCDS to adjust the headlights?
Connect the VCDS interface to your vehicle’s OBD-II port, turn on the ignition but do not start the engine, launch the VCDS software on your laptop, and select the appropriate control module for headlight range adjustment.
-
What steps should I take before starting the headlight adjustment process with VCDS?
Ensure you have a genuine VCDS interface, a laptop with VCDS software installed, your VAG vehicle, a flat surface, and a headlight aiming screen. Check and clear any fault codes before proceeding.
-
How do I perform basic settings for headlight adjustment using VCDS?
In VCDS, click on “Basic Settings – 04”, select group 001, adjust the headlights using a headlight aiming screen, select group 002, and click “Done, Go Back” to finish. Turn the ignition off and on to save the learned control position.
-
What should I do if fault codes persist after clearing them during the headlight adjustment process?
Investigate the underlying issue by checking the wiring and connections to the level sensors, testing the headlight motors, and inspecting the control units for damage or corrosion.
-
How can I verify the headlight alignment after making adjustments with VCDS?
After completing the basic settings, check the headlight alignment using a headlight aiming screen and ensure the beams are correctly aligned according to the manufacturer’s specifications.
-
What are some common issues that may arise during headlight adjustment, and how can I troubleshoot them?
Common issues include persistent fault codes, incorrect headlight alignment, and sensor range issues. Troubleshooting involves checking sensor mounting, inspecting wiring, and verifying sensor function.
-
How can CARDIAGTECH.NET assist with my automotive diagnostic needs, including headlight range adjustment?
CARDIAGTECH.NET offers high-quality diagnostic tools, expert support, competitive pricing, and a commitment to customer satisfaction. Contact us for a consultation to find the perfect solutions for your automotive diagnostic needs.