
Hdmi Autel Evo connections are essential for drone enthusiasts and professionals alike, offering enhanced viewing and sharing capabilities. When your HDMI output isn’t functioning correctly, it can disrupt your workflow and hinder your ability to showcase your drone footage effectively. CARDIAGTECH.NET provides expert insights and solutions to address common HDMI issues, ensuring you can maximize the potential of your Autel Evo drone. Let’s explore the troubleshooting steps and reasons behind HDMI connectivity problems to keep you flying high with crystal-clear video output.
1. Understanding the Importance of HDMI Output for Drones
The High-Definition Multimedia Interface (HDMI) output plays a pivotal role in enhancing the usability and functionality of drones like the Autel Evo series. It allows users to connect their drone’s remote controller or live deck to external monitors or displays, providing a larger and more detailed view of the drone’s camera feed. This is particularly useful for various applications, including:
- Presentations: Sharing live drone footage with clients, colleagues, or audiences during presentations and demonstrations.
- Real-Time Monitoring: Observing the drone’s flight path and camera view on a larger screen for improved situational awareness and control.
- Professional Videography: Connecting to high-quality monitors or recording devices for capturing and reviewing professional-grade aerial footage.
- Training and Education: Facilitating drone pilot training by allowing instructors and trainees to view the drone’s camera feed simultaneously.
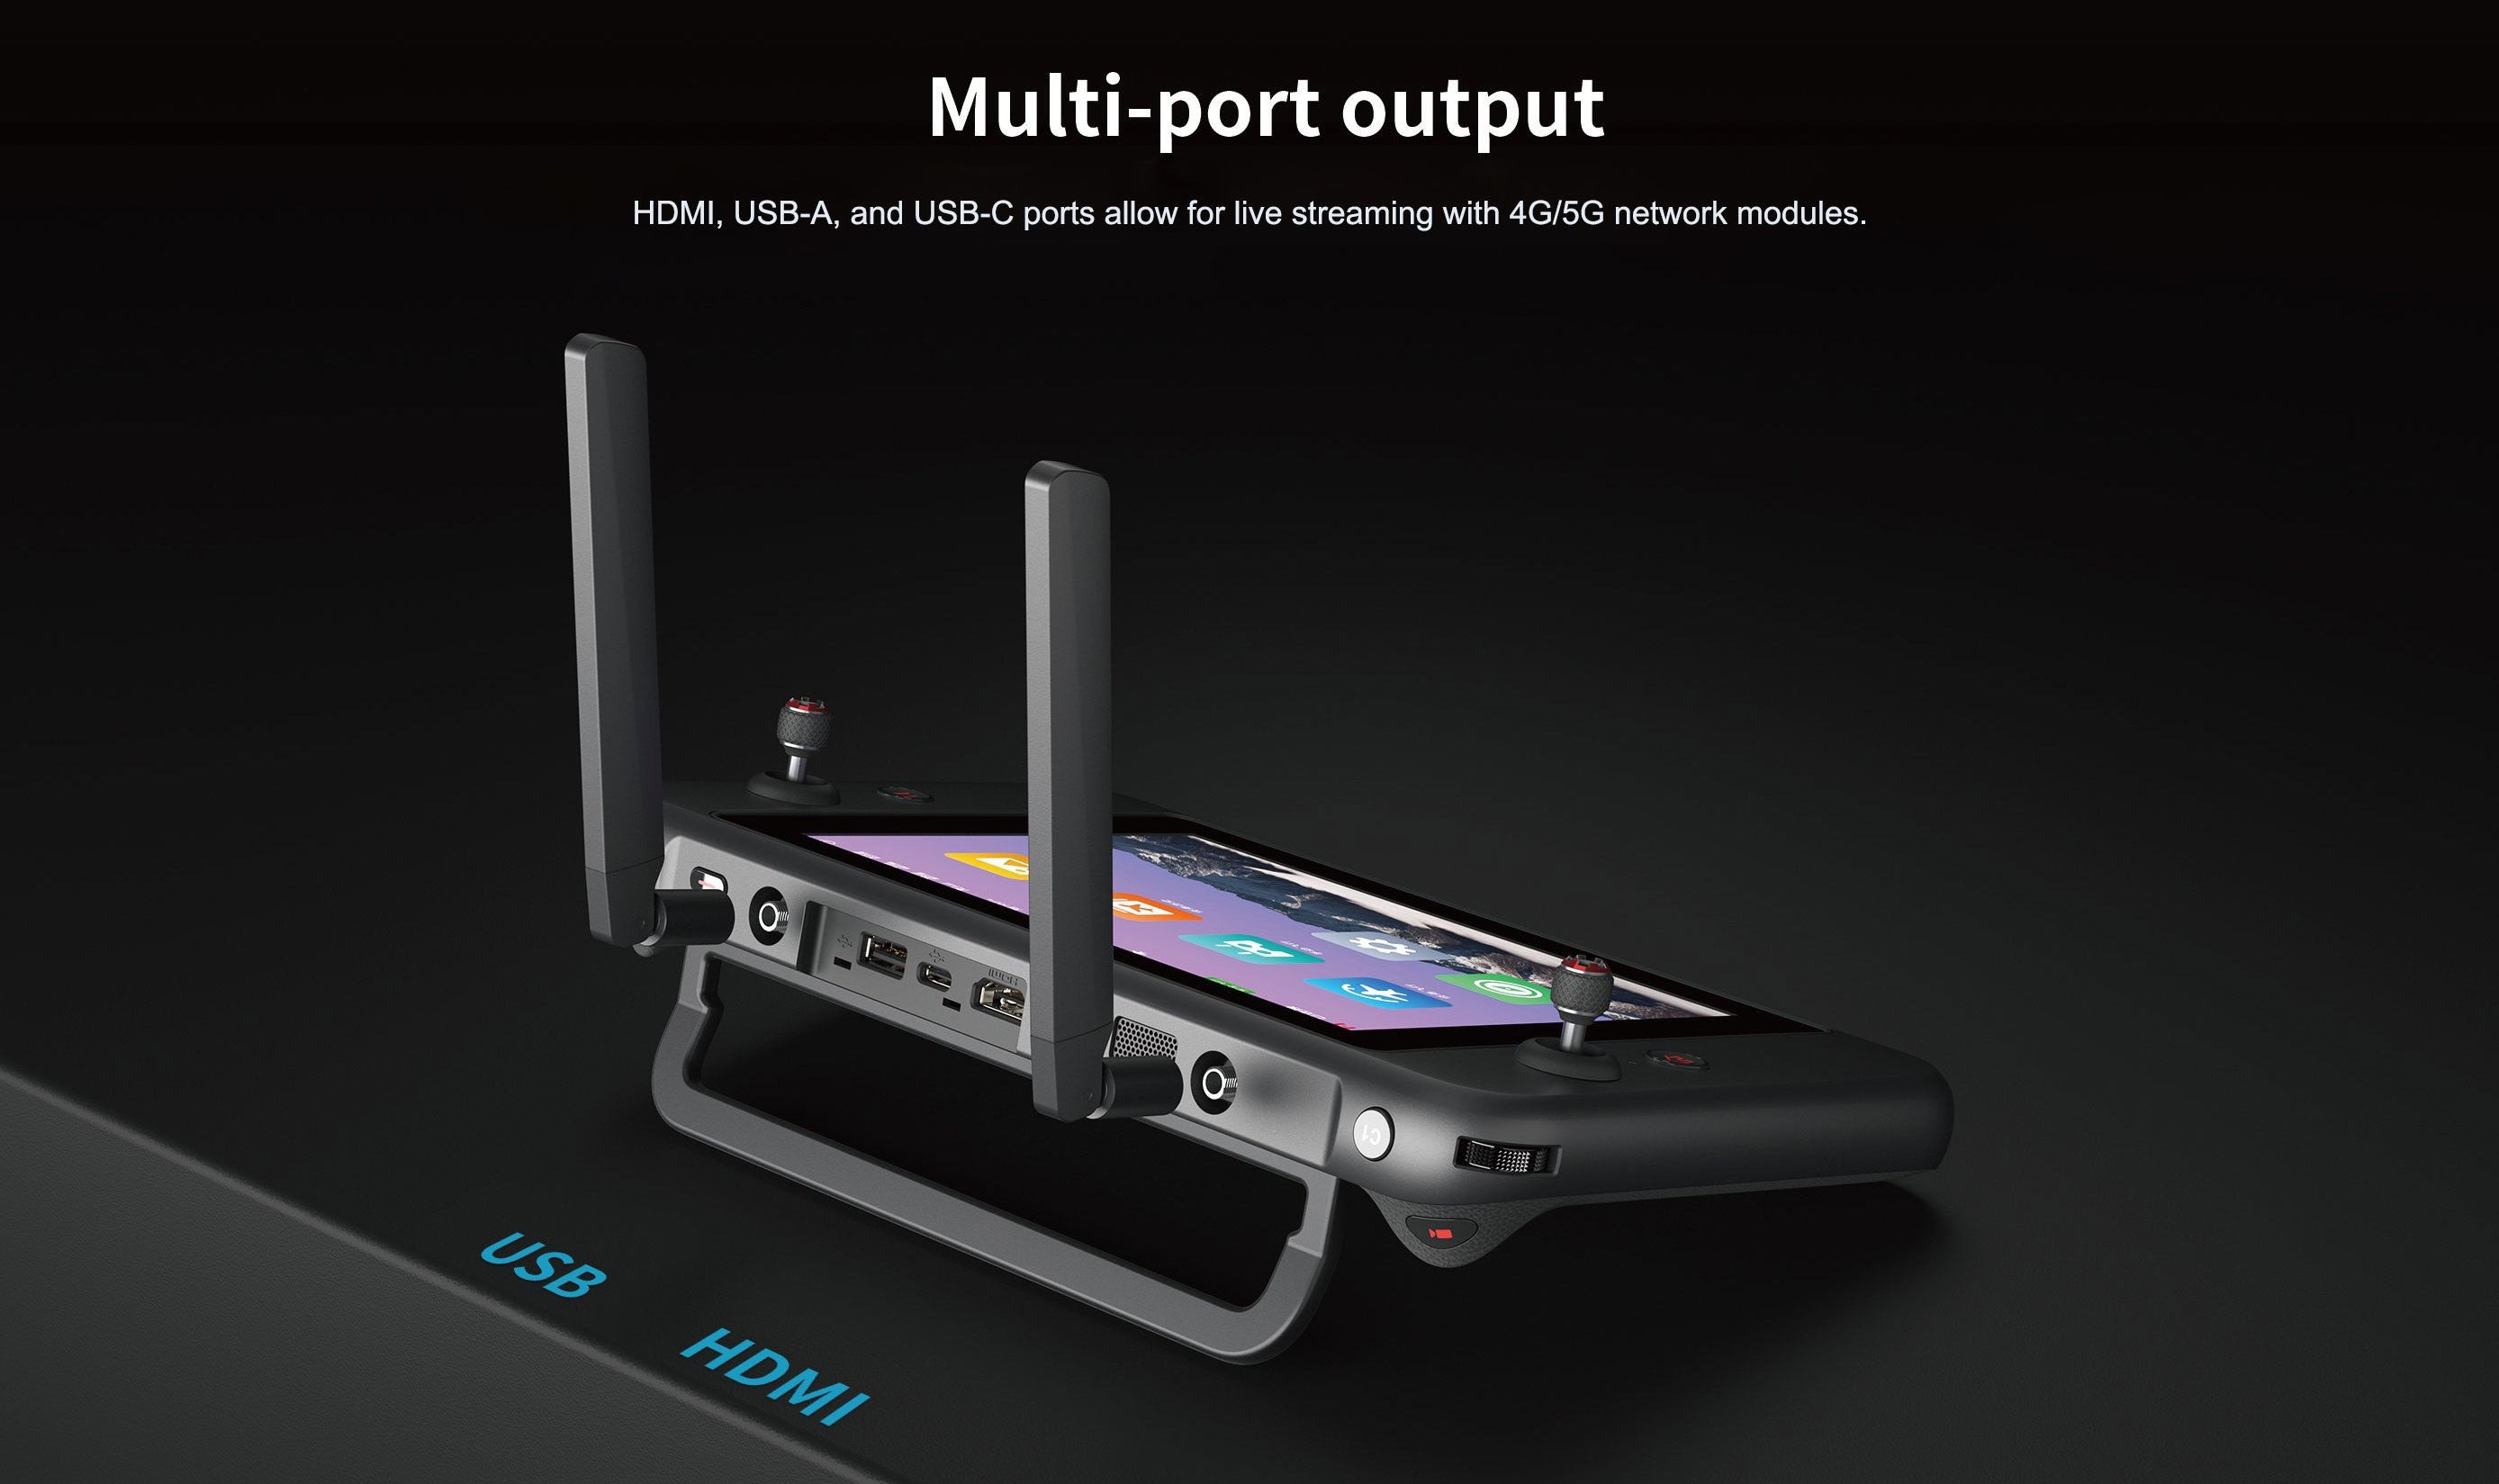
The Autel Smart Remote Control features an HDMI output for connecting to external displays.
2. Scenarios Where HDMI Output is Crucial
HDMI connectivity is indispensable in several practical scenarios, providing enhanced flexibility and convenience for drone operators. Here are some key instances where HDMI output becomes essential:
- Outdoor Filming in Bright Sunlight: When flying a drone in direct sunlight, the brightness of the remote controller’s screen may be insufficient for clear viewing. Connecting to a higher-brightness external monitor via HDMI ensures optimal visibility and control.
- Team Collaboration: In situations where multiple team members need to monitor the drone’s camera feed simultaneously, HDMI output allows for sharing the video on a larger display, facilitating collaborative decision-making.
- Live Broadcasting: For live streaming events or broadcasts, HDMI output enables seamless integration with broadcasting equipment, allowing for real-time transmission of high-quality drone footage.
- Detailed Inspections: When conducting aerial inspections of infrastructure or construction sites, HDMI output to a large monitor provides a more detailed view, enabling inspectors to identify potential issues with greater accuracy.
3. Utilizing HDMI Output with Autel Smart Remote Control and Live Deck 2
Autel Robotics offers two primary methods for utilizing HDMI output with their drones: the Autel Smart Remote Control and the Autel Live Deck 2.
3.1. Autel Smart Remote Control
The Autel Smart Remote Control is equipped with an HDMI output interface, allowing users to connect it directly to a computer or external monitor. This provides a convenient and straightforward way to view the drone’s camera feed on a larger screen.
3.2. Autel Live Deck 2
The Autel Live Deck 2 is a dedicated device designed for transmitting Autel drone video to multiple terminal devices simultaneously. It connects to the drone via a wireless connection and provides HDMI outputs for connecting to multiple monitors or displays. This is particularly useful for sharing the drone’s video feed with a larger audience or for collaborative viewing scenarios. The Autel Live Deck 2 is compatible with the Autel EVO II V3 series drones.
The Autel Live Deck 2 transmits drone video to multiple devices via HDMI.
4. Step-by-Step Guide to Using HDMI Output for Live Video Streaming
To effectively live stream video from your Autel drone using HDMI output, follow these steps:
- Prepare the Necessary Equipment: Ensure you have the Autel Live Deck 2 (if using), a compatible monitor or display device, and an HDMI cable.
- Power On and Pair the Devices: Turn on the aircraft and pair it with the Autel Live Deck 2.
- Connect the HDMI Cable: Connect the Autel Live Deck 2 to the monitor or display device using the HDMI cable.
- Select the Appropriate HDMI Input: On the monitor or display device, select the HDMI input that corresponds to the port where the Autel Live Deck 2 is connected.
- Display the Live Drone Video: The live drone video should now be displayed on the monitor or display device.
5. Common HDMI Output Issues and Troubleshooting Steps
Encountering HDMI output problems can be frustrating. Here are common issues and detailed troubleshooting steps:
5.1. HDMI Port Has a Cable Plugged In, But Nothing Happens
This is a frequent problem. Let’s explore the possible reasons and solutions.
5.1.1. Drone Firmware Not Updated
Problem: Outdated firmware can cause compatibility issues with HDMI output.
Solution: Update your drone and remote controller to the latest firmware version using the Autel Assistant software. Check the official Autel Robotics website or the CARDIAGTECH.NET resources for the latest updates and instructions.
5.1.2. Incompatible Cable Wires
Problem: Not all HDMI cables are created equal. Some cables may not support the required bandwidth or resolution for drone video output.
Solution: Use a high-quality HDMI cable that is specifically designed for high-resolution video transmission. Ensure the cable is certified to support the resolution and refresh rate of your drone’s video output.
5.1.3. Black Screen or “No Input” Message
Problem: This indicates that the display device is not receiving a signal from the drone or remote controller.
Solution:
- Verify that the HDMI cable is securely connected to both the drone/remote controller and the display device.
- Try a different HDMI port on the display device.
- Ensure that the display device is set to the correct HDMI input source.
- Restart both the drone/remote controller and the display device.
5.1.4. Pixelated or Distorted Screen
Problem: This suggests a problem with the HDMI cable or the video signal being transmitted.
Solution:
- Try a different HDMI cable.
- Check the resolution settings on the drone/remote controller and the display device. Ensure that they are compatible.
- Reduce the video resolution to see if it improves the image quality.
5.1.5. Ports are Tight or Loose
Problem: A loose or damaged HDMI port can prevent a proper connection.
Solution:
- Gently try wiggling the HDMI cable in the port to see if it makes a connection.
- Inspect the HDMI port for any signs of damage or debris.
- If the port is damaged, it may need to be repaired or replaced by a professional.
5.2. HDMI is Working and is Interrupted
An intermittent HDMI connection can be caused by these factors:
5.2.1. Signal Interference or Loose Cables
Problem: Signal interference can disrupt the HDMI connection, causing the video output to be interrupted.
Solution:
- Ensure that the HDMI cable is securely connected to both the drone/remote controller and the display device.
- Try using a shorter HDMI cable.
- Move away from any potential sources of interference, such as Wi-Fi routers or other electronic devices.
6. Detailed Steps to Fix HDMI Port Hardware Issues
Let’s dive into each step to fix hardware issues.
Step 1: Check if the Cable is Plugged in Correctly
Ensure the HDMI cable is fully inserted into both the Autel device and the display. A loose connection is a common cause of signal loss.
Step 2: Test Different HDMI Cables
HDMI cables can degrade over time. Testing with a new, high-quality cable can quickly rule out a faulty cable as the issue. CARDIAGTECH.NET recommends using HDMI 2.0 or higher cables for optimal performance.
Step 3: Check the Display Settings of the Drone Smart Remote Control
Navigate to the display settings on your Autel Smart Remote Control to ensure the HDMI output is enabled and configured correctly. This often involves selecting the appropriate resolution and refresh rate.
Step 4: Check Whether the Drone Smart Remote Control and the HDMI Port of the Display are Damaged
Inspect the HDMI ports on both the drone remote and the display for physical damage or debris. Use a flashlight to get a better view and carefully clean the ports if necessary.
Step 5: Restart the Drone Smart Remote Control and Display
A simple restart can often resolve temporary glitches. Power cycle both devices to refresh the connection and settings.
Step 6: Update Drone and Drone Smart Remote Controller Firmware
Outdated firmware can lead to compatibility issues. Ensure both your drone and smart remote controller are running the latest firmware. CARDIAGTECH.NET provides detailed guides on how to perform these updates.
Step 7: Restart the Monitor
Restarting the monitor can refresh its settings and resolve display issues.
7. Advanced Troubleshooting Techniques
When basic troubleshooting steps fail, consider these advanced techniques:
7.1. Inspecting the HDMI Ports
Examine the HDMI ports on both the drone’s remote controller and the display device for any signs of physical damage or debris. Use a magnifying glass to get a closer look and carefully clean the ports with a soft brush or compressed air.
7.2. Checking the HDMI Output Settings
Access the settings menu on the drone’s remote controller and verify that the HDMI output is enabled and configured correctly. Ensure that the resolution and refresh rate settings are compatible with the display device.
7.3. Testing with Different Display Devices
Connect the drone’s HDMI output to different display devices, such as a computer monitor or a television, to determine if the issue is specific to a particular display. This can help isolate the problem and identify whether the issue lies with the drone or the display device.
7.4. Seeking Professional Assistance
If you have exhausted all troubleshooting steps and the HDMI output is still not working, it may be necessary to seek professional assistance from Autel Support or a qualified drone repair technician. They can diagnose and repair any underlying hardware or software issues that may be causing the problem.
8. Preventing HDMI Port Issues
Prevention is better than cure. Here are some tips:
- Use High-Quality Cables: Invest in durable, well-shielded HDMI cables to ensure a stable connection and minimize signal interference.
- Protect the Ports: Use port covers or dust caps to protect the HDMI ports from dust, debris, and physical damage.
- Handle with Care: Avoid excessive force when plugging or unplugging HDMI cables to prevent damage to the ports.
- Regular Maintenance: Periodically inspect the HDMI ports for any signs of damage or debris and clean them as needed.
9. Understanding HDMI Standards and Compatibility
Different HDMI standards offer varying levels of performance and features. It’s crucial to understand these standards to ensure compatibility and optimal performance.
9.1. HDMI Versions
- HDMI 1.4: Supports 4K resolution at 30Hz, 3D video, and Audio Return Channel (ARC).
- HDMI 2.0: Supports 4K resolution at 60Hz, increased bandwidth, and High Dynamic Range (HDR).
- HDMI 2.1: Supports 8K resolution at 60Hz or 4K resolution at 120Hz, Dynamic HDR, and enhanced Audio Return Channel (eARC).
9.2. Compatibility Considerations
Ensure that the HDMI ports and cables you are using support the required HDMI standard for your drone’s video output. Using an older HDMI standard may result in reduced resolution, refresh rate, or lack of support for certain features.
10. Optimizing HDMI Output for Different Applications
The optimal HDMI output settings may vary depending on the intended application.
10.1. Presentations
For presentations, prioritize image clarity and resolution. Choose a resolution that is appropriate for the display device and ensure that the colors are accurate and vibrant.
10.2. Real-Time Monitoring
For real-time monitoring, prioritize frame rate and low latency. Choose a resolution and refresh rate that provide a smooth and responsive viewing experience.
10.3. Professional Videography
For professional videography, prioritize color accuracy and dynamic range. Use a high-quality HDMI cable and a display device that supports HDR to capture the full range of colors and details in your drone footage.
11. The Advantage of Purchasing From CARDIAGTECH.NET
At CARDIAGTECH.NET, we understand the critical role that reliable tools and equipment play in the automotive repair industry. We go beyond merely selling products, offering:
- Expert Guidance: Our experienced team provides professional advice to help you select the perfect tools for your specific needs.
- Quality Assurance: We source our products from trusted manufacturers, guaranteeing durability and optimal performance.
- Comprehensive Support: From initial purchase to after-sales service, we are committed to supporting you every step of the way.
Do you struggle with finding the right tools for your auto repair shop? Contact CARDIAGTECH.NET today at 276 Reock St, City of Orange, NJ 07050, United States, or reach out via Whatsapp at +1 (641) 206-8880. Visit our website CARDIAGTECH.NET for more information.
12. Frequently Asked Questions (FAQ)
Q1: Why is my HDMI output not working on my Autel Evo drone?
A1: There could be several reasons, including outdated firmware, faulty HDMI cables, incorrect display settings, or hardware damage.
Q2: How do I update the firmware on my Autel Evo drone and remote controller?
A2: You can update the firmware using the Autel Assistant software, available on the official Autel Robotics website.
Q3: What type of HDMI cable should I use for my Autel Evo drone?
A3: Use a high-quality HDMI cable that supports the resolution and refresh rate of your drone’s video output. HDMI 2.0 or higher is recommended.
Q4: How do I enable HDMI output on my Autel Smart Remote Control?
A4: Access the settings menu on the remote control and verify that the HDMI output is enabled and configured correctly.
Q5: Can I use the Autel Live Deck 2 with any Autel drone?
A5: The Autel Live Deck 2 is only compatible with the Autel EVO II V3 series drones.
Q6: What should I do if my HDMI port is damaged?
A6: If the HDMI port is damaged, it may need to be repaired or replaced by a professional. Contact Autel Support or a qualified drone repair technician.
Q7: How can I prevent HDMI port issues?
A7: Use high-quality cables, protect the ports from dust and damage, and handle the cables with care.
Q8: What is the latest HDMI standard?
A8: The latest HDMI standard is HDMI 2.1, which supports 8K resolution at 60Hz or 4K resolution at 120Hz.
Q9: How do I optimize HDMI output for presentations?
A9: Prioritize image clarity and resolution. Choose a resolution that is appropriate for the display device and ensure that the colors are accurate and vibrant.
Q10: Where can I find more information about Autel Evo drones and accessories?
A10: You can find more information on the official Autel Robotics website or on CARDIAGTECH.NET.
13. Conclusion
Mastering HDMI Autel Evo connectivity is crucial for maximizing your drone’s potential. By understanding common issues, following detailed troubleshooting steps, and implementing preventive measures, you can ensure a seamless and reliable video output experience. Remember, CARDIAGTECH.NET is your trusted partner for all your automotive and drone-related needs, offering expert guidance, quality products, and comprehensive support.