Eobd/obdii Error P0155 can be a frustrating issue for any car owner or mechanic. CARDIAGTECH.NET provides you with a comprehensive guide to understanding, diagnosing, and resolving this error, ensuring your vehicle runs smoothly. We’ll explore the root causes, symptoms, and step-by-step solutions to help you tackle the P0155 code effectively, offering premium diagnostic tools to assist you every step of the way.
1. Understanding the EOBD/OBDII Error Code P0155
The error code P0155, as defined by the Society of Automotive Engineers (SAE), indicates a problem with the oxygen (O2) sensor heater circuit in Bank 2, Sensor 1. This sensor is crucial for monitoring the exhaust gases and ensuring optimal engine performance. Let’s break down what each component of this code means:
- O2 Sensor: Measures the amount of oxygen in the exhaust gas.
- Heater Circuit: Heats the O2 sensor to operating temperature quickly for accurate readings.
- Bank 2: Refers to the side of the engine opposite cylinder number 1.
- Sensor 1: Indicates the sensor located before the catalytic converter (upstream sensor).
Understanding these components is vital for accurately diagnosing and resolving the P0155 error code. Accurate O2 sensor readings are paramount for efficient fuel combustion and emissions control.
2. Common Symptoms Associated with EOBD/OBDII Error P0155
When the O2 sensor heater circuit malfunctions, several symptoms may arise, affecting your vehicle’s performance and fuel efficiency. Being aware of these symptoms can help you identify the problem early and prevent further damage. Common symptoms include:
- Check Engine Light: The most obvious sign is the illumination of the check engine light on your dashboard.
- Poor Fuel Economy: A faulty O2 sensor can lead to an improper air-fuel mixture, resulting in reduced fuel efficiency.
- Rough Engine Performance: The engine may run rough, especially during cold starts, due to the sensor not reaching operating temperature quickly.
- Failed Emission Test: Since the O2 sensor is crucial for emissions control, a malfunctioning sensor can cause your vehicle to fail an emission test.
- Hesitation During Acceleration: You might experience hesitation or a lack of power when accelerating.
- Engine Stalling: In some cases, the engine may stall, particularly when idling.
These symptoms highlight the importance of promptly addressing the P0155 error code.
3. Potential Causes of EOBD/OBDII Error P0155
Several factors can trigger the P0155 error code. Identifying the root cause is essential for an effective and lasting repair. Common causes include:
- Faulty O2 Sensor: The sensor itself may be defective, with a malfunctioning heater circuit.
- Wiring Issues: Damaged, corroded, or disconnected wiring to the O2 sensor can disrupt the heater circuit.
- Blown Fuse: A blown fuse in the O2 sensor heater circuit can cut off power to the sensor.
- Relay Problems: A malfunctioning relay can prevent the heater circuit from operating correctly.
- ECM/PCM Issues: In rare cases, a faulty Engine Control Module (ECM) or Powertrain Control Module (PCM) can cause the P0155 error.
Addressing these potential causes systematically will help you pinpoint the exact problem. Consider purchasing diagnostic tools from CARDIAGTECH.NET to streamline this process.
4. Step-by-Step Diagnostic Procedure for EOBD/OBDII Error P0155
Diagnosing the P0155 error code requires a systematic approach. Here’s a step-by-step procedure to help you identify the problem:
- Read the Error Code: Use an OBDII scanner to confirm the presence of the P0155 code and any other related codes.
- Inspect the O2 Sensor: Visually inspect the O2 sensor, looking for any signs of damage, corrosion, or contamination.
- Check the Wiring: Examine the wiring and connectors leading to the O2 sensor. Look for any breaks, frays, or loose connections.
- Test the Heater Circuit: Use a multimeter to test the resistance of the O2 sensor heater circuit. A reading outside the specified range indicates a faulty sensor.
- Check the Fuse: Locate the fuse for the O2 sensor heater circuit and check if it is blown. Replace it if necessary.
- Test the Relay: If the fuse is intact, test the relay for the O2 sensor heater circuit. A faulty relay should be replaced.
- Inspect for Exhaust Leaks: Check for any exhaust leaks near the O2 sensor, as these can affect its performance.
- Consult a Wiring Diagram: Refer to your vehicle’s wiring diagram to ensure all connections are correct.
- Check the ECM/PCM: As a last resort, inspect the ECM/PCM for any signs of damage or malfunction. This usually requires professional diagnosis.
Following these steps will guide you in accurately diagnosing the cause of the P0155 error.
5. Tools Needed for Diagnosing and Repairing EOBD/OBDII Error P0155
Having the right tools can make the diagnostic and repair process much smoother. Here’s a list of essential tools you’ll need:
- OBDII Scanner: To read and clear error codes. CARDIAGTECH.NET offers a range of high-quality OBDII scanners.
- Multimeter: To test the resistance and voltage of the O2 sensor heater circuit.
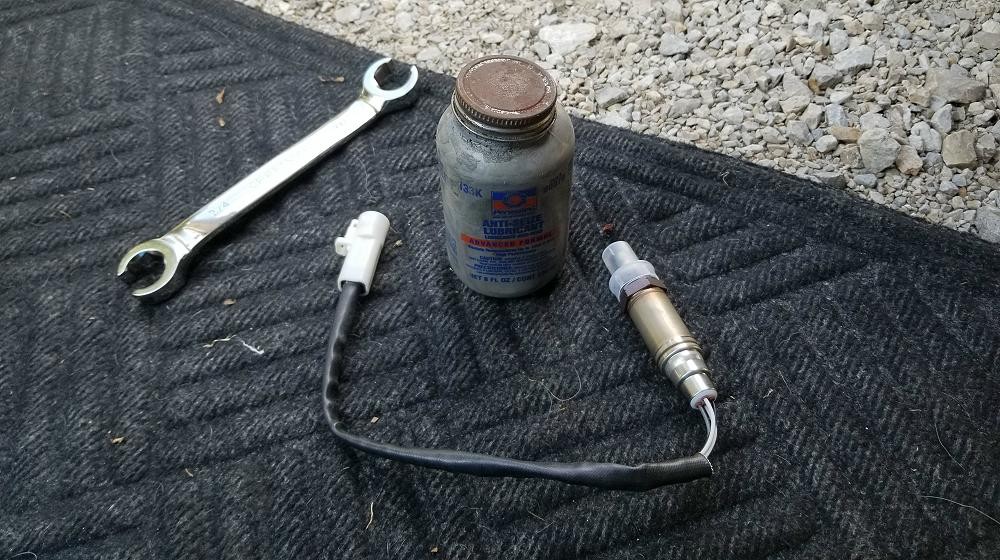
- Wrench Set: Including a 22mm or 7/8-inch wrench for removing and installing the O2 sensor.
- Wiring Diagram: To understand the O2 sensor wiring and connections.
- Fuse Tester: To check the continuity of fuses.
- Relay Tester: To test the functionality of relays.
- Anti-Seize Compound: To apply to the threads of the new O2 sensor.
- Jack and Jack Stands: To safely lift the vehicle for access to the O2 sensor.
- Gloves and Safety Glasses: To protect yourself during the repair process.
Investing in quality tools from CARDIAGTECH.NET ensures you have the right equipment for the job.
6. Step-by-Step Repair Procedures for EOBD/OBDII Error P0155
Once you’ve diagnosed the cause of the P0155 error, follow these repair procedures to resolve the issue:
6.1. Replacing a Faulty O2 Sensor
- Gather Your Tools: Ensure you have the necessary tools, including a wrench, new O2 sensor, and anti-seize compound.
- Disconnect the Battery: Disconnect the negative battery terminal to prevent electrical shorts.
- Locate the O2 Sensor: Identify the Bank 2, Sensor 1 O2 sensor. This is typically located on the exhaust manifold before the catalytic converter on the side opposite cylinder number 1.
- Disconnect the Electrical Connector: Disconnect the electrical connector from the O2 sensor.
- Remove the Old Sensor: Use a wrench to carefully remove the old O2 sensor. Be sure to apply penetrating oil if the sensor is stuck.
- Apply Anti-Seize Compound: Apply a small amount of anti-seize compound to the threads of the new O2 sensor.
- Install the New Sensor: Carefully install the new O2 sensor, tightening it to the manufacturer’s specified torque.
- Reconnect the Electrical Connector: Reconnect the electrical connector to the O2 sensor.
- Reconnect the Battery: Reconnect the negative battery terminal.
- Clear the Error Code: Use an OBDII scanner to clear the P0155 error code.
- Test Drive: Take the vehicle for a test drive to ensure the error code does not return.
6.2. Repairing Wiring Issues
- Identify the Damaged Wiring: Locate any damaged, corroded, or disconnected wiring leading to the O2 sensor.
- Clean Corroded Connectors: Use a wire brush or electrical contact cleaner to clean any corroded connectors.
- Repair Broken Wires: Splice and reconnect any broken wires using appropriate connectors.
- Replace Damaged Wiring: If the wiring is severely damaged, replace it with new wiring of the same gauge.
- Secure the Wiring: Ensure all wiring is properly secured and routed away from hot exhaust components.
6.3. Replacing a Blown Fuse
- Locate the Fuse Box: Find the fuse box for the O2 sensor heater circuit. Consult your vehicle’s owner’s manual for the location.
- Identify the Blown Fuse: Use a fuse tester or visually inspect the fuse to determine if it is blown.
- Replace the Fuse: Replace the blown fuse with a new fuse of the same amperage.
6.4. Replacing a Faulty Relay
- Locate the Relay: Find the relay for the O2 sensor heater circuit. Consult your vehicle’s wiring diagram for the location.
- Test the Relay: Use a multimeter or relay tester to check the functionality of the relay.
- Replace the Relay: Replace the faulty relay with a new relay of the same type.
By following these repair procedures, you can effectively resolve the P0155 error code.
7. The Importance of Using Quality Parts
When repairing your vehicle, using high-quality parts is essential for ensuring reliability and longevity. Inferior parts may fail prematurely, leading to repeat repairs and further expenses. Here’s why you should always opt for quality parts:
- Reliability: Quality parts are manufactured to meet or exceed OEM specifications, ensuring they perform reliably under various conditions.
- Durability: High-quality materials and construction make these parts more durable and resistant to wear and tear.
- Performance: Quality parts ensure optimal engine performance and fuel efficiency.
- Longevity: Investing in quality parts can extend the lifespan of your vehicle and prevent future issues.
- Warranty: Reputable manufacturers often offer warranties on their parts, providing peace of mind.
CARDIAGTECH.NET is committed to providing our customers with only the highest quality parts, ensuring your vehicle runs smoothly and reliably.
8. Preventing Future EOBD/OBDII Error P0155 Issues
Preventing future issues with the O2 sensor heater circuit involves regular maintenance and proactive measures. Here are some tips to help you avoid the P0155 error code in the future:
- Regular Inspections: Inspect the O2 sensors and wiring during routine maintenance checks.
- Proper Wiring Maintenance: Ensure all wiring is properly secured and protected from damage.
- Use Quality Fuel: Avoid using low-quality fuel that can damage the O2 sensors and other engine components.
- Monitor Fuel Efficiency: Keep track of your vehicle’s fuel efficiency and address any sudden drops promptly.
- Address Exhaust Leaks: Repair any exhaust leaks as soon as they are detected.
- Regular OBDII Scans: Periodically scan your vehicle for error codes, even if the check engine light is not illuminated.
- Follow Maintenance Schedule: Adhere to your vehicle’s recommended maintenance schedule for optimal performance and longevity.
By following these preventive measures, you can minimize the risk of encountering the P0155 error code and keep your vehicle running smoothly.
9. How CARDIAGTECH.NET Can Help
At CARDIAGTECH.NET, we understand the challenges of diagnosing and repairing automotive issues like the P0155 error code. That’s why we offer a wide range of high-quality diagnostic tools and parts to help you get the job done right. Here’s how we can assist you:
- OBDII Scanners: Our advanced OBDII scanners provide accurate and reliable error code readings, helping you quickly identify the problem.
- Quality Parts: We offer a comprehensive selection of O2 sensors, wiring, fuses, and relays, all manufactured to the highest standards.
- Expert Support: Our team of experienced technicians is available to provide expert advice and support, helping you diagnose and repair your vehicle.
- Competitive Prices: We offer competitive prices on all our products, ensuring you get the best value for your money.
- Fast Shipping: We provide fast and reliable shipping, so you can get the parts you need quickly.
Investing in quality tools and parts from CARDIAGTECH.NET can save you time, money, and frustration in the long run.
10. Understanding Oxygen Sensors and Their Function
Oxygen sensors play a critical role in your vehicle’s engine management system. They monitor the amount of oxygen in the exhaust gases and provide feedback to the ECM/PCM, which adjusts the air-fuel mixture to optimize combustion. Here’s a more detailed look at their function:
- Air-Fuel Ratio Monitoring: O2 sensors measure the oxygen content in the exhaust gases, indicating whether the engine is running rich (too much fuel) or lean (too little fuel).
- Feedback to ECM/PCM: The sensors send this information to the ECM/PCM, which then adjusts the amount of fuel injected into the engine to maintain the ideal air-fuel ratio (14.7:1).
- Optimized Combustion: By maintaining the correct air-fuel ratio, O2 sensors help ensure efficient combustion, reducing emissions and improving fuel economy.
- Types of O2 Sensors: There are two main types of O2 sensors: upstream sensors (before the catalytic converter) and downstream sensors (after the catalytic converter). Upstream sensors are primarily responsible for air-fuel ratio control, while downstream sensors monitor the efficiency of the catalytic converter.
- Heated O2 Sensors: Modern O2 sensors are heated to reach operating temperature quickly, ensuring accurate readings even during cold starts. The P0155 error code specifically relates to the heater circuit of the O2 sensor.
Understanding the function of oxygen sensors can help you appreciate their importance and the need for proper maintenance and repair.
11. The Role of the Catalytic Converter
The catalytic converter is another essential component of your vehicle’s emission control system. It uses chemical reactions to convert harmful pollutants in the exhaust gases into less harmful substances. Here’s a closer look at its role:
- Pollutant Conversion: The catalytic converter converts carbon monoxide (CO), hydrocarbons (HC), and nitrogen oxides (NOx) into carbon dioxide (CO2), water (H2O), and nitrogen (N2).
- Chemical Reactions: It uses precious metals such as platinum, palladium, and rhodium as catalysts to facilitate these chemical reactions.
- Efficiency Monitoring: The downstream O2 sensor monitors the efficiency of the catalytic converter, ensuring it is functioning properly.
- Environmental Impact: By reducing harmful emissions, the catalytic converter plays a crucial role in protecting the environment.
A properly functioning catalytic converter is essential for meeting emission standards and maintaining air quality.
12. Understanding OBDII Systems
OBDII (On-Board Diagnostics II) is a standardized system used in modern vehicles to monitor and diagnose various engine and emission control components. Here’s what you need to know about OBDII systems:
- Standardization: OBDII is a standardized system mandated in the United States since 1996 and in many other countries as well.
- Error Code Detection: The system monitors various sensors and components, detecting any malfunctions and storing corresponding error codes.
- Check Engine Light: When an error is detected, the OBDII system illuminates the check engine light on the dashboard.
- Diagnostic Information: Technicians can use an OBDII scanner to retrieve error codes and access diagnostic information, helping them identify and resolve the problem.
- Emission Control: OBDII systems play a crucial role in ensuring vehicles meet emission standards and protect the environment.
Understanding OBDII systems can help you better understand your vehicle’s performance and address any issues promptly.
13. Using a Multimeter to Diagnose Electrical Issues
A multimeter is an indispensable tool for diagnosing electrical issues in your vehicle. It can measure voltage, resistance, and current, helping you pinpoint problems in circuits and components. Here’s how to use a multimeter effectively:
- Voltage Measurement: Use a multimeter to measure the voltage at various points in a circuit to check for proper power supply.
- Resistance Measurement: Measure the resistance of components such as sensors and resistors to check for continuity and proper functioning.
- Continuity Testing: Use the continuity function to check for breaks in wires or circuits.
- Current Measurement: Measure the current flowing through a circuit to check for excessive or insufficient current draw.
- Safety Precautions: Always follow safety precautions when using a multimeter, such as wearing gloves and safety glasses.
Mastering the use of a multimeter can greatly enhance your diagnostic skills and help you resolve a wide range of electrical issues.
14. Tips for Working Safely on Your Vehicle
Working on your vehicle can be a rewarding experience, but it’s essential to prioritize safety. Here are some tips to help you work safely:
- Disconnect the Battery: Always disconnect the negative battery terminal before working on electrical components.
- Use Jack Stands: When lifting your vehicle, always use jack stands to support it securely.
- Wear Safety Glasses: Protect your eyes from flying debris by wearing safety glasses.
- Wear Gloves: Protect your hands from sharp edges, hot surfaces, and chemicals by wearing gloves.
- Work in a Well-Ventilated Area: Avoid working in enclosed spaces where fumes can accumulate.
- Use the Right Tools: Use the appropriate tools for the job to avoid damaging components or injuring yourself.
- Follow Instructions: Always follow the manufacturer’s instructions when installing or repairing components.
- Stay Focused: Avoid distractions and stay focused on the task at hand.
By following these safety tips, you can minimize the risk of accidents and injuries while working on your vehicle.
15. Common Mistakes to Avoid When Diagnosing EOBD/OBDII Error P0155
Diagnosing the P0155 error code can be challenging, and it’s easy to make mistakes. Here are some common pitfalls to avoid:
- Not Reading the Error Code Correctly: Always double-check the error code and its definition to ensure you understand the problem.
- Ignoring Related Codes: Pay attention to any other error codes that may be present, as they can provide valuable clues.
- Not Inspecting the Wiring: Thoroughly inspect the wiring and connectors leading to the O2 sensor, as wiring issues are a common cause of the P0155 error.
- Replacing the O2 Sensor Without Testing: Don’t assume the O2 sensor is faulty without testing it first. Use a multimeter to check the resistance of the heater circuit.
- Not Checking the Fuse and Relay: Always check the fuse and relay for the O2 sensor heater circuit before replacing other components.
- Not Clearing the Error Code After Repair: After completing the repair, clear the error code and test drive the vehicle to ensure the problem is resolved.
- Using Low-Quality Parts: Avoid using low-quality parts that may fail prematurely. Invest in quality parts from reputable suppliers like CARDIAGTECH.NET.
By avoiding these common mistakes, you can improve your diagnostic accuracy and resolve the P0155 error code more effectively.
16. Advanced Diagnostic Techniques for EOBD/OBDII Error P0155
For complex cases, advanced diagnostic techniques may be necessary to pinpoint the cause of the P0155 error code. These techniques include:
- Using a Scan Tool with Live Data: A scan tool that can display live data from the O2 sensor can help you monitor its performance in real-time.
- Performing a Voltage Drop Test: A voltage drop test can help you identify excessive resistance in the wiring circuit.
- Using an Oscilloscope: An oscilloscope can display the waveform of the O2 sensor signal, providing valuable insights into its performance.
- Performing a Smoke Test: A smoke test can help you identify exhaust leaks near the O2 sensor.
- Consulting Technical Service Bulletins (TSBs): TSBs provide information on known issues and recommended repair procedures for specific vehicles.
These advanced techniques require specialized equipment and expertise, so it’s best to consult a qualified technician if you’re not comfortable performing them yourself.
17. EOBD/OBDII Error P0155 and Emission Testing
The P0155 error code can significantly impact your vehicle’s ability to pass an emission test. Here’s why:
- Emission Control System: The O2 sensor is a critical component of the emission control system, and a malfunctioning sensor can lead to increased emissions.
- Test Failure: If the P0155 error code is present, your vehicle will likely fail the emission test.
- Environmental Regulations: Many states and countries have strict emission regulations, and failing to meet these standards can result in fines or penalties.
- Repair Requirements: Before your vehicle can pass the emission test, you’ll need to diagnose and repair the cause of the P0155 error code.
Addressing the P0155 error code promptly is essential for ensuring your vehicle meets emission standards and avoids any legal or financial consequences.
18. The Importance of Regular Vehicle Maintenance
Regular vehicle maintenance is crucial for preventing a wide range of issues, including the P0155 error code. Here are some key maintenance tasks to keep your vehicle running smoothly:
- Oil Changes: Regular oil changes help keep your engine lubricated and prevent wear and tear.
- Filter Replacements: Replacing air, fuel, and oil filters ensures optimal engine performance and fuel efficiency.
- Spark Plug Replacements: Replacing spark plugs at the recommended intervals helps maintain proper ignition and combustion.
- Fluid Checks: Regularly check and top off fluids such as coolant, brake fluid, and power steering fluid.
- Tire Rotations: Rotating your tires helps ensure even wear and extends their lifespan.
- Brake Inspections: Regularly inspect your brakes for wear and tear and replace them as needed.
- Battery Maintenance: Keep your battery terminals clean and check the battery’s voltage regularly.
By following a regular maintenance schedule, you can prevent many common issues and extend the lifespan of your vehicle.
19. Addressing EOBD/OBDII Error P1151
The P1151 error code is closely related to the P0155 code, often appearing together. P1151 indicates a “Lack of HO2S21 Switch – Sensor Indicates Lean,” meaning the upstream oxygen sensor on Bank 2 (Sensor 1) is reporting a lean condition. Here’s how to address it:
- Check the O2 Sensor: Since P1151 often accompanies P0155, start by addressing the P0155 issue first. A faulty O2 sensor heater circuit (P0155) can cause the sensor to provide inaccurate readings, leading to a P1151 code.
- Inspect for Vacuum Leaks: Vacuum leaks can cause a lean condition. Check all vacuum hoses and intake manifold gaskets for leaks.
- Check Fuel Pressure: Insufficient fuel pressure can also cause a lean condition. Test the fuel pressure to ensure it’s within the manufacturer’s specifications.
- Inspect Fuel Injectors: Leaking or clogged fuel injectors can cause a lean condition. Consider having the fuel injectors professionally cleaned or replaced.
- Check the MAF Sensor: A dirty or faulty Mass Airflow (MAF) sensor can cause inaccurate readings, leading to a lean condition. Clean or replace the MAF sensor as needed.
Addressing both P0155 and P1151 codes systematically will ensure your engine runs efficiently and smoothly.
20. Contact CARDIAGTECH.NET for Assistance
Experiencing challenges diagnosing or repairing your vehicle? Need expert advice or high-quality diagnostic tools and parts? Contact CARDIAGTECH.NET today! Our knowledgeable team is ready to assist you with all your automotive needs.
- Address: 276 Reock St, City of Orange, NJ 07050, United States
- WhatsApp: +1 (641) 206-8880
- Website: CARDIAGTECH.NET
Let CARDIAGTECH.NET be your trusted partner in automotive diagnostics and repair. We’re here to help you keep your vehicle running at its best!
FAQ: Addressing Your Questions About EOBD/OBDII Error P0155
- What does the EOBD/OBDII error P0155 mean?
The P0155 error code indicates a problem with the oxygen (O2) sensor heater circuit in Bank 2, Sensor 1. This sensor is crucial for monitoring exhaust gases. - What are the common symptoms of the P0155 error?
Common symptoms include a check engine light, poor fuel economy, rough engine performance, failed emission test, hesitation during acceleration, and engine stalling. - What are the potential causes of the P0155 error?
Potential causes include a faulty O2 sensor, wiring issues, a blown fuse, relay problems, and ECM/PCM issues. - How can I diagnose the P0155 error?
You can diagnose the P0155 error by reading the error code, inspecting the O2 sensor and wiring, testing the heater circuit, checking the fuse and relay, and consulting a wiring diagram. - What tools do I need to diagnose and repair the P0155 error?
Essential tools include an OBDII scanner, multimeter, wrench set, wiring diagram, fuse tester, relay tester, anti-seize compound, jack, and jack stands. CARDIAGTECH.NET provides these tools. - Can I fix the P0155 error myself?
Yes, you can fix the P0155 error yourself if you have the necessary tools and knowledge. Follow the step-by-step repair procedures outlined in this guide. - What is the role of the O2 sensor in my vehicle?
The O2 sensor monitors the amount of oxygen in the exhaust gases and provides feedback to the ECM/PCM, which adjusts the air-fuel mixture to optimize combustion. - Why is it important to use quality parts when repairing my vehicle?
Using high-quality parts ensures reliability, durability, performance, and longevity. CARDIAGTECH.NET provides only the highest quality parts. - How can I prevent future issues with the O2 sensor heater circuit?
Preventive measures include regular inspections, proper wiring maintenance, using quality fuel, monitoring fuel efficiency, and addressing exhaust leaks. - How can CARDIAGTECH.NET help me with the P0155 error?
CARDIAGTECH.NET offers high-quality OBDII scanners, quality parts, expert support, competitive prices, and fast shipping to help you diagnose and repair the P0155 error.