The Elm327 Obdii Wifi Interface is a powerful tool for car enthusiasts and DIY mechanics, allowing you to access your vehicle’s diagnostic information wirelessly. This guide will walk you through the simple steps to connect your ELM327 adapter to your smartphone or tablet using Wi-Fi and start using a car diagnostic app.
Step-by-Step Guide to Connect Your ELM327 OBDII WiFi Interface
Connecting your ELM327 WiFi adapter involves a few straightforward steps, primarily focusing on establishing a Wi-Fi connection between your adapter and your mobile device, and then configuring your car scanner app.
Step 1: Plug in and Power On Your ELM327 OBDII WiFi Adapter
First, locate the OBDII diagnostic socket in your car. This is usually found under the dashboard on the driver’s side. Plug your ELM327 OBDII WiFi interface securely into this socket.
Next, turn on your car’s ignition or start the engine. This will power up the OBDII system and your adapter. If your adapter has a power button, make sure to press it to turn it on.
Step 2: Connect to the ELM327 WiFi Network
Now, on your smartphone or tablet (iOS or Android), open the Wi-Fi settings. Ensure Wi-Fi is turned on.
Search for available Wi-Fi networks. Your ELM327 OBDII WiFi interface will broadcast a Wi-Fi network, typically named “OBDII”, “OBD2”, “WIFI_OBDII”, or something similar. Some adapters, like those from VGate, might have names like “VLINK”.
Select the network name associated with your adapter and connect to it. In most cases, these networks are open and do not require a password. If a password is required, consult the documentation that came with your ELM327 OBDII WiFi interface.
It is important to note that the network name will never be related to your car brand.
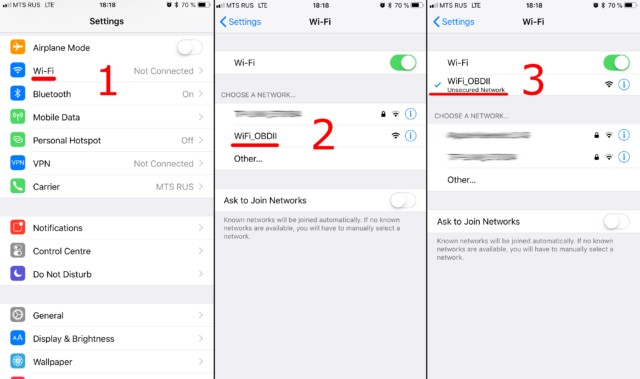 Connecting ELM327 OBDII Wi-Fi interface: Wi-Fi settings on iOS and Android showing OBDII network.
Step 3: Configure Your Car Scanner App
With your device connected to the adapter’s Wi-Fi, open your car scanner application (like Car Scanner). Navigate to the app’s settings, usually found by tapping a gear icon or menu button.
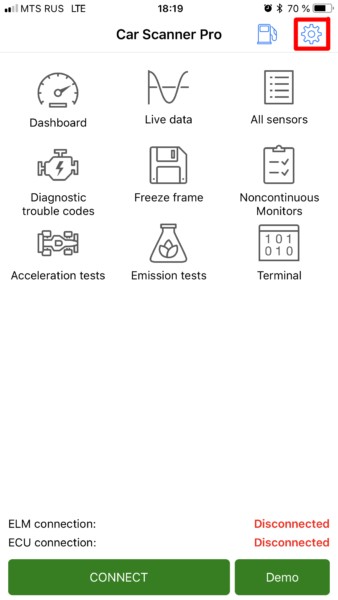 Accessing Car Scanner app settings to configure ELM327 OBDII Wi-Fi interface connection.
Look for a setting labeled “Adapter” or “Connection”. Tap on this option.
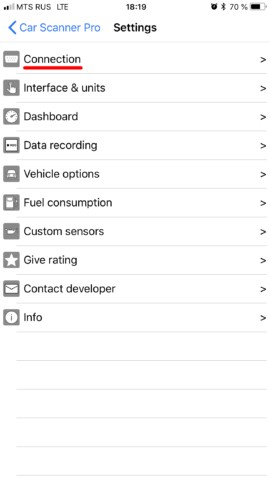 Selecting 'Adapter' settings within Car Scanner app for ELM327 OBDII Wi-Fi setup.
Within the connection settings, you will need to select the connection type. Choose “Wi-Fi”.
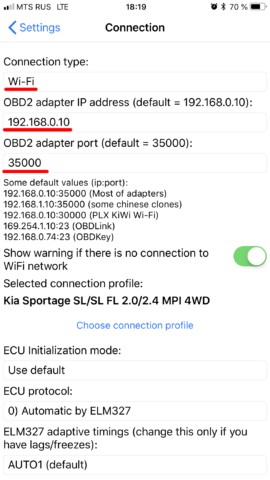 Choosing Wi-Fi as the connection type in Car Scanner for ELM327 OBDII interface.
Verify the Adapter IP address and Port settings. For the majority of ELM327 OBDII WiFi interfaces, the default IP address is 192.168.0.10 and the port is 35000. However, some adapters may use different settings, so always refer to the documentation provided with your specific adapter to confirm these values.
Once you have configured these settings, you are ready to connect. In the main screen of your car scanner app, tap the large “Connect” button.
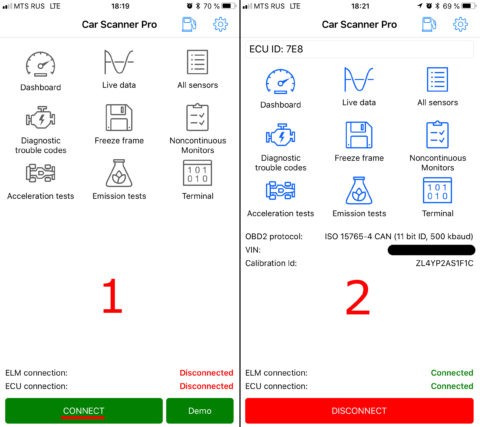 Connecting to ELM327 OBDII Wi-Fi interface in Car Scanner app.
Troubleshooting WiFi Connection Issues
If you encounter problems connecting, ensure the following:
- Adapter is powered: Double-check that your car ignition is on and the adapter is receiving power.
- Correct WiFi network: Verify you are connected to the correct Wi-Fi network broadcast by your ELM327 adapter, not your home or other networks.
- IP Address and Port: Confirm the IP address and port settings in your car scanner app match the values specified for your adapter.
- App Compatibility: Ensure your car scanner app is compatible with WiFi ELM327 adapters.
By following these steps, you should be able to establish a stable Wi-Fi connection with your ELM327 OBDII WiFi interface and start diagnosing your vehicle with ease.

