Bluetooth OBDII scanners have revolutionized car diagnostics, offering a convenient and wireless way to access your vehicle’s onboard computer system. When paired with the right Bluetooth Obdii Windows Software, these scanners empower you to read diagnostic trouble codes (DTCs), monitor real-time engine data, and gain valuable insights into your car’s health, all from the comfort of your Windows device.
This guide provides a comprehensive walkthrough on how to successfully connect your ELM327 Bluetooth OBD scanner to your Windows system. Whether you’re a seasoned mechanic or a car owner keen on understanding your vehicle better, this article will equip you with the knowledge to establish a seamless connection and utilize OBDII software effectively.
STEP 1: Plugging Your Bluetooth OBDII Scanner into Your Car’s OBD Port
The first step is to physically connect your Bluetooth OBDII scanner to your vehicle. The OBD-II port (On-Board Diagnostics II) is the standardized access point to your car’s computer.
It typically looks like this:
And is commonly located on the driver’s side dashboard area, usually beneath the steering wheel.
If you are having trouble locating your OBD port, you can use online resources designed to help you find it based on your car’s make and model. Once located, firmly plug your ELM327 Bluetooth scanner into the OBD port. You should usually see a power light illuminate on the scanner, indicating it’s receiving power from the car.
STEP 2: Turning ON Your Car’s Ignition
Before proceeding with the Bluetooth pairing process, you need to turn on your car’s ignition. This means turning the key to the position right before you start the engine. This step is crucial as it powers up your car’s computer system and the OBD port, allowing the Bluetooth scanner to initialize and become discoverable.
STEP 3: Adding and Pairing Your ELM327 Bluetooth Scanner to Windows
With the scanner plugged in and the ignition turned on, you can now proceed to pair the Bluetooth OBDII scanner with your Windows computer. Follow these steps:
- Access Bluetooth Settings: Right-click on the Bluetooth icon, usually found in the system tray (bottom right corner of your Windows taskbar). Select “Add a Bluetooth Device”.
-
Search for Your OBDII Scanner: Windows will begin searching for Bluetooth devices in range. Your ELM327 Bluetooth scanner may appear under various names such as OBDII, OBD-II, VLink, or Can OBDII.
Note: It might take up to 15 seconds for the Bluetooth signal from the OBD scanner to become visible. Be patient and allow sufficient time for the device to appear in the list.
Troubleshooting Tip: Signal Not Showing?
If the scanner’s signal doesn’t appear in the “Add a device” list, try these troubleshooting steps:
a. Rescan: Exit the “Add a device” screen, unplug the ELM327 Bluetooth scanner from your car’s OBD port, and then plug it back in. Initiate the “Add a device” process again.
b. Restart Computer: If rescanning doesn’t work, restart your Windows computer and repeat the “Add a device” process.
c. Check Power Light: Ensure the red power light on your ELM327 Bluetooth device is illuminated. If it is, the device is physically working and should be detectable.
d. Check “Show Bluetooth Devices”: If you have previously attempted to pair the device, it might not reappear in “Add a Device.” In this case, look for it in “Show Bluetooth Devices” in your Bluetooth settings.
-
Pairing Code Entry: When your OBDII scanner appears in the list, select it and proceed with pairing. Windows will prompt you for a pairing code.
For most ELM327 Bluetooth scanners, the default pairing code is:
Pair Code Options 1234 0000 (If 1234 doesn’t work) ———————– ——- 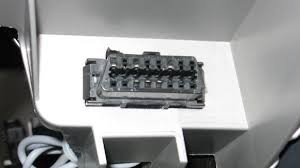

Enter either “1234” or “0000” as the pairing code when requested.
Additional Step for Windows XP Users: Windows XP may present a slightly different pairing option, prompting you to “Use the passkey found in the documentation.” In this case, use the pairing codes provided above.
-
COM Port Assignment: Once successfully paired, Windows will display a confirmation message and, importantly, the COM port numbers assigned to the Bluetooth connection.
Crucially, note down the number of the “Outgoing” COM port. This COM port number is essential as you will need to configure your bluetooth obdii windows software to use this specific port to communicate with the OBDII scanner.
STEP 4: Launching OBD Software and Connecting to Your Vehicle
With the Bluetooth pairing complete and the COM port noted, the final step is to launch your chosen OBD-II software on your Windows system and establish a connection to your vehicle through the Bluetooth OBDII scanner.
Launch your preferred OBD software. For optimal compatibility and a professional-grade experience, software like TOAD (Total OBD & ECU Auto Diagnostics) is highly recommended as it is fully compatible with Bluetooth OBDII scanners and offers advanced diagnostic capabilities.
Within your OBD software, navigate to the connection settings. You will typically find an option to select the connection type and the COM port. Choose “Bluetooth” as the connection type and select the “Outgoing” COM port number that you noted down in the previous step.
Click the “Connect” or similar button in your OBD software. The software should now automatically detect your ELM327 Bluetooth device and establish a connection to your car’s Engine Control Unit (ECU) through the scanner.
Troubleshooting Connection Issues with OBD Software
If your OBD software encounters difficulties connecting to your car, a common solution is to adjust the baud rate of the connection. A lower baud rate can sometimes resolve connection problems, especially with certain vehicles or software.
If your OBD software provides an option to set the baud rate, try setting it to 9600 or even 110 bits per second. Some software, like TOAD, includes a setting to force a 9600 bits per second connection, which can often resolve intermittent disconnection issues.
If your OBD software lacks a built-in baud rate setting, you can also adjust it through Windows Device Manager:
-
Access Device Manager:
- Windows XP: Go to Control Panel » System » “Hardware” tab » Device Manager » Ports (COM & LPT).
- Windows Vista/7/8/10: Go to Control Panel » System » Device Manager » Ports (COM & LPT).
-
Locate Bluetooth COM Port: Expand “Ports (COM & LPT)”. Right-click on “Standard Serial Bluetooth link” (the name might vary slightly). Select “Properties”.
-
Adjust Baud Rate: Go to the “Port Settings” tab. Lower the “Bits per second” value to 110. Click “OK”.
After adjusting the baud rate in Device Manager (if necessary), attempt to reconnect to your car using your OBD software.
By following these steps, you should be able to successfully pair your Bluetooth OBDII scanner with your Windows system and effectively utilize bluetooth obdii windows software for comprehensive vehicle diagnostics.