
The Autel EVO user’s guide is essential for mastering your drone and unlocking its full potential. CARDIAGTECH.NET provides comprehensive information on everything from setup and operation to advanced features and troubleshooting. Explore aerial photography tips, flight safety guidelines, and maintenance advice to enhance your piloting skills. Learn about flight modes, camera settings, and obstacle avoidance systems.
1. Understanding the Autel EVO II Series: A Comprehensive Guide
The Autel EVO II series is a versatile drone platform designed to meet the needs of both hobbyists and professionals. This section provides a detailed overview of the EVO II lineup, highlighting the key features and capabilities of each model. We’ll discuss the differences between the EVO II 8K, EVO II Pro (6K), and various thermal imaging options, helping you choose the right drone for your specific needs.
1.1. Visual/RGB Imaging or Thermal: Choosing the Right Camera for Your Mission
The first step in selecting the right Autel EVO II drone is determining whether you need visual/RGB imaging or thermal capabilities. This decision depends on the types of missions you plan to undertake. Visual/RGB imaging is suitable for general photography, videography, and mapping applications, while thermal imaging is essential for tasks such as search and rescue, inspections, and surveillance.
- Visual/RGB Imaging: Ideal for capturing high-resolution images and videos in daylight conditions.
- Thermal Imaging: Allows you to see heat signatures, making it useful for detecting anomalies and operating in low-light or no-light environments.
 Autel EVO II Pro
1.2. Visual/RGB Options: Comparing the EVO II (8K) and EVO II Pro (6K)
Autel offers two primary visual/RGB imaging options in the EVO II series: the EVO II (8K) and the EVO II Pro (6K). While both drones are capable of capturing stunning aerial imagery, they differ in sensor size and aperture control. Understanding these differences is crucial for making an informed decision.
- EVO II (8K): Features a ½” CMOS sensor, ideal for capturing detailed 8K video and 48MP photos in well-lit conditions.
- EVO II Pro (6K): Equipped with a 1” CMOS sensor, offering superior low-light performance and adjustable aperture from f/2.8 to f/11 for greater control over image exposure.
| Feature | EVO II (8K) | EVO II Pro (6K) |
|---|---|---|
| Sensor Size | ½” CMOS | 1” CMOS |
| Video Resolution | 8K | 6K |
| Photo Resolution | 48MP | 20MP |
| Aperture | Fixed | Adjustable (f/2.8-f/11) |
| Low-Light Performance | Good | Excellent |
According to DJI’s official website, sensor size significantly impacts image quality, especially in low-light conditions. The larger sensor on the EVO II Pro allows for better light gathering, resulting in cleaner and more detailed images.
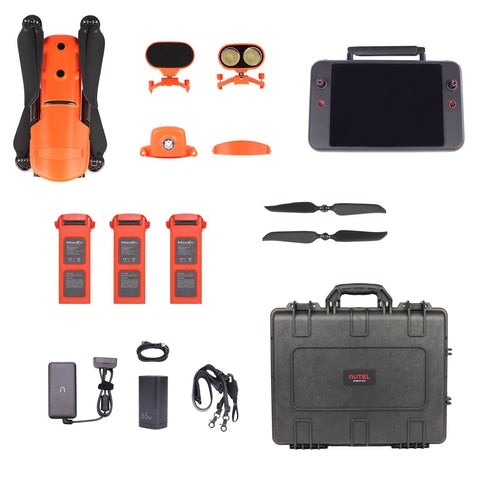
1.3. EVO II Base Units vs. Rugged Bundles: Which Package is Right for You?
When purchasing an Autel EVO II drone, you’ll typically have the option of choosing between a base unit and a rugged bundle. The rugged bundle includes additional accessories that can enhance your flying experience and protect your investment.
- Base Unit: Includes the drone, remote controller, and one intelligent battery.
- Rugged Bundle: Includes the drone, remote controller, two intelligent batteries, a rugged hard case, and often a subscription to Pix4Dreact software.
For professional users, the rugged bundle is often the preferred choice due to the added convenience and protection it offers. The extra battery ensures longer flight times, while the hard case safeguards the drone during transport and storage. CARDIAGTECH.NET offers both options, allowing you to select the package that best suits your needs.
1.4. EVO II V1 vs. V2: Key Differences and Compatibility
Autel Robotics has released two versions of the EVO II drone: V1 and V2. While both versions share many similarities, there are some key differences to be aware of, particularly regarding compatibility.
- EVO II V1: The original version of the EVO II drone.
- EVO II V2: An updated version featuring a dual-band transmission system for improved stability.
The primary difference between the V1 and V2 models lies in their transmission systems. The V2 utilizes a dual-band system, which enhances transmission stability and reduces interference. However, V1 and V2 controllers are not cross-compatible, meaning you cannot use a V1 controller with a V2 drone or vice versa.
All other accessories, such as batteries and camera payloads, are cross-compatible between the two versions. Always check the compatibility of your accessories before use.
1.5. The Versatility of Interchangeable Camera Payloads
One of the standout features of the Autel EVO II series is its interchangeable camera payload system. This innovative design allows you to swap out different camera modules depending on your specific needs.
- Flexibility: Easily switch between visual, thermal, and zoom cameras.
- Cost-Effective: Avoid purchasing multiple drones for different applications.
- Future-Proof: Upgrade your camera system as new technologies emerge.
For example, you can start with the EVO II Pro for high-resolution photography and later add a thermal camera for inspections or search and rescue operations. This flexibility makes the EVO II series a versatile and cost-effective solution for a wide range of applications. CARDIAGTECH.NET offers a variety of camera payloads, making it easy to customize your drone to meet your specific requirements.
1.6. EVO II Thermal Options: Dual, Dual R, and 640T
For applications requiring thermal imaging, the Autel EVO II series offers several options, each with its own unique capabilities.
- EVO II Dual: Features a FLIR Boson 640×512 thermal camera, ideal for general thermal imaging applications.
- EVO II Dual R: Includes a FLIR Radiometric 640×512 thermal camera, allowing for precise temperature measurement and post-flight analysis.
- EVO II 640T: Equipped with an InfiRay Radiometric 640 thermal camera, providing a cost-effective solution for thermal imaging.
| Feature | EVO II Dual | EVO II Dual R | EVO II 640T |
|---|---|---|---|
| Thermal Core | FLIR Boson | FLIR Radiometric | InfiRay Radiometric |
| Resolution | 640×512 | 640×512 | 640×512 |
| Radiometric | No | Yes | Yes |
| Post-Flight Analysis | No | Yes | Yes |
| Price | Mid-Range | High-End | Budget-Friendly |
The EVO II Dual R is particularly useful for applications requiring accurate temperature data, such as building inspections and solar panel analysis. The ability to capture and analyze radiometric data allows for the identification of potential issues before they escalate.
1.7. EVO II Enterprise Models: Enhanced Capabilities for Professional Use
The Autel EVO II Enterprise series is designed for professional users who require enhanced capabilities and durability. These models feature a robust airframe, longer flight times, and a range of add-on modules.
- EVO II Pro Enterprise: Combines the 6K camera of the EVO II Pro with the enhanced features of the Enterprise series.
- EVO II 640T Enterprise: Integrates the 640T thermal camera with the Enterprise airframe for advanced thermal imaging applications.
- EVO II Dual R Enterprise: Offers the radiometric thermal capabilities of the Dual R with the added benefits of the Enterprise series.
Key features of the EVO II Enterprise series include:
- Increased flight time (up to 42 minutes)
- Add-on module support (speaker, spotlight, strobe, RTK module)
- Carbon fiber arms for enhanced durability
- ADS-B receiver for improved airspace awareness
- Standard Autel 7.9” Smart Controller
According to Autel Robotics, the Enterprise series is built to withstand the harsh conditions that professional users may encounter during flights. The longer flight times and add-on modules make these drones ideal for demanding applications such as search and rescue, inspections, and surveying.
1.8. RTK with the EVO II Enterprise: Achieving Centimeter-Level Accuracy
For applications requiring precise positioning, the Autel EVO II Enterprise series offers an optional RTK (Real-Time Kinematic) module. RTK technology allows the drone to achieve centimeter-level accuracy, eliminating the need for ground control points in many surveying and mapping applications.
- Enhanced Accuracy: Achieve 1cm + 1ppm horizontal accuracy and 1.5cm + 1ppm vertical accuracy.
- Real-Time Corrections: Make real-time corrections using GPS positioning data.
- Improved Autonomy: Enhance waypoint navigation and overall autonomy.
RTK works by using a base station or network to provide real-time corrections to the drone’s GPS data. This results in significantly improved positioning accuracy, making it ideal for applications such as surveying, construction, and infrastructure inspection.
CARDIAGTECH.NET can help you integrate RTK into your EVO II Enterprise setup, providing the expertise and support you need to achieve the highest levels of accuracy. Contact us today to learn more about our RTK solutions. 276 Reock St, City of Orange, NJ 07050, United States. Whatsapp: +1 (641) 206-8880.
2. Setting Up Your Autel EVO II: A Step-by-Step Guide
Proper setup is crucial for ensuring a safe and successful flight with your Autel EVO II drone. This section provides a detailed, step-by-step guide to setting up your drone, from initial assembly to calibrating the compass.
2.1. Unboxing and Assembly: What’s in the Box?
Before you can start flying, you’ll need to unbox and assemble your Autel EVO II drone. Here’s what you can expect to find in the box:
- Autel EVO II Drone
- Remote Controller
- Intelligent Battery
- Battery Charger
- Propellers (pairs)
- Power Cable
- Communication Cable
- Gimbal Clamp
- Manuals and Documentation
Begin by carefully removing all items from the box. Attach the propellers to the drone, ensuring they are securely fastened. Refer to the drone’s manual for detailed instructions on propeller installation.
2.2. Charging the Batteries: Ensuring Optimal Performance
Before your first flight, it’s essential to fully charge the intelligent battery and the remote controller. Use the provided battery charger to charge the battery. The charging time is typically around 60-90 minutes.
- Battery Charging: Connect the battery to the charger and plug it into a power outlet. The LED indicator on the charger will turn green when the battery is fully charged.
- Remote Controller Charging: Use the provided USB cable to connect the remote controller to a power source. The charging time is similar to the battery.
It’s recommended to use only the official Autel charger to avoid damaging the battery. Proper battery maintenance is crucial for ensuring optimal performance and longevity. CARDIAGTECH.NET offers a range of battery care products to help you keep your batteries in top condition.
2.3. Installing the Autel Explorer App: Your Gateway to Flight Control
The Autel Explorer app is your primary interface for controlling the EVO II drone. Download and install the app on your smartphone or tablet from the App Store (iOS) or Google Play Store (Android).
- Download and Installation: Search for “Autel Explorer” in the app store and install the app.
- Account Creation: Create an Autel account or log in if you already have one.
- Device Pairing: Follow the in-app instructions to pair your mobile device with the remote controller.
The Autel Explorer app provides access to a wide range of features, including flight controls, camera settings, and telemetry data. Familiarize yourself with the app’s interface before your first flight.
2.4. Activating Your Drone: Linking Your Drone to Your Account
Before you can start flying, you’ll need to activate your Autel EVO II drone through the Autel Explorer app.
- Power On: Turn on the drone and the remote controller.
- App Connection: Connect your mobile device to the remote controller via USB cable.
- Activation: Follow the in-app instructions to activate your drone, linking it to your Autel account.
Activation is a one-time process that ensures your drone is properly registered and authorized for flight. This step is essential for unlocking all of the drone’s features and capabilities.
2.5. Compass Calibration: Ensuring Accurate Positioning
Proper compass calibration is crucial for ensuring accurate positioning and stable flight. The Autel Explorer app will prompt you to calibrate the compass if necessary.
- Calibration Process: Follow the in-app instructions to calibrate the compass. This typically involves rotating the drone horizontally and vertically in a figure-eight pattern.
- Location: Perform compass calibration in an open area away from metallic objects and sources of interference.
- Regular Calibration: It’s recommended to calibrate the compass before each flight, especially if you’re flying in a new location.
Compass calibration ensures that the drone’s internal compass is properly aligned with the Earth’s magnetic field. This is essential for accurate GPS positioning and stable flight performance.
3. Mastering Flight Controls: A Pilot’s Guide to the Autel EVO II
This section provides a comprehensive guide to mastering the flight controls of the Autel EVO II drone. We’ll cover everything from basic maneuvers to advanced flight modes, helping you develop the skills you need to fly with confidence and precision.
3.1. Understanding the Remote Controller: Buttons, Sticks, and Functions
The Autel EVO II remote controller is your primary interface for controlling the drone. Understanding the layout and functions of the controller is essential for effective flight control.
- Control Sticks: Used to control the drone’s movement (throttle, yaw, pitch, and roll).
- Buttons: Used to access various functions, such as taking photos, recording videos, and initiating intelligent flight modes.
- Dials: Used to adjust camera settings, such as aperture and ISO.
- Screen: Displays telemetry data, such as altitude, speed, and battery level.
Familiarize yourself with the location and function of each button, stick, and dial before your first flight. This will allow you to react quickly and effectively in various flight situations.
3.2. Basic Flight Maneuvers: Takeoff, Landing, and Hovering
The first step in mastering flight controls is learning the basic maneuvers: takeoff, landing, and hovering.
- Takeoff: Place the drone on a level surface, power on the drone and remote controller, and use the Autel Explorer app to initiate takeoff. The drone will automatically ascend to a predetermined altitude and hover in place.
- Landing: Use the Autel Explorer app to initiate landing. The drone will automatically descend and land gently on the ground.
- Hovering: Use the control sticks to maintain a stable hover. Adjust the throttle stick to control altitude and the yaw stick to control rotation.
Practice these basic maneuvers in a safe and open area until you feel comfortable and confident.
3.3. Advanced Flight Techniques: Smooth Movements and Precision Control
Once you’ve mastered the basic maneuvers, you can start exploring more advanced flight techniques.
- Smooth Movements: Practice making smooth and coordinated movements with the control sticks. Avoid jerky or abrupt inputs, which can result in unstable flight.
- Precision Control: Use small and precise inputs to maintain precise control over the drone’s position and orientation.
- Coordination: Coordinate your inputs to achieve complex maneuvers, such as flying in a circle or following a specific path.
Developing these advanced flight techniques will allow you to fly with greater confidence and precision, opening up new possibilities for aerial photography and videography.
3.4. Intelligent Flight Modes: Automating Complex Maneuvers
The Autel EVO II offers a range of intelligent flight modes that automate complex maneuvers, making it easier to capture stunning aerial footage.
- Orbit: The drone will automatically fly in a circle around a selected point of interest.
- Waypoints: The drone will follow a pre-programmed path defined by a series of waypoints.
- Dynamic Track: The drone will automatically follow a moving subject, keeping it in the frame.
- Tripod Mode: Reduces the drone’s speed and sensitivity for smooth and stable footage.
Experiment with these intelligent flight modes to discover new ways to capture creative and compelling aerial footage.
According to Autel Robotics, the intelligent flight modes are designed to make it easier for pilots to capture professional-quality footage without requiring advanced flying skills.
3.5. Understanding Flight Safety: Regulations and Best Practices
Flight safety is paramount when operating any drone. It’s essential to understand and comply with all applicable regulations and best practices.
- Regulations: Familiarize yourself with the drone regulations in your area. These regulations may vary depending on your location and the type of operation you’re conducting.
- Best Practices: Follow best practices for safe drone operation, such as flying in clear weather, avoiding obstacles, and maintaining a safe distance from people and property.
- Situational Awareness: Maintain situational awareness at all times. Be aware of your surroundings and anticipate potential hazards.
By following these guidelines, you can help ensure a safe and enjoyable flying experience for yourself and others. CARDIAGTECH.NET is committed to promoting safe drone operation and provides resources to help you stay informed and compliant. For more information, contact us at 276 Reock St, City of Orange, NJ 07050, United States or Whatsapp: +1 (641) 206-8880.
4. Camera Settings and Techniques: Capturing Stunning Aerial Imagery
The Autel EVO II series is renowned for its exceptional camera capabilities. This section provides a comprehensive guide to mastering camera settings and techniques, helping you capture stunning aerial imagery.
4.1. Understanding Camera Settings: Aperture, ISO, and Shutter Speed
Understanding the fundamental camera settings is crucial for capturing high-quality aerial photos and videos.
- Aperture: Controls the amount of light that enters the camera. A wider aperture (lower f-number) allows more light in, resulting in a shallower depth of field.
- ISO: Controls the sensitivity of the camera’s sensor to light. Higher ISO values are useful in low-light conditions, but can introduce noise into the image.
- Shutter Speed: Controls the amount of time the camera’s shutter is open. Faster shutter speeds are useful for capturing sharp images of moving objects, while slower shutter speeds can create motion blur.
Experiment with these settings to achieve the desired look and feel for your aerial imagery.
4.2. Shooting Modes: Photo, Video, and Intelligent Options
The Autel EVO II offers a range of shooting modes to suit different scenarios.
- Photo Mode: Captures still images in various formats, such as JPEG and RAW.
- Video Mode: Records video in resolutions up to 8K, with various frame rates and codecs.
- Intelligent Modes: Includes features such as HDR, burst shooting, and time-lapse.
Explore these different shooting modes to discover new ways to capture creative and compelling aerial footage.
4.3. Composition Techniques: Framing, Rule of Thirds, and Leading Lines
Composition is a crucial element of photography and videography. By applying basic composition techniques, you can significantly enhance the visual appeal of your aerial imagery.
- Framing: Use natural elements, such as trees or buildings, to frame your subject and draw the viewer’s eye.
- Rule of Thirds: Divide the frame into thirds horizontally and vertically, and place key elements along these lines or at their intersections.
- Leading Lines: Use lines to guide the viewer’s eye through the scene and towards the subject.
Experiment with these composition techniques to create visually engaging and impactful aerial imagery.
4.4. Post-Processing: Enhancing Your Images and Videos
Post-processing is the final step in the image creation process. By using photo editing software, you can enhance your images and videos, correct imperfections, and achieve the desired look and feel.
- Color Correction: Adjust the colors in your images and videos to achieve a natural and balanced look.
- Sharpening: Enhance the details in your images and videos.
- Noise Reduction: Reduce noise in your images, especially in low-light conditions.
CARDIAGTECH.NET recommends Adobe Lightroom and Adobe Premiere Pro for post-processing. These powerful software tools provide a wide range of features for enhancing your aerial imagery.
4.5. Optimizing for Different Platforms: Social Media and Print
When sharing your aerial imagery online, it’s important to optimize it for different platforms.
- Social Media: Compress your images and videos to reduce file size and improve loading times. Use appropriate aspect ratios for different social media platforms.
- Print: Use high-resolution images for printing. Calibrate your monitor to ensure accurate color reproduction.
By optimizing your aerial imagery for different platforms, you can ensure that it looks its best, whether it’s viewed on a smartphone, tablet, or printed photograph.
5. Troubleshooting Common Issues: A Quick Reference Guide
Even with proper care and maintenance, you may encounter issues with your Autel EVO II drone. This section provides a quick reference guide to troubleshooting common problems.
5.1. Connection Issues: Remote Controller and App
If you’re experiencing connection issues between the remote controller and the Autel Explorer app, try the following steps:
- Check Cables: Ensure that the USB cable is securely connected to both the remote controller and your mobile device.
- Restart Devices: Restart the remote controller, the drone, and your mobile device.
- Re-Pair Devices: Follow the in-app instructions to re-pair the remote controller with the drone.
- Update Firmware: Ensure that the firmware on the remote controller and the drone is up to date.
If the problem persists, contact CARDIAGTECH.NET support for assistance at Whatsapp: +1 (641) 206-8880.
5.2. Flight Instability: Shaking and Drifting
If your Autel EVO II drone is experiencing flight instability, such as shaking or drifting, try the following steps:
- Calibrate Compass: Calibrate the compass in an open area away from metallic objects and sources of interference.
- Check Propellers: Ensure that the propellers are securely fastened and in good condition. Replace any damaged propellers.
- Check GPS Signal: Ensure that the drone has a strong GPS signal before takeoff.
- Avoid Interference: Avoid flying near sources of interference, such as power lines and cell towers.
If the problem persists, contact CARDIAGTECH.NET support for assistance.
5.3. Camera Problems: Blurry Images and Video
If you’re experiencing camera problems, such as blurry images or video, try the following steps:
- Clean Lens: Clean the camera lens with a soft, lint-free cloth.
- Adjust Settings: Adjust the camera settings, such as aperture, ISO, and shutter speed, to optimize image quality.
- Check Gimbal: Ensure that the gimbal is functioning properly and is not obstructed.
- Update Firmware: Ensure that the camera firmware is up to date.
If the problem persists, contact CARDIAGTECH.NET support for assistance.
5.4. Battery Issues: Not Charging or Draining Quickly
If you’re experiencing battery issues, such as the battery not charging or draining quickly, try the following steps:
- Check Charger: Ensure that the battery charger is functioning properly.
- Inspect Battery: Inspect the battery for any signs of damage.
- Calibrate Battery: Calibrate the battery by fully charging and discharging it.
- Store Properly: Store the battery in a cool, dry place at a storage charge level (approximately 50%).
If the problem persists, contact CARDIAGTECH.NET support for assistance.
5.5. Obstacle Avoidance System Malfunctions
If the obstacle avoidance system is not functioning properly, try the following steps:
- Clean Sensors: Ensure that the obstacle avoidance sensors are clean and unobstructed.
- Avoid Obstacles: Avoid flying in areas with dense obstacles, such as trees and buildings.
- Calibrate System: Calibrate the obstacle avoidance system in the Autel Explorer app.
If the problem persists, contact CARDIAGTECH.NET support for assistance.
6. Maintenance and Care: Extending the Life of Your Autel EVO II
Proper maintenance and care are essential for extending the life of your Autel EVO II drone. This section provides a comprehensive guide to maintaining your drone in top condition.
6.1. Cleaning Your Drone: Keeping It Free from Dust and Debris
Regular cleaning is essential for keeping your Autel EVO II drone in good condition.
- Exterior Cleaning: Use a soft, damp cloth to clean the exterior of the drone. Avoid using harsh chemicals or solvents.
- Propeller Cleaning: Clean the propellers with a soft cloth and mild soap and water.
- Sensor Cleaning: Clean the obstacle avoidance sensors and camera lens with a soft, lint-free cloth.
Remove any dust, dirt, or debris that may accumulate on the drone. This will help ensure optimal performance and prevent damage.
6.2. Propeller Maintenance: Inspection and Replacement
The propellers are a critical component of your Autel EVO II drone. Inspect the propellers regularly for any signs of damage, such as cracks or chips.
- Inspection: Check the propellers before each flight.
- Replacement: Replace any damaged propellers immediately.
- Proper Installation: Ensure that the propellers are properly installed and securely fastened.
Using damaged propellers can result in unstable flight and potential accidents. CARDIAGTECH.NET offers a range of replacement propellers for the Autel EVO II series.
6.3. Battery Care: Storage and Charging Best Practices
Proper battery care is essential for maximizing the lifespan of your Autel EVO II batteries.
- Storage: Store the batteries in a cool, dry place at a storage charge level (approximately 50%).
- Charging: Use only the official Autel charger. Avoid overcharging or undercharging the batteries.
- Calibration: Calibrate the batteries periodically by fully charging and discharging them.
By following these best practices, you can help ensure that your batteries provide optimal performance and longevity.
6.4. Firmware Updates: Keeping Your Drone Up to Date
Autel Robotics regularly releases firmware updates to improve the performance and stability of the EVO II drone.
- Check for Updates: Check for firmware updates regularly in the Autel Explorer app.
- Installation: Follow the in-app instructions to install firmware updates.
- Stay Informed: Stay informed about the latest firmware releases and their benefits.
Installing firmware updates is essential for keeping your drone up to date and taking advantage of the latest features and improvements.
CARDIAGTECH.NET recommends always using the latest version of firmware for optimal performance and stability.
6.5. Safe Storage: Protecting Your Investment
Proper storage is essential for protecting your Autel EVO II drone when it’s not in use.
- Hard Case: Store the drone in a hard case to protect it from physical damage.
- Cool, Dry Place: Store the drone in a cool, dry place away from direct sunlight and extreme temperatures.
- Battery Storage: Remove the batteries from the drone and store them separately in a safe location.
By following these guidelines, you can help ensure that your Autel EVO II drone remains in good condition for years to come.
Choosing the right Autel EVO II model depends on your unique needs and intended applications. Whether you prioritize high-resolution photography, thermal imaging, or enhanced enterprise capabilities, CARDIAGTECH.NET offers a solution to meet your requirements. By understanding the key features and benefits of each model, you can make an informed decision and unlock the full potential of your drone. Remember to follow the safety guidelines and best practices outlined in this guide to ensure a safe and successful flying experience.
7. Autel EVO II: Frequently Asked Questions (FAQ)
This section addresses some frequently asked questions about the Autel EVO II series drones.
7.1. What is the flight time of the Autel EVO II?
The Autel EVO II series drones offer a flight time of up to 40 minutes, with the Enterprise models providing up to 42 minutes.
7.2. What is the transmission range of the Autel EVO II?
The Autel EVO II series drones have a transmission range of up to 5.59 miles (9 km).
7.3. Does the Autel EVO II have obstacle avoidance?
Yes, the Autel EVO II series drones feature omnidirectional obstacle avoidance.
7.4. What is the camera resolution of the Autel EVO II Pro?
The Autel EVO II Pro features a 6K camera with a 1-inch CMOS sensor.
7.5. Can I change the camera on the Autel EVO II?
Yes, the Autel EVO II series drones have an interchangeable camera payload system.
7.6. What is the thermal resolution of the Autel EVO II Dual?
The Autel EVO II Dual features a thermal camera with a resolution of 640×512.
7.7. What is RTK and how does it improve accuracy?
RTK (Real-Time Kinematic) is a technology that improves positioning accuracy by providing real-time corrections to GPS data.
7.8. What is the difference between the EVO II Dual and the EVO II Dual R?
The EVO II Dual features a standard thermal camera, while the EVO II Dual R features a radiometric thermal camera that allows for precise temperature measurement.
7.9. Where can I buy Autel EVO II drones and accessories?
You can purchase Autel EVO II drones and accessories from authorized dealers like CARDIAGTECH.NET. Contact us at 276 Reock St, City of Orange, NJ 07050, United States or Whatsapp: +1 (641) 206-8880 for more information.
7.10. How do I update the firmware on my Autel EVO II drone?
You can update the firmware on your Autel EVO II drone through the Autel Explorer app.
By following this comprehensive guide, you can master the Autel EVO II and unlock its full potential for a variety of applications.