OBDII (On-Board Diagnostics II) readers are generally user-friendly, but encountering unfamiliar codes like 7EA can be confusing. Unlike common “P” codes, 7EA isn’t a specific fault code but rather points to a communication issue within the vehicle’s control modules. This guide delves into the meaning of Obdii Code 7ea, its implications, and steps to address it.
Decoding 7EA: Not an Error, but a Pathway
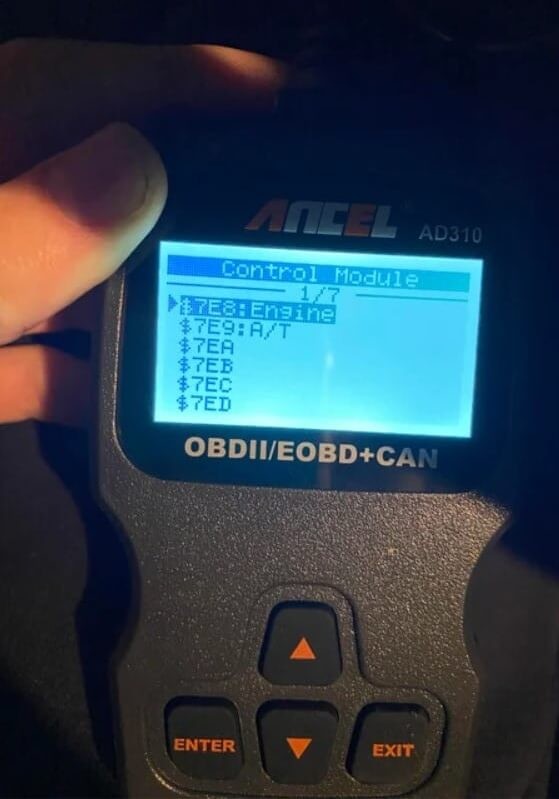
7EA signifies a sub-menu within your OBDII scanner, indicating a specific control module – typically module number three. However, this can vary between car manufacturers (Chevy, Cadillac, GMC, and Toyota are commonly associated with this code). Essentially, 7EA highlights the scanner’s inability to communicate with a specific Engine Control Unit (ECU). Importantly, 7EA itself doesn’t indicate a mechanical problem or failure within the vehicle. Instead, it signals a need for further diagnostics. Code 7EB, for instance, often relates to ECU 4, highlighting this distinction.
Troubleshooting OBDII Code 7EA
While 7EA isn’t a direct trouble code, resolving the communication issue is crucial for comprehensive diagnostics. Here’s a step-by-step guide focusing on vehicles using the OBDII standard (post-1996):
1. Choosing the Right OBDII Scanner
Ensure your OBDII scanner is functional and compatible with your vehicle. While OBD-I scanners exist for older models, this guide focuses on the more prevalent OBD-II system.
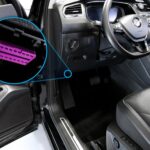
2. Connecting to the DLC Port
Locate the Diagnostic Link Connector (DLC), a 16-pin port usually under the dashboard on the driver’s side. Connect your OBDII scanner securely to this port. Consult your vehicle’s manual if you’re unable to find the DLC.
3. Powering On, Not Starting
Turn the ignition key to the “on” position without starting the engine. This powers up the vehicle’s computer system, allowing the OBDII scanner to establish communication. Double-check connections if the scanner remains unresponsive.
4. Vehicle Information Input
Some scanners require specific vehicle information like the VIN (Vehicle Identification Number) or model. Providing this data enhances accuracy and ensures compatibility between the scanner and your vehicle’s system.
5. Navigating the Scanner Menu
Access the “Trouble Codes” section on your scanner. This section usually differentiates between “current” codes (triggering the Check Engine Light) and “pending” codes (potential future issues).
6. Retrieving the Code and Further Diagnostics
Select “Read Code” to retrieve diagnostic information. If 7EA appears, focus on resolving the communication issue with ECU 3. This might involve resetting the scanner, rechecking connections, or consulting manufacturer-specific diagnostic procedures.
7. Resetting the Check Engine Light
After addressing potential communication problems, try resetting the Check Engine Light. While this might temporarily clear the 7EA code, it’s crucial to address underlying communication issues for accurate future diagnostics.
Conclusion: Addressing 7EA for Accurate Diagnostics
OBDII code 7EA emphasizes the importance of proper communication between your scanner and the vehicle’s ECUs. Resolving this communication breakdown, often by resetting the system and ensuring proper connections, is crucial for retrieving accurate diagnostic trouble codes. While 7EA itself isn’t a cause for alarm, it highlights the need for thorough diagnostic procedures to uncover any underlying vehicle issues. Remember, accurate diagnosis is the first step towards effective vehicle repair.