
Experiencing issues connecting your diagnostic tools to your 2014 Acura TL’s OBDII port? Many DIY mechanics and car enthusiasts encounter connection problems when trying to read diagnostic codes or use performance monitoring devices. Let’s explore how to diagnose potential issues with your 2014 Acura Tl Obdii Port, ensuring you can effectively interface with your vehicle’s computer system.
Understanding the OBDII port is crucial for modern vehicle maintenance and diagnostics. This port, standardized across most vehicles including the 2014 Acura TL, provides access to your car’s computer for reading trouble codes, monitoring engine performance, and even performing certain programming tasks. A faulty or loose connection at the OBDII port can prevent these tools from working correctly, leading to frustration and potentially misdiagnosed issues.
Diagnosing a malfunctioning OBDII port on your 2014 Acura TL involves a systematic approach, starting with basic electrical checks. One of the first steps is to verify the power and ground connections to the port. Using a multimeter, you can check for continuity and voltage at specific pins of the OBDII connector.
To begin, ensure your 2014 Acura TL’s ignition is off. You can then test for ground continuity between Pin 4 and Pin 5 of the OBDII port and a known vehicle ground, often found behind the driver’s side kick panel. A solid connection should be present. Next, with the ignition still off, measure the voltage between Pins 4 and 5; it should be minimal, ideally less than 2V. To check for power, turn the ignition to the “ON” position (engine not started) and measure the voltage between Pin 16 and the vehicle ground. A healthy OBDII port should show a reading close to your battery voltage, typically around 12.2V or higher. Also verify the voltage between Pins 4 & 16 and Pins 5 & 16, both should also be around battery voltage.
If your electrical tests indicate proper voltage and ground, as shown in the tests performed on a 2014 Acura TL, the problem might lie in the physical connection of the port itself. A loose or damaged port can prevent reliable communication even if the electrical supply is good. In such cases, you might find that devices need to be forcefully pushed or held at a specific angle to establish a temporary connection. Comparing the feel of your 2014 Acura TL OBDII port to that of another vehicle, like a 2007 Acura RDX, can highlight a noticeable difference in firmness and connection security. A properly functioning OBDII port should securely hold the diagnostic device without requiring extra pressure.
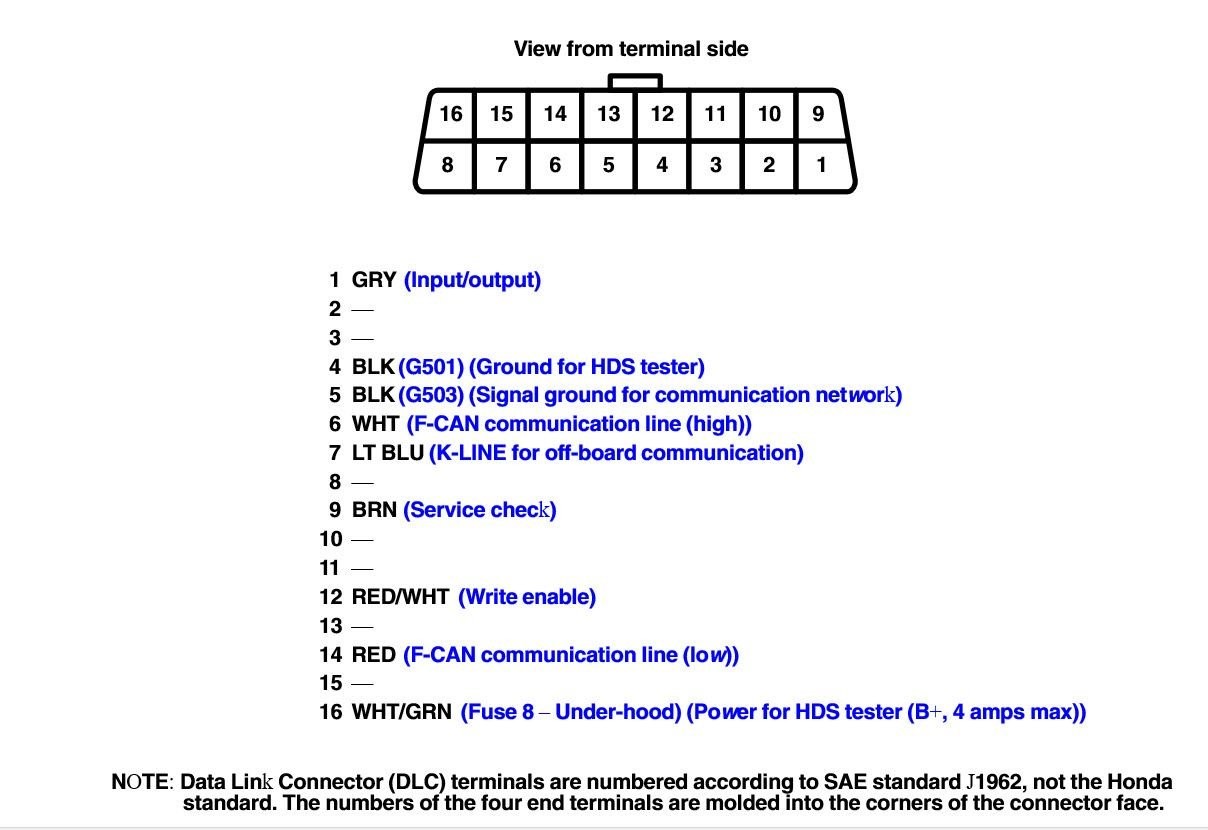 OBDII port pin layout diagram for 2014 Acura TL, highlighting pin positions for voltage and continuity testing
In conclusion, while electrical testing is a crucial first step in diagnosing OBDII port issues in your 2014 Acura TL, physical port integrity is equally important. If your voltage readings are normal but you still experience connection problems, consider the possibility of a loose or damaged OBDII port. Ensuring a secure physical connection might be the key to reliably using diagnostic and performance monitoring tools with your vehicle. If issues persist, seeking professional diagnosis to further investigate the OBDII port and its connections might be necessary.